Create Calendar Using HTML, CSS, and JavaScript

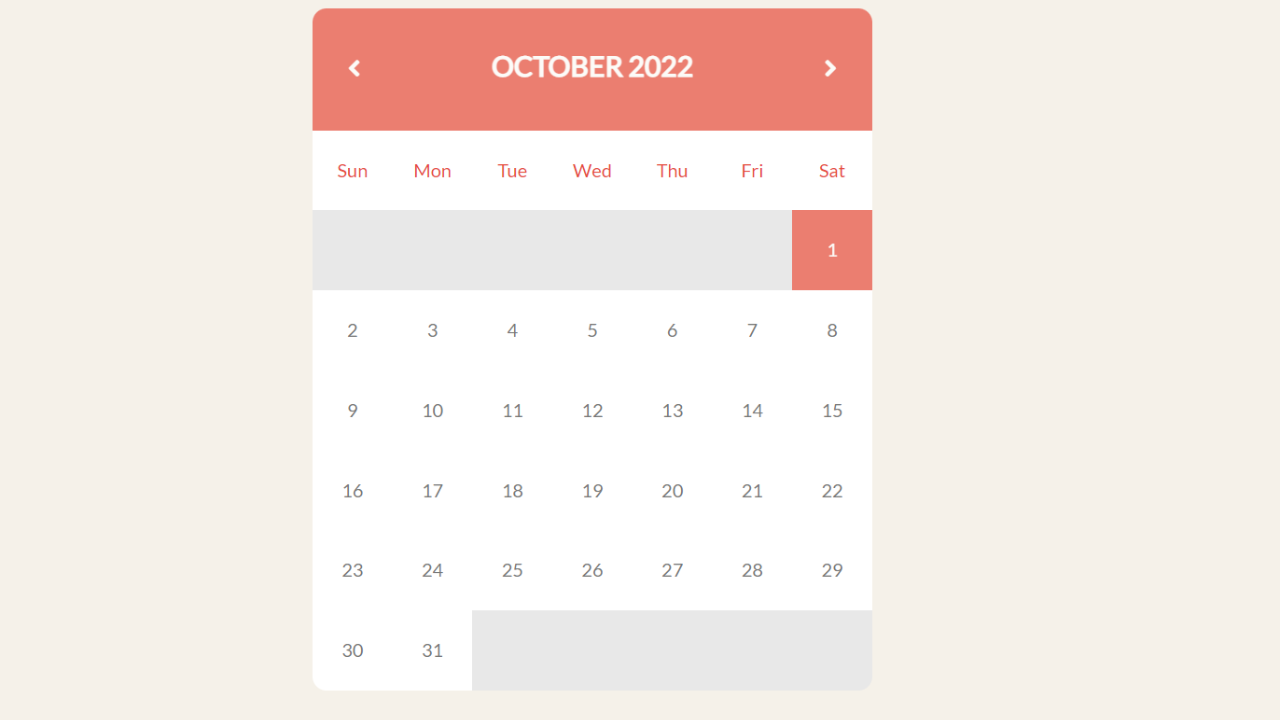
Let’s build a calendar using HTML, CSS, and javascript. The Calendar has a month slider, and the month heading and background color change each month.
Hope you enjoy our blog so let’s start with a basic html structure for a Calendar.
| Code by | N/A |
| Project Download | Link Available below |
| Language used | HTML, CSS and JavaScript |
| External link / Dependencies | Yes |
| Responsive | Yes |
50+ HTML, CSS &JavaScript Projects With Source Code
HTML Code For Calendar
Add font awesome CDN link: Font Awesome link
This URL is used by us to display icons on our website. Avoid including this CDN link in your project if you want to encounter it. See what you see instead, and then add to it. Your task has been finished. To put the icon links inside the HTML, you must add this link inside the header section.
<!DOCTYPE html>
<html lang="en">
<head>
<meta charset="UTF-8" />
<meta http-equiv="X-UA-Compatible" content="IE=edge" />
<meta name="viewport" content="width=device-width, initial-scale=1.0" />
<title>Document</title>
<link
href="https://fonts.googleapis.com/css?family=Lato"
rel="stylesheet"
type="text/css"
/>
</head>
<body>
<div id="calendar">
<div id="calendar_header">
<i class="icon-chevron-left"></i>
<h1></h1>
<i class="icon-chevron-right"></i>
</div>
<div id="calendar_weekdays"></div>
<div id="calendar_content"></div>
</div>
</body>
</html>
We have used minimum HTML code to add the basic structure to our calendar. First of all, we have added the external file link to our head section in order to add styling to our project.
Restaurant Website Using HTML and CSS
<link rel="stylesheet" href="style.css" />
The container for our calendar will now be created using the div element with the id “calendar,” and inside of it, two more div tags will be created, to which we will add the left and right arrow icons using the font-awesome classes.
Only Html Code Output Calendar:-

CSS Code For Calendar
body{
background-color: #F5F1E9;
}
#calendar{
margin-left: auto;
margin-right: auto;
width: 320px;
font-family: 'Lato', sans-serif;
}
#calendar_weekdays div{
display:inline-block;
vertical-align:top;
}
#calendar_content, #calendar_weekdays, #calendar_header{
position: relative;
width: 320px;
overflow: hidden;
float: left;
z-index: 10;
}
#calendar_weekdays div, #calendar_content div{
width:40px;
height: 40px;
overflow: hidden;
text-align: center;
background-color: #FFFFFF;
color: #787878;
}
#calendar_content{
-webkit-border-radius: 0px 0px 12px 12px;
-moz-border-radius: 0px 0px 12px 12px;
border-radius: 0px 0px 12px 12px;
}
#calendar_content div{
float: left;
}
#calendar_content div:hover{
background-color: #F8F8F8;
}
#calendar_content div.blank{
background-color: #E8E8E8;
}
#calendar_header, #calendar_content div.today{
zoom: 1;
filter: alpha(opacity=70);
opacity: 0.7;
}
#calendar_content div.today{
color: #FFFFFF;
}
#calendar_header{
width: 100%;
height: 37px;
text-align: center;
background-color: #FF6860;
padding: 18px 0;
-webkit-border-radius: 12px 12px 0px 0px;
-moz-border-radius: 12px 12px 0px 0px;
border-radius: 12px 12px 0px 0px;
}
#calendar_header h1{
font-size: 1.5em;
color: #FFFFFF;
float:left;
width:70%;
}
i[class^=icon-chevron]{
color: #FFFFFF;
float: left;
width:15%;
border-radius: 50%;
}Step-1: We will apply a beige background color to our background using the body tag selector. Next, we will use the id selector (#calendar) to define the margins to the left and right as “auto,” and the width is set to 320px. We will set the font family to “Latin” using the font-family attribute.
Ecommerce Website Using HTML, CSS, & JavaScript (Source Code)
Step-2:The hover property will be added to the calendar using the id selector, and styling will be added to the calendar using CSS principles. You only need to read through the code once to understand how our calendar is styled.
Html + Css Output Of Calendar project

Now add javascript code for functionality Calendar!
Calendar Code in JavaScript:-
We use Jquery code in this calendar project, so we must include the Jquery CDN link in our calendar project otherwise our project not work so here is the CDN link of Jquery ( you add script-src and paste this link).
$(function () {
function c() {
p();
var e = h();
var r = 0;
var u = false;
l.empty();
while (!u) {
if (s[r] == e[0].weekday) {
u = true;
} else {
l.append('<div class="blank"></div>');
r++;
}
}
for (var c = 0; c < 42 - r; c++) {
if (c >= e.length) {
l.append('<div class="blank"></div>');
} else {
var v = e[c].day;
var m = g(new Date(t, n - 1, v)) ? '<div class="today">' : "<div>";
l.append(m + "" + v + "</div>");
}
}
var y = o[n - 1];
a.css("background-color", y)
.find("h1")
.text(i[n - 1] + " " + t);
f.find("div").css("color", y);
l.find(".today").css("background-color", y);
d();
}
function h() {
var e = [];
for (var r = 1; r < v(t, n) + 1; r++) {
e.push({ day: r, weekday: s[m(t, n, r)] });
}
return e;
}
function p() {
f.empty();
for (var e = 0; e < 7; e++) {
f.append("<div>" + s[e].substring(0, 3) + "</div>");
}
}
function d() {
var t;
var n = $("#calendar").css("width", e + "px");
n.find((t = "#calendar_weekdays, #calendar_content"))
.css("width", e + "px")
.find("div")
.css({
width: e / 7 + "px",
height: e / 7 + "px",
"line-height": e / 7 + "px",
});
n.find("#calendar_header")
.css({ height: e * (1 / 7) + "px" })
.find('i[class^="icon-chevron"]')
.css("line-height", e * (1 / 7) + "px");
}
function v(e, t) {
return new Date(e, t, 0).getDate();
}
function m(e, t, n) {
return new Date(e, t - 1, n).getDay();
}
function g(e) {
return y(new Date()) == y(e);
}
function y(e) {
return e.getFullYear() + "/" + (e.getMonth() + 1) + "/" + e.getDate();
}
function b() {
var e = new Date();
t = e.getFullYear();
n = e.getMonth() + 1;
}
var e = 480;
var t = 2013;
var n = 9;
var r = [];
var i = [
"JANUARY",
"FEBRUARY",
"MARCH",
"APRIL",
"MAY",
"JUNE",
"JULY",
"AUGUST",
"SEPTEMBER",
"OCTOBER",
"NOVEMBER",
"DECEMBER",
];
var s = [
"Sunday",
"Monday",
"Tuesday",
"Wednesday",
"Thursday",
"Friday",
"Saturday",
];
var o = [
"#16a085",
"#1abc9c",
"#c0392b",
"#27ae60",
"#FF6860",
"#f39c12",
"#f1c40f",
"#e67e22",
"#2ecc71",
"#e74c3c",
"#d35400",
"#2c3e50",
];
var u = $("#calendar");
var a = u.find("#calendar_header");
var f = u.find("#calendar_weekdays");
var l = u.find("#calendar_content");
b();
c();
a.find('i[class^="icon-chevron"]').on("click", function () {
var e = $(this);
var r = function (e) {
n = e == "next" ? n + 1 : n - 1;
if (n < 1) {
n = 12;
t--;
} else if (n > 12) {
n = 1;
t++;
}
c();
};
if (e.attr("class").indexOf("left") != -1) {
r("previous");
} else {
r("next");
}
});
});
Right now, the most important thing we need to do is get the user’s browser’s most recent date, time, and day. That day and time will be saved as variables before being added to our calendar.
100+ JavaScript Projects With Source Code ( Beginners to Advanced)
Using the days in month property, we will create a function inside it that will return the value of month and year using the getDate() method. Similarly, using the properties for the first day and last day, we will be returning the values of the day and number values using the get date method.
Using the foundations of JavaScript, we will now add the date of the current month and the following dates after the dates of the current month. To add the dates for the upcoming several months, we’ll use the fundamental Java script.
In this project, the user’s browser was simply used to get the user’s data, which was then stored in a variable and displayed in our structure using the basics of javascript.
Final Output Of Calendar:-
[su_button id=”download” url=”https://drive.google.com/drive/folders/1iAwqu_dX-_PVhOlcwjjwsC18amyYFHFW?usp=sharing” target=”blank” style=”3d” size=”11″ wide=”yes” center=”yes” icon=”icon: download”]DOWNLOAD CODE NOW[/su_button]

Here is our updated output of the working calendar. Hope you like the Calendar. you can see the output video and project screenshots. See our other blogs and gain knowledge in front-end development. Thank you
10+ Javascript Project Ideas For Beginners( Project Source Code)
Thank You And Keep Learning!!!
Written by – Code With Random/Anki
FaQ For Calendar Using HTML, CSS, & JavaScript
Which code editor do you use for this Calendar project coding?
I personally recommend using VS Code Studio, it’s very simple and easy to use.
is this project responsive or not?
Yes! this project is a responsive project.
ADVERTISEMENT
Do you use any external links to create this project?
Yes!
ADVERTISEMENT


![15+ Multi-Step forms Using JavaScript [ Demo + Code ] Read more about the article 15+ Multi-Step forms Using JavaScript [ Demo + Code ]](https://www.codewithrandom.com/wp-content/uploads/2022/11/codewithrandom62-300x157.png)

The HTML code is not working after i copy paste the same code from this website, anyone can help me please ?