Create To do list using Vanilla JavaScript
In this tutorial, we will explore how to make a To-do list using HTML, CSS, and Vanilla JavaScript. A To-do list is a basic organizer list where we can list out the tasks we have to do. To-do List JavaScript is a great project for beginners as it pushes their knowledge about JavaScript.
A to-do list is a beginner project while learning the fundamentals of frontend concepts. We will be explaining the step-by-step process of creating a to-do list app using javascript.
Before we start with our project let’s understand some of the basic concepts for our To-do-list app
What is a to-do list app?
What are the features of to-do list app?
A to-do list app allows users to list multiple tasks and also allows them to be marked as complete once they perform the task. Additionally, users can delete specific tasks.
Live Project Preview:
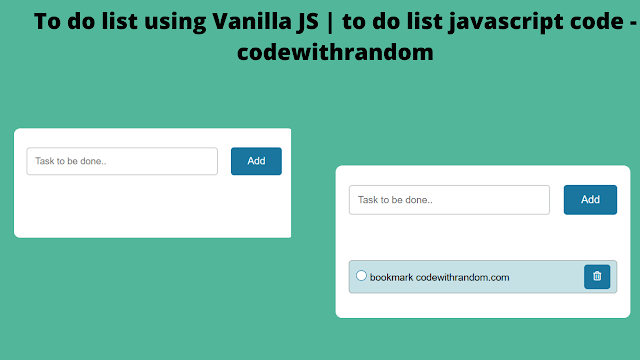
Here is the live demonstration of our final project. We have a textbox to write the task and then add it to the list. Once a task is added is visible in the list, each task can be checked once completed. Also, a delete button is present to delete a task from the list.
Prerequisite:
As a prerequisite, all you need is a basic understanding of HTML, CSS, Vanilla JS, and DOM to get started with this project.
Step 1: Create the basic HTML structure.
50+ HTML, CSS & JavaScript Projects With Source Code
After writing the HTML boilerplate code and linking it with the CSS file, we will create a container for our toggle switch.
<div class="container"> </div>
Step 2: Use CSS to design the background and switch the container.
We are using a grid layout for this project, but you can use any layout of your choice.
*,
*:before,
*:after {
    padding: 0;
    margin: 0;
    box-sizing: border-box;
}
body {
    height: 100vh;
    background: #52b69a;
    display: grid;
    justify-content: center;
    align-items: center;
}
Here we are giving the width = 40% and the height is left intrinsic to the container. Also, we are giving a minimum width = 450px
.container {
    width: 40%;
    min-width: 450px;
    min-height: 100px;
    background: white;
    border-radius: 10px;
}
Step 3: Create an input text box and a button to add new task to the list
Create a div element with the class name new task inside the container. Next, we create a text input and a button to add new tasks to the list.
<div id="newtask">
    <input type="text" placeholder="Task to be done.." />
    <button id="push">Add</button>
</div>
We then style the new task div element and its button.
#newtask {
    position: relative;
    padding: 30px 20px;
}
#newtask input {
    width: 75%;
    height: 45px;
    font-family: "Poppins", sans-serif;
    font-size: 15px;
    border: 2px solid #d1d3d4;
    padding: 12px;
    color: #111111;
    font-weight: 500;
    position: relative;
    border-radius: 5px;
}
Here we are using the focus pseudoclass to emphasize a special style when the input text is clicked, hence the focus.
#newtask input:focus {
    outline: none;
    border-color: #0d75ec;
}
#newtask button {
    position: relative;
    float: right;
    width: 20%;
    height: 45px;
    border-radius: 5px;
    font-family: "Poppins", sans-serif;
    font-weight: 500;
    font-size: 16px;
    background-color: #1a759f;
    border: none;
    color: #ffffff;
    cursor: pointer;
    outline: none;
}
Step 4: Add a tasks list.
Add a div element next to newtask div, to store tasks in the tasks list.
ADVERTISEMENT
<div id="tasks-list"></div>
 Style the tasks list and position it inside the container.
#tasks-list {
    background-color: #ffffff;
    padding: 30px 20px;
    margin-top: 10px;
    border-radius: 10px;
    width: 100%;
    position: relative;
}
Step 5: Add functionality to the Project
ADVERTISEMENT
Now the user interface of our project is ready and it is time to add functionality to the project using JavaScript.
ADVERTISEMENT
10+ HTML CSS Projects For Beginners with Source Code
ADVERTISEMENT
When a new task is given in the input and the add button is pressed, the event listener activates and checks if the length of text input. If the input text length is zero, then an alert message appears on the screen.
ADVERTISEMENT
If the input text length is greater than zero, then addTaskHandler() is executed. And the input text value is turned back to empty string.
document.querySelector("#push").addEventListener("click", function () {
    if (document.querySelector("#newtask input").value.length == 0) {
        alert("Please Enter a Task");
    } else {
        addTaskHandler();
        document.querySelector("#newtask input").value = "";
    }
});
The addTaskHandler() function adds a new task element for every task entry. Here we are using .innerHTML function to add a new task entry to the list.
document.querySelector(
    "#tasks-list"
).innerHTML += ` <div class="task"> <div> <input class="task-check" type="checkbox"> <div class="custom-checkbox"></div> <span class="taskname"> ${
    document.querySelector("#newtask input").value
} </span> </div> <button class="delete"> <i class="far fa-trash-alt"></i> </button> </div> `;
In every new task, we are adding a new responsive custom checkbox.
<div> <input class="task-check" type="checkbox">
<div class="custom-checkbox"> </div>
The delete button is designed using font awesome icon, a CSS file is linked using <link rel=”stylesheet” href=”https://cdnjs.cloudflare.com/ajax/libs/font-awesome/5.15.2/css/all.min.css”> inside the <head> of the HTML document.
10+ Javascript Projects For Beginners With Source Code
The icon is added to the delete button using <i class=”far fa-trash-alt”></i> .
Step 6: Styling task block and its component
We are styling the task block using the following CSS script.
.task {
    background-color: #c5e1e6;
    height: 50px;
    margin-bottom: 8px;
    padding: 5px 10px;
    display: flex;
    border-radius: 5px;
    align-items: center;
    justify-content: space-between;
    border: 1px solid #939697;
    cursor: pointer;
}
.task .custom-checkbox {
    display: inline-block;
    width: 1em;
    height: 1em;
    background-color: white;
    border: 1px solid #1a759f;
    margin-right: 0.1em;
    border-radius: 50%;
}
.task span {
    font-family: "Poppins", sans-serif;
    font-size: 15px;
    font-weight: 400;
}
.delete {
    background-color: #1a759f;
    color: #ffffff;
    height: 100%;
    width: 40px;
    border-radius: 5px;
    border: none;
    cursor: pointer;
    outline: none;
}
Step 7: Add responsiveness to the custom checkbox and delete button.
When delete button is clicked the parent container of that button is removed from the DOM. Hence the task is deleted from the tasks list.
document.querySelectorAll(".delete").forEach((task) =>
    task.addEventListener("click", function () {
        this.parentNode.remove();
    })
);
Add responsiveness to the custom-checkbox, when it is clicked the parentnode of the checkbox toggles the class “task-completed” from its class list.
Profile Card Using HTML and CSS
document.querySelectorAll(".custom-checkbox").forEach((task) =>
    task.addEventListener("click", function () {
        this.parentNode.classList.toggle("task-completed");
    })
);
Next, style the class “task-completed” in the CSS file.
.task-completed .custom-checkbox {
    background-color: #6a994e;
}
Here, we are changing the text color of the task to green when the task-completed class is added.
.task-completed .custom-checkbox {
    background-color: #6a994e;
}
Final Output of To-do-list app
If you find out this Blog helpful, then make sure to search Codewithrandom on Google for Front End Projects with Source codes and make sure to Follow the Code with Random Instagram page.
Follow: Codewithrandom


