Multi-step growing button | CSS Only | New Design Button
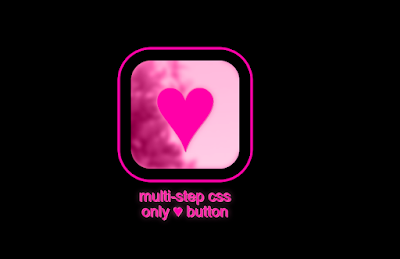
Welcome🎉 to Code With Random blog. In this blog, we learn how to create a multi-step growing button. We use HTML & CSS for multi-step growing button. Hope you enjoy our blog so let’s start with a basic HTML structure for the multi-step growing button.
HTML code
<input checked type="radio" id="step-1" name="button-step" value="step-1">
<input type="radio" id="step-2" name="button-step" value="step-2">
<input type="radio" id="step-3" name="button-step" value="step-3">
<input type="radio" id="step-4" name="button-step" value="step-4">
<input type="radio" id="step-5" name="button-step" value="step-5">
<input type="radio" id="step-6" name="button-step" value="step-6">
<input type="radio" id="step-7" name="button-step" value="step-7">
<a href="javascript:void(0);" title="button">
♥
<label for="step-1"></label>
<label for="step-2"></label>
<label for="step-3"></label>
<label for="step-4"></label>
<label for="step-5"></label>
<label for="step-6"></label>
<label for="step-7"></label>
</a>
There is all HTML code for the multi-step growing button. Now, you can see output without CSS, then we write CSS for the multi-step growing button.
 /* Try clicking it quickly and slowly. Try long and short button presses. :^) */
 /* Remove a::before from line 55 to remove text. */
 *,
 *::before,
 *::after {
  box-sizing: border-box;
  font-family: "Poppins", sans-serif;
 }
 body,
 html {
  -webkit-text-size-adjust: 100%;
  -webkit-tap-highlight-color: transparent;
  -webkit-font-smoothing: antialiased;
  text-rendering: optimizeLegibility;
  line-height: 0;
  font-weight: 400;
  color: white;
 }
 body {
  display: flex;
  flex-direction: column;
  align-items: center;
  justify-content: center;
  width: 100vw;
  height: 100vh;
  overflow: hidden;
  background: black;
  margin: 0;
 }
 a {
  position: relative;
  display: flex;
  flex-direction: column;
  align-items: center;
  justify-content: center;
  text-decoration: none;
  background: url("https://picsum.photos/id/517/1500/1500");
  background-position: center;
  text-shadow: 0px 0px 10px hotpink, 1px 1px 0px hotpink, -1px -1px 0px hotpink,
   1px 1px 0px black;
  z-index: 1;
  transition: all 0.3s ease-in-out;
 }
 a:active {
  transform: scale(0.85);
  font-size: 100% !important;
  transition: all 0.1s ease-in-out;
 }
 a::before {
  position: absolute;
  bottom: -90px;
  width: 200px;
  height: auto;
  line-height: 20pt;
  font-size: 20pt;
  content: "multi-step css only ♥ button";
  text-align: center;
 }
 a::after {
  position: absolute;
  top: 0;
  left: 0;
  width: 100%;
  height: 100%;
  content: "";
  background: hotpink;
  mix-blend-mode: color;
  z-index: -1;
  transition: all 0.3s ease-in-out;
 }
 input {
  display: none;
 }
 label {
  position: absolute;
  top: 0;
  left: 0;
  width: 100%;
  height: 100%;
  content: "";
  display: none;
 }
 label:hover {
  cursor: pointer;
 }
 input:nth-child(1):checked ~ a {
  background-size: 100%;
  width: 120px;
  height: 40px;
  border-radius: 5px;
  font-size: 20pt;
  color: white;
 }
 input:nth-child(1):checked ~ a::after {
  opacity: 1;
  background: white;
  border-radius: 5px;
 }
 input:nth-child(1):checked ~ a > label:nth-child(2) {
  display: initial;
 }
 input:nth-child(2):checked ~ a {
  background-size: 125%;
  width: 136px;
  height: 52px;
  font-size: 25pt;
  border-radius: 10px;
  color: #ffc8ec;
  outline: 1px solid hotpink;
 }
 input:nth-child(2):checked ~ a:active {
  font-size: 180% !important;
 }
 input:nth-child(2):checked ~ a::after {
  opacity: 0.2;
  border-radius: 10px;
 }
 input:nth-child(2):checked ~ a > label:nth-child(3) {
  display: initial;
 }
 input:nth-child(3):checked ~ a {
  background-size: 155%;
  width: 126px;
  height: 68px;
  font-size: 35pt;
  border-radius: 15px;
  color: #ff9ede;
  outline: 1px solid hotpink;
  outline-offset: 5px;
  text-shadow: 1px 1px 0px black, -1px -1px 0px black, 1px -1px 0px black,
   -1px 1px 0px black;
 }
 input:nth-child(3):checked ~ a:active {
  font-size: 280% !important;
 }
 input:nth-child(3):checked ~ a::after {
  opacity: 0.4;
  border-radius: 15px;
 }
 input:nth-child(3):checked ~ a > label:nth-child(4) {
  display: initial;
 }
 input:nth-child(4):checked ~ a {
  background-size: 185%;
  width: 116px;
  height: 88px;
  font-size: 50pt;
  border-radius: 20px;
  color: #ff73cf;
  outline: 2px solid hotpink;
  outline-offset: 15px;
  text-shadow: 1px 1px 0px black, -1px -1px 0px black, 1px -1px 0px black,
   -1px 1px 0px black;
 }
 input:nth-child(4):checked ~ a:active {
  font-size: 380% !important;
 }
 input:nth-child(4):checked ~ a::after {
  opacity: 0.6;
  border-radius: 20px;
 }
 input:nth-child(4):checked ~ a > label:nth-child(5) {
  display: initial;
 }
 input:nth-child(5):checked ~ a {
  background-size: 210%;
  width: 114px;
  height: 114px;
  font-size: 70pt;
  border-radius: 25px;
  color: #ff4bc2;
  outline: 3px solid hotpink;
  outline-offset: 15px;
  text-shadow: 1px 1px 0px black, -1px -1px 0px black, 1px -1px 0px black,
   -1px 1px 0px black;
 }
 input:nth-child(5):checked ~ a:active {
  font-size: 480% !important;
 }
 input:nth-child(5):checked ~ a::after {
  opacity: 0.8;
  border-radius: 25px;
  backdrop-filter: blur(1px);
 }
 input:nth-child(5):checked ~ a > label:nth-child(6) {
  display: initial;
 }
 input:nth-child(6):checked ~ a {
  background-size: 250%;
  width: 148px;
  height: 148px;
  font-size: 100pt;
  border-radius: 30px;
  color: #ff29b6;
  outline: 3px solid hotpink;
  outline-offset: 20px;
 }
 input:nth-child(6):checked ~ a:active {
  font-size: 580% !important;
 }
 input:nth-child(6):checked ~ a::after {
  opacity: 0.9;
  border-radius: 30px;
  backdrop-filter: blur(2px);
 }
 input:nth-child(6):checked ~ a > label:nth-child(7) {
  display: initial;
 }
 input:nth-child(7):checked ~ a {
  background-size: 300%;
  width: 192px;
  height: 192px;
  font-size: 140pt;
  border-radius: 35px;
  color: #ff00a8;
  outline: 4px solid #ff00a8;
  outline-offset: 20px;
 }
 input:nth-child(7):checked ~ a:active {
  font-size: 680% !important;
 }
 input:nth-child(7):checked ~ a::after {
  opacity: 1;
  border-radius: 35px;
  backdrop-filter: blur(4px);
 }
 input:nth-child(7):checked ~ a > label:nth-child(1) {
  display: initial;
 }


