Infinite Autoplay Carousel using HTML,CSS and JavaScript
Hello, guys Welcome to codewithrandom today I am showing how to make an Infinite Autoplay Carousel using HTML, CSS, AND JavaScript.Here is the autoplay carousel which uses smooth looking-over animation.
Autoplay Carousel is an image slider that displays a collection of images in a slideshow manner continuously in 3D, which provides a great visual experience. This is an intermediate project, and every developer should practice this type of project, which uses a combination of CSS to add smooth movement and transition between the web applications.
.png)
Before we start with our project, let’s understand some of the important concepts that every developer should be aware of while creating an autoplay carousel app.
What is Autoplay Carousel?
A carousel is a slide show web application that contains multiple images, and these images are continuously changed after a particular time interval the image of the carousel gets changed. It uses various CSS and Javascript concepts to add smooth movement and transition between the apps.
What is the use of Carousel?
Carousel is mainly used for scrolling news headlines, featured articles on home pages, and image galleries.
Preview Of Infinite Autoplay Carousel
100+ JavaScript Projects With Source Code ( Beginners to Advanced)
| Code by | N/A |
| Project Download | Link Available Below |
| Language used | HTML, CSS, and JavaScript |
| External link / Dependencies | NO |
| Responsive | YES |
HTML, CSS & JavaScript CODE:-
HTML Code:-
<h2>CSS Autoplay Carousel</h2>
<div id="sliderSettings">
    <label for="slider-width">Slider width in px:</label>
    <input
        type="text"
        id="slider-width"
        name="slider-width"
        minlength="2"
        maxlength="4"
        size="6"
        placeholder="300"
    />
    <label for="slider-height">Slider height in px:</label>
    <input
        type="text"
        id="slider-height"
        name="slider-height"
        minlength="2"
        maxlength="4"
        size="6"
        placeholder="300"
    />
</div>
<div id="pSlider">
    <ol id="slider-container" dir="ltr">
        <li id="slide_1" class="li_slide">
            <div class="slide-snapper"></div>
            <a class="prev_slide" href="#slide_4"></a>
            <a class="next_slide" href="#slide_2"></a>
        </li>
        <li id="slide_2" class="li_slide">
            <div class="slide-snapper"></div>
            <a class="prev_slide" href="#slide_1"></a>
            <a class="next_slide" href="#slide_3"></a>
        </li>
        <li id="slide_3" class="li_slide">
            It have 4
            <div class="slide-snapper"></div>
            <a class="prev_slide" href="#slide_2"></a>
            <a class="next_slide" href="#slide_4"></a>
        </li>
        <li id="slide_4" class="li_slide">
            <div class="slide-snapper"></div>
            <a class="prev_slide" href="#slide_3"></a>
            <a class="next_slide" href="#slide_1"></a>
        </li>
    </ol>
</div>
- First of all, using the <h2> tag, we will add the heading for our automatic carousel.
- Now, using the input tag with type “checkbox,” we will create a slider switch for switching images.
- Now we will create a div with the id “slider,” and we will create an unordered list that contains different numbers of the list as images for our image slider.
- We will create another div tag for the controls of the image slider.
HTML OUTPUT:-
.png)
CSS CODE:-
*,
*:after,
*:before {
    box-sizing: border-box;
} /* Example images */
#slide_1 {
    background-image: url(https://images.unsplash.com/photo-1579353977828-2a4eab540b9a?ixlib=rb-1.2.1&ixid=MnwxMjA3fDB8MHxzZWFyY2h8MXx8c2FtcGxlfGVufDB8fDB8fA%3D%3D&auto=format&fit=crop&w=800&q=60);
}
#slide_2 {
    background-image: url(https://images.unsplash.com/photo-1561336313-0bd5e0b27ec8?ixlib=rb-1.2.1&ixid=MnwxMjA3fDB8MHxzZWFyY2h8Mnx8c2FtcGxlfGVufDB8fDB8fA%3D%3D&auto=format&fit=crop&w=800&q=60);
}
#slide_3 {
    background-image: url(https://images.unsplash.com/photo-1600716051809-e997e11a5d52?ixlib=rb-1.2.1&ixid=MnwxMjA3fDB8MHxzZWFyY2h8M3x8c2FtcGxlfGVufDB8fDB8fA%3D%3D&auto=format&fit=crop&w=800&q=60);
}
#slide_4 {
    background-image: url(https://images.unsplash.com/photo-1524419986249-348e8fa6ad4a?ixlib=rb-1.2.1&ixid=MnwxMjA3fDB8MHxzZWFyY2h8MTB8fHNhbXBsZXxlbnwwfHwwfHw%3D&auto=format&fit=crop&w=800&q=60);
}
.li_slide {
    background-size: cover;
    background-position: center;
}
The next step is to add Animation to the slide and in this, we want to use keyframe animation. A keyframe is a location on the timeline which marks the beginning or end of the timeline. we are adding keyframe text, snap, and to start.
/* Animations */
@keyframes tonext {
    75% {
        margin-left: 0;
    }
    95% {
        margin-left: calc(100% + 150px);
    }
    98% {
        margin-left: calc(100% + 150px);
    }
    99% {
        margin-left: 0;
    }
}
@keyframes snap {
    96% {
        scroll-snap-align: start;
    }
    97% {
        scroll-snap-align: none;
    }
    99% {
        scroll-snap-align: none;
    }
    100% {
        scroll-snap-align: start;
    }
}
@keyframes tostart {
    75% {
        margin-left: 0;
    }
    95% {
        margin-left: calc(-300% - 450px);
    }
    98% {
        margin-left: calc(-300% - 450px);
    }
    99% {
        margin-left: 0;
    }
}
STEP 3:- We want to style the HTML components in this as well as add the RESET value. We want to style the slider that we put to the HTML in this area. The slider’s width and height will be set using the id selector. The display property will be used to set the display to “flex,” with the width and height both set to 300px.
Responsive Gym Website Using HTML ,CSS & JavaScript
/* Reset */
ol,
li {
    list-style: none;
    margin: 0;
    padding: 0;
}
#pSlider {
    width: 300px;
    height: 300px;
    position: relative;
    margin: 0 auto; /* Left, Right Navigation Arrows */
}
#pSlider #slider-container {
    display: flex;
    height: 100%;
    width: 100%;
    overflow-x: scroll;
    scroll-snap-type: x mandatory;
    scroll-behavior: smooth;
}
#pSlider #slider-container .li_slide {
    position: relative;
    width: 100%;
    border-radius: 10px;
    background-color: khaki;
    flex: none;
    margin-right: 150px;
}
#pSlider #slider-container .li_slide:nth-child(even) {
    background-color: mediumaquamarine;
}
#pSlider #slider-container .li_slide:last-child {
    margin-right: 0;
}
#pSlider #slider-container .li_slide .slide-snapper {
    /* Auto play */
    scroll-snap-align: start;
    position: absolute;
    top: 0;
    left: 0;
    width: 100%;
    height: 100%;
    animation: tonext 4s infinite ease, snap 4s infinite ease;
}
@media (prefers-reduced-motion: reduce) {
    #pSlider #slider-container .li_slide .slide-snapper {
        animation-name: none;
    }
}
#pSlider #slider-container .li_slide:last-child .slide-snapper {
    animation-name: tostart, snap;
}
#pSlider #slider-container:hover .li_slide .slide-snapper,
#pSlider #slider-container:focus-within .li_slide .slide-snapper {
    animation-name: none;
}
#pSlider:before,
#pSlider:after,
#pSlider .prev_slide,
#pSlider .next_slide {
    display: inline-block;
    position: absolute;
    top: 0;
    width: 30px;
    height: 100%;
    z-index: 2;
    cursor: pointer;
}
#pSlider:before,
#pSlider:after {
    background-repeat: no-repeat;
    background-position: center;
    background-size: 70%;
}
#pSlider .next_slide {
    border-top-right-radius: 10px;
    border-bottom-right-radius: 10px;
    padding: 20px;
}
#pSlider .prev_slide {
    border-top-left-radius: 10px;
    border-bottom-left-radius: 10px;
    padding: 20px;
}
#pSlider:before,
#pSlider .prev_slide {
    content: "";
    left: 0px;
}
#pSlider:after,
#pSlider .next_slide {
    content: "";
    right: 0px;
}
#pSlider:after {
    z-index: 1; /* set underneath .next_slide (z: 2)*/
    background-image: url("data:image/svg+xml,%3Csvg width='40' height='60' xmlns='http://www.w3.org/2000/svg' version='1.1'%3E%3Cpolyline points='10 10 30 30 10 50' stroke='rgba(255,255,255,0.9)' stroke-width='4' stroke-linecap='butt' fill='none' stroke-linejoin='round'%3E<%3C/polyline%3E%3C/svg%3E");
}
#pSlider:before {
    background-image: url("data:image/svg+xml,%3Csvg width='40' height='60' xmlns='http://www.w3.org/2000/svg' version='1.1'%3E%3Cpolyline points='30 10 10 30 30 50' stroke='rgba(255,255,255,0.9)' stroke-width='4' stroke-linecap='butt' fill='none' stroke-linejoin='round'%3E>%3C/polyline%3E%3C/svg%3E");
}
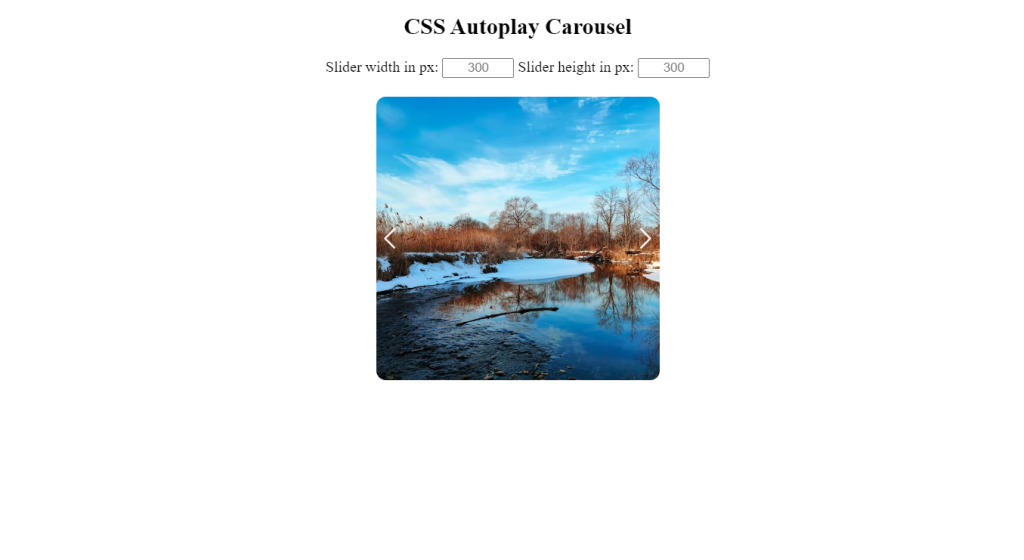
STEP 4:- Add scrollbar in the slider for that we using the -webkit scrollbar property we will set the display as “none” and the height is set as 5px . Also using the background color proeprty we will set the background color as “black” .
/* Scrollbar */
#pSlider #slider-container::-webkit-scrollbar {
    display: none;
    height: 5px;
}
#pSlider #slider-container::-webkit-scrollbar-thumb {
    background-color: #000;
    border-radius: 50px;
}
#pSlider #slider-container::-webkit-scrollbar-track {
    background-color: transparent;
} /* Input */
#sliderSettings {
    text-align: center;
}
#slider-width,
#slider-height {
    text-align: center;
    margin-bottom: 20px;
}
h2 {
    text-align: center;
}
CSS OUTPUT:-
Responsive Resume/CV Website Using HTML & CSS
JavaScript Code:
// Only to conveniently set width and height in this pen.
let widthInput = document.getElementById("slider-width");
widthInput.addEventListener("change", (e) => {
    let currentValue = e.currentTarget.value;
    let pSliderWidth = document.getElementById("pSlider");
    pSliderWidth.style.width = `${currentValue}px`
    for that we want to add some;
    let liSlideWidth = document.getElementsByClassName(".li_slide");
    for (let i = 0; i < liSlideWidth.length; i++) {
        liSlideWidth[i].style.width = `${currentValue}px`;
    }
}) let heightInput = document.getElementById("slider-height");
heightInput.addEventListener("change", (e) => {
    let currentValue = e.currentTarget.value;
    let pSliderWidth = document.getElementById("pSlider");
    pSliderWidth.style.height = `${currentValue}px`;
    let liSlideWidth = document.getElementsByClassName(".li_slide");
    for (let i = 0; i < liSlideWidth.length; i++) {
        liSlideWidth[i].style.height = `${currentValue}px`;
    }
})Final Output Of Infinite Autoplay Carousel Using Html,Css and JavaScript
Now you successfully create Infinite Autoplay Carousel USING HTML, CSS, AND JavaScript.
In this post, we learn how to create an Infinite Autoplay Carousel with simple coding of HTML CSS and javascript. If we made a mistake or any confusion please drop a comment to give a reply or help you in easy learning.
Which code editor do you use for this Infinite Autoplay Carousel coding?
I personally recommend using VS Code Studio, it’s straightforward and easy to use.
is this project responsive or not?
Yes! this project is a responsive project.
What is Autoplay Carousel?
A carousel is a slide show web application that contains multiple images, and these images are continuously changed after a particular time interval the image of the carousel gets changed. It uses various CSS and Javascript concepts to add smooth movement and transition between the apps.
What is the use of Carousel?
Carousel is mainly used for scrolling news headlines, featured articles on home pages, and image galleries.
ADVERTISEMENT
