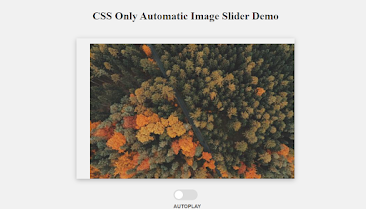
Automatic Multiple Image Slider in HTML and CSS
.png)
Automatic Multiple Image Slider in HTML and CSS
| Code by | msrafi |
| Project Download | Link Available Below |
| Language used | HTML, CSS, and JavaScript |
| External link / Dependencies | No |
| Responsive | YES |

LIVE Preview Of Automatic Multiple Image Slider in HTML CSS
HTML CODE For Automatic Image Slider:-
<h1 style="margin-top: 150px; text-align: center">
    CSS Only Automatic Image Slider Demo
</h1>
<input
    id="sliderSwitch"
    class="slider__switch"
    type="checkbox"
    name="sliderSwitch"
    hidden
/>
<div class="slider">
    <ul class="slider__list">
        <li class="slider__slide">
            <img src="https://unsplash.it/650/420?image=924" alt="Slide 1" />
        </li>
        <li class="slider__slide">
            <img src="https://unsplash.it/650/420?image=923" alt="Slide 2" />
        </li>
        <li class="slider__slide">
            <img src="https://unsplash.it/650/420?image=922" alt="Slide 3" />
        </li>
        <li class="slider__slide">
            <img src="https://unsplash.it/650/420?image=921" alt="Slide 4" />
        </li>
    </ul>
</div>
<div class="slider__control"><label for="sliderSwitch"></label></div>
- First of all using the <h1> tag we will add the heading for our automatic image slider.
- Now usinfg the input tag with type as checkbox we will create a slider switch for switching of images.
- Now we will create a div with class “slider” we will create an unordered list which will contains different numbers of list as images for our image slider.
- We will create an another div tag for creating the controls of the image slider.
Portfolio Website using HTML and CSS (Source Code)
HTML OUTPUT:-


CSS CODE For Automatic Image Slider:-
body {
    font-size: 100%;
    background: #f1f1f1;
} /* Fallback for hidden attribute */
hidden {
    display: none;
} /** * Keyframes for autoplay */
@-webkit-keyframes autoplay {
    /* position of the first slide */
    0% {
        left: 0;
    } /* position of the second slide */
    25% {
        left: -40.625rem;
    } /* position of the third slide */
    50% {
        left: -81.25rem;
    } /* position of the fourth slide */
    100% {
        left: -121.875rem;
    }
}
@keyframes autoplay {
    /* position of the first slide */
    0% {
        left: 0;
    } /* position of the second slide */
    25% {
        left: -40.625rem;
    } /* position of the third slide */
    50% {
        left: -81.25rem;
    } /* position of the fourth slide */
    100% {
        left: -121.875rem;
    }
} /** * Slider */
.slider {
    position: relative; /* top margin is for purposes of demo */
    margin-top: 3rem;
    margin-right: auto;
    margin-left: auto;
    overflow: hidden;
    width: 40.625rem;
    height: 26.25rem;
    box-shadow: 0 4px 14px rgba(0, 0, 0, 0.25);
}
.slider__list {
    position: absolute;
    left: 0;
    width: 162.5rem;
}
.slider__slide {
    float: left;
} /** * Slider control */
.slider__control {
    margin-right: auto;
    margin-left: auto;
    width: 4.5rem;
    font-family: sans-serif;
}
.slider__control label {
    position: relative;
    display: block;
    margin-top: 2rem;
    margin-bottom: 1rem;
    width: 4.5rem;
    height: 2rem;
    font-size: 1rem;
    font-weight: normal;
    line-height: 1.5;
    color: transparent;
    background: #ddd;
    border-radius: 2rem;
    cursor: pointer;
    -webkit-transition: left 0.15s ease-out;
    transition: left 0.15s ease-out;
}
.slider__control label:before {
    content: "autoplay";
    position: absolute;
    top: 2.5rem;
    left: 0;
    color: #333;
    font-size: 0.95rem;
    font-weight: bold;
    text-transform: uppercase;
}
.slider__control label:after {
    content: "";
    position: absolute;
    top: 0.25rem;
    left: 0.25rem;
    display: block;
    width: 1.5rem;
    height: 1.5rem;
    border-radius: 2rem;
    background: #fff;
    -webkit-transition: left 0.15s ease-out;
    transition: left 0.15s ease-out;
    -webkit-transform: translate3d(0, 0, 0);
    transform: translate3d(0, 0, 0);
}
.slider__switch:checked + .slider > .slider__list {
    -webkit-animation-name: autoplay;
    animation-name: autoplay; /* This will change the time it takes to move to next slide */
    -webkit-animation-duration: 10s;
    animation-duration: 10s;
    -webkit-animation-iteration-count: infinite;
    animation-iteration-count: infinite;
}
.slider__switch:checked + .slider + .slider__control > label {
    background: #455a64;
}
.slider__switch:checked + .slider + .slider__control > label:after {
    left: 2.75rem;
}
Step1: Using the body tag selector we will set the font-size as “100%” and using the background property we will set the background as “light gray” and using the display property we will set the display as hidden.
body {
  font-size: 100%;
  background: #f1f1f1;
}

/* Fallback for hidden attribute */

hidden { display: none; }
Step2: Now we will add keyframes autoplay we will be using the left property of css to add the autoplay feature inside our image slider we will create keyframes at 0,25,50,100 we as the increase in the keyframe percentage we will decrease the position of image from the left side
Gym Website Using HTML and CSS With Source Code
ADVERTISEMENT
/**
 * Keyframes for autoplay
 */
@-webkit-keyframes
autoplay {   /* position of the first slide */
  0% {
 left: 0;
}
  /* position of the second slide */
  25% {
 left: -40.625rem;
}
  /* position of the third slide */
  50% {
 left: -81.25rem;
}
  /* position of the fourth slide */
  100% {
 left: -121.875rem;
}
}
@keyframes
autoplay {   /* position of the first slide */
  0% {
 left: 0;
}
  /* position of the second slide */
  25% {
 left: -40.625rem;
}
  /* position of the third slide */
  50% {
 left: -81.25rem;
}
  /* position of the fourth slide */
  100% {
 left: -121.875rem;
}
}
Step3: The class selector will now be used to add the control and location of the image slider (.slider). The position will be set to absolute, and the left property will be used to delete the left space’s value of “zero.” Additionally, we will style the picture slider’s controls, which are now set to be in a “absolute” position. The autoplay button’s status will be verified using the checked property. If it is, automatic image sliding will begin; it will cease as soon as the auto check is removed from the image slider.
ADVERTISEMENT
.slider {
  position: relative;
  /* top margin is for purposes of demo */
  margin-top: 3rem;
  margin-right: auto;
  margin-left: auto;
  overflow: hidden;
  width: 40.625rem;
  height: 26.25rem;
  box-shadow: 0 4px 14px rgba(0, 0, 0, 0.25);
}

.slider__list {
  position: absolute;
  left: 0;
  width: 162.5rem;
}

.slider__slide { float: left; }

/**
 * Slider control
 */

.slider__control {
  margin-right: auto;
  margin-left: auto;
  width: 4.5rem;
  font-family: sans-serif;
}

.slider__control label {
  position: relative;
  display: block;
  margin-top: 2rem;
  margin-bottom: 1rem;
  width: 4.5rem;
  height: 2rem;
  font-size: 1rem;
  font-weight: normal;
  line-height: 1.5;
  color: transparent;
  background: #ddd;
  border-radius: 2rem;
  cursor: pointer;
  -webkit-transition: left 0.15s ease-out;
  transition: left 0.15s ease-out;
}

.slider__control label:before {
  content: "autoplay";
  position: absolute;
  top: 2.5rem;
  left: 0;
  color: #333;
 font-size: .95rem;
  font-weight: bold;
  text-transform: uppercase;
}

.slider__control label:after {
  content: "";
  position: absolute;
 top: .25rem;
 left: .25rem;
  display: block;
  width: 1.5rem;
  height: 1.5rem;
  border-radius: 2rem;
  background: #fff;
  -webkit-transition: left 0.15s ease-out;
  transition: left 0.15s ease-out;
  -webkit-transform: translate3d(0, 0, 0);
  transform: translate3d(0, 0, 0);
}

.slider__switch:checked + .slider > .slider__list {
  -webkit-animation-name: autoplay;
  animation-name: autoplay;
  /* This will change the time it takes to move to next slide */
  -webkit-animation-duration: 10s;
  animation-duration: 10s;
  -webkit-animation-iteration-count: infinite;
  animation-iteration-count: infinite;
}

.slider__switch:checked + .slider + .slider__control > label { background: #455a64; }

.slider__switch:checked + .slider + .slider__control > label:after { left: 2.75rem; }
CSS OUTPUT Of Automatic Image Slider:-
ADVERTISEMENT
ADVERTISEMENT
ADVERTISEMENT
Which code editor do you use for this Automatic Multiple Image Slider project coding?
I personally recommend using VS Code Studio, it’s straightforward and easy to use.
is this project responsive or not?
Yes! this project is a responsive project.
Do you use any external links to create this project?
No!


