Responsive Login and Sign Up Form in HTML and CSS (Source Code)
Hello Coder! Welcome to the Codewithrandom blog. In this blog, We learn how to create a Responsive Login And Sign Up Form Form In Html And Css and a little bit of JavaScript. You see the login form when you select the login button. By selecting the Signup option, the signup form is displayed. Due to the HTML option, it is enabled.
On the registration page, you must fill out your first and last names, email, password, and other details. The only fields on the login screen that must be filled in are the email address and password.
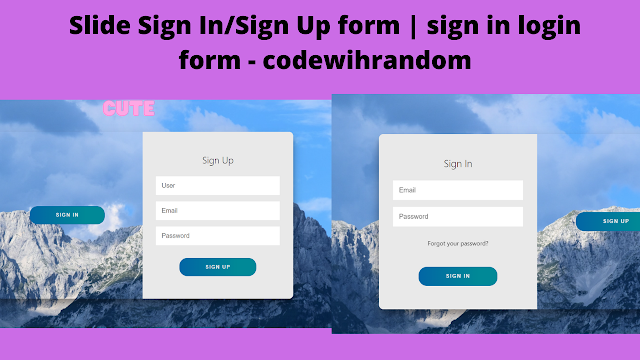
Nowadays, every website gathers user information to allow for a legitimate login. To do this, users must register and receive a login ID and password.
Create Scroll Animation Using CSS
| Code by | N/A |
| Project Download | Link Available Below |
| Language used | HTML ,CSS and JavaScript |
| External link / Dependencies | No |
| Responsive | Yes |
I hope you enjoy our blog so let’s start with a basic HTML structure for a Login and Registration Form.
HTML Code For Login and Sign Up Form :-
<div class="container right-panel-active">
<!-- Sign Up -->
<div class="container__form container--signup">
<form action="#" class="form" id="form1">
<h2 class="form__title">Sign Up</h2>
<input type="text" placeholder="User" class="input" />
<input type="email" placeholder="Email" class="input" />
<input type="password" placeholder="Password" class="input" />
<button class="btn">Sign Up</button>
</form>
</div>
<!-- Sign In -->
<div class="container__form container--signin">
<form action="#" class="form" id="form2">
<h2 class="form__title">Sign In</h2>
<input type="email" placeholder="Email" class="input" />
<input type="password" placeholder="Password" class="input" />
<a href="#" class="link">Forgot your password?</a>
<button class="btn">Sign In</button>
</form>
</div>
<!-- Overlay -->
<div class="container__overlay">
<div class="overlay">
<div class="overlay__panel overlay--left">
<button class="btn" id="signIn">Sign In</button>
</div>
<div class="overlay__panel overlay--right">
<button class="btn" id="signUp">Sign Up</button>
</div>
</div>
</div>
</div>
The information for the registration and login forms has been added to the HTML code in the sections below. The codes listed below are copied, and they are then added directly to your HTML file.
Ecommerce Website Using HTML, CSS, and JavaScript (Source Code)
- To start, we’ll add a “container right-panel-active” class to a div tag, which will contain our signup and login forms.
- Using the h2 tag, we will add the heading for our signup form.
- We will now create our login form. To do that, we will design a label that requests a username and, beneath it, a text-only input box for the username.
- We’re going to make a “password” input box now, along with a “checkbox” input box that says “keep me logged in.”
- Now, using the hr> tag, we will make a horizontal rule similar to the one we used to divide our form.
- Now we will create a “forgot password” link using the anchor tag.
- Now we will be creating the structure of our sign-in form. Using the div tag, we will create a container for our input form.
- First, we’ll construct a label for our username and an input type for the username called “text.” Then, two input fields of the type “password” will be created.
- Then, using the sign-in button, we will add the button for the sign-in..
There is all the Html code for the Sign In/Sign Up form. Now, you can see output without Css and JavaScript. then we write Css and JavaScript for the Sign In/Sign Up form.
Portfolio Website using HTML and CSS (Source Code)
Only Html Code Output:-
:root {
/* COLORS */
--white: #e9e9e9;
--gray: #333;
--blue: #0367a6;
--lightblue: #008997;
/* RADII */
--button-radius: 0.7rem;
/* SIZES */
--max-width: 758px;
--max-height: 420px;
font-size: 16px;
font-family: -apple-system, BlinkMacSystemFont, "Segoe UI", Roboto, Oxygen,
Ubuntu, Cantarell, "Open Sans", "Helvetica Neue", sans-serif;
}
body {
align-items: center;
background-color: var(--white);
background: url("https://res.cloudinary.com/dci1eujqw/image/upload/v1616769558/Codepen/waldemar-brandt-aThdSdgx0YM-unsplash_cnq4sb.jpg");
background-attachment: fixed;
background-position: center;
background-repeat: no-repeat;
background-size: cover;
display: grid;
height: 100vh;
place-items: center;
}
.form__title {
font-weight: 300;
margin: 0;
margin-bottom: 1.25rem;
}
.link {
color: var(--gray);
font-size: 0.9rem;
margin: 1.5rem 0;
text-decoration: none;
}
.container {
background-color: var(--white);
border-radius: var(--button-radius);
box-shadow: 0 0.9rem 1.7rem rgba(0, 0, 0, 0.25),
0 0.7rem 0.7rem rgba(0, 0, 0, 0.22);
height: var(--max-height);
max-width: var(--max-width);
overflow: hidden;
position: relative;
width: 100%;
}
.container__form {
height: 100%;
position: absolute;
top: 0;
transition: all 0.6s ease-in-out;
}
.container--signin {
left: 0;
width: 50%;
z-index: 2;
}
.container.right-panel-active .container--signin {
transform: translateX(100%);
}
.container--signup {
left: 0;
opacity: 0;
width: 50%;
z-index: 1;
}
.container.right-panel-active .container--signup {
animation: show 0.6s;
opacity: 1;
transform: translateX(100%);
z-index: 5;
}
.container__overlay {
height: 100%;
left: 50%;
overflow: hidden;
position: absolute;
top: 0;
transition: transform 0.6s ease-in-out;
width: 50%;
z-index: 100;
}
.container.right-panel-active .container__overlay {
transform: translateX(-100%);
}
.overlay {
background-color: var(--lightblue);
background: url("https://res.cloudinary.com/dci1eujqw/image/upload/v1616769558/Codepen/waldemar-brandt-aThdSdgx0YM-unsplash_cnq4sb.jpg");
background-attachment: fixed;
background-position: center;
background-repeat: no-repeat;
background-size: cover;
height: 100%;
left: -100%;
position: relative;
transform: translateX(0);
transition: transform 0.6s ease-in-out;
width: 200%;
}
.container.right-panel-active .overlay {
transform: translateX(50%);
}
.overlay__panel {
align-items: center;
display: flex;
flex-direction: column;
height: 100%;
justify-content: center;
position: absolute;
text-align: center;
top: 0;
transform: translateX(0);
transition: transform 0.6s ease-in-out;
width: 50%;
}
.overlay--left {
transform: translateX(-20%);
}
.container.right-panel-active .overlay--left {
transform: translateX(0);
}
.overlay--right {
right: 0;
transform: translateX(0);
}
.container.right-panel-active .overlay--right {
transform: translateX(20%);
}
.btn {
background-color: var(--blue);
background-image: linear-gradient(90deg, var(--blue) 0%, var(--lightblue) 74%);
border-radius: 20px;
border: 1px solid var(--blue);
color: var(--white);
cursor: pointer;
font-size: 0.8rem;
font-weight: bold;
letter-spacing: 0.1rem;
padding: 0.9rem 4rem;
text-transform: uppercase;
transition: transform 80ms ease-in;
}
.form > .btn {
margin-top: 1.5rem;
}
.btn:active {
transform: scale(0.95);
}
.btn:focus {
outline: none;
}
.form {
background-color: var(--white);
display: flex;
align-items: center;
justify-content: center;
flex-direction: column;
padding: 0 3rem;
height: 100%;
text-align: center;
}
.input {
background-color: #fff;
border: none;
padding: 0.9rem 0.9rem;
margin: 0.5rem 0;
width: 100%;
}
@keyframes show {
0%,
49.99% {
opacity: 0;
z-index: 1;
}
50%,
100% {
opacity: 1;
z-index: 5;
}
}Step1:We will add many more fundamental styles to our signup and sign-in elements by using the root element property to define the font color, background color, button radius, and other attributes. In our design, we will use them after that. The font will be 16 pixels in height.
Messaging App Clone With HTML,CSS and JavaScript Code
We will centre the objects using the body tag selector, and then add an image to the backdrop by using the background property and a url link. The background location will be fixed using the background property position. At 100 vh, the height is fixed.
:root {
/* COLORS */
--white: #e9e9e9;
--gray: #333;
--blue: #0367a6;
--lightblue: #008997;
/* RADII */
--button-radius: 0.7rem;
/* SIZES */
--max-width: 758px;
--max-height: 420px;
font-size: 16px;
font-family: -apple-system, BlinkMacSystemFont, "Segoe UI", Roboto, Oxygen,
Ubuntu, Cantarell, "Open Sans", "Helvetica Neue", sans-serif;
}
body {
align-items: center;
background-color: var(--white);
background: url("https://res.cloudinary.com/dci1eujqw/image/upload/v1616769558/Codepen/waldemar-brandt-aThdSdgx0YM-unsplash_cnq4sb.jpg");
background-attachment: fixed;
background-position: center;
background-repeat: no-repeat;
background-size: cover;
display: grid;
height: 100vh;
place-items: center;
}
Step2: Using the class selector (.form-title) we will set the font weight as 300 and margin property is set as”0″ and using the margin bottom property we will add a bottom margin of 1.25rem.
Using the class selector (.container) we will set the background colour “white” and using the border radius we will inherit from the root element.
.form__title {
font-weight: 300;
margin: 0;
margin-bottom: 1.25rem;
}
.link {
color: var(--gray);
font-size: 0.9rem;
margin: 1.5rem 0;
text-decoration: none;
}
.container {
background-color: var(--white);
border-radius: var(--button-radius);
box-shadow: 0 0.9rem 1.7rem rgba(0, 0, 0, 0.25),
0 0.7rem 0.7rem rgba(0, 0, 0, 0.22);
height: var(--max-height);
max-width: var(--max-width);
overflow: hidden;
position: relative;
width: 100%;
}
.container__form {
height: 100%;
position: absolute;
top: 0;
transition: all 0.6s ease-in-out;
}
.container--signin {
left: 0;
width: 50%;
z-index: 2;
}
.container.right-panel-active .container--signin {
transform: translateX(100%);
}
.container--signup {
left: 0;
opacity: 0;
width: 50%;
z-index: 1;
}
.container.right-panel-active .container--signup {
animation: show 0.6s;
opacity: 1;
transform: translateX(100%);
z-index: 5;
}
.container__overlay {
height: 100%;
left: 50%;
overflow: hidden;
position: absolute;
top: 0;
transition: transform 0.6s ease-in-out;
width: 50%;
z-index: 100;
}
.container.right-panel-active .container__overlay {
transform: translateX(-100%);
}Step3:We will choose the colour “lightblue” and the height “100%” using the class selector (.overlay). The form and y axis will be translated using the transform property, and the cursor will be assigned to the pointer using the cursor type.
Create A Travel/Tourism Website Using HTML and CSS
Now, using the class selector (.form), we will set the background to white, the display property to “flex,” and the align item property to “center” for all of the items. We will use the keyframes property to set the keyframes at 0% and 100% to display the animation of the sign-in and sign-up forms, and we will use the background property to set the backdrop as white.
.overlay {
background-color: var(--lightblue);
background: url("https://res.cloudinary.com/dci1eujqw/image/upload/v1616769558/Codepen/waldemar-brandt-aThdSdgx0YM-unsplash_cnq4sb.jpg");
background-attachment: fixed;
background-position: center;
background-repeat: no-repeat;
background-size: cover;
height: 100%;
left: -100%;
position: relative;
transform: translateX(0);
transition: transform 0.6s ease-in-out;
width: 200%;
}
.container.right-panel-active .overlay {
transform: translateX(50%);
}
.overlay__panel {
align-items: center;
display: flex;
flex-direction: column;
height: 100%;
justify-content: center;
position: absolute;
text-align: center;
top: 0;
transform: translateX(0);
transition: transform 0.6s ease-in-out;
width: 50%;
}
.overlay--left {
transform: translateX(-20%);
}
.container.right-panel-active .overlay--left {
transform: translateX(0);
}
.overlay--right {
right: 0;
transform: translateX(0);
}
.container.right-panel-active .overlay--right {
transform: translateX(20%);
}
.btn {
background-color: var(--blue);
background-image: linear-gradient(90deg, var(--blue) 0%, var(--lightblue) 74%);
border-radius: 20px;
border: 1px solid var(--blue);
color: var(--white);
cursor: pointer;
font-size: 0.8rem;
font-weight: bold;
letter-spacing: 0.1rem;
padding: 0.9rem 4rem;
text-transform: uppercase;
transition: transform 80ms ease-in;
}
.form > .btn {
margin-top: 1.5rem;
}
.btn:active {
transform: scale(0.95);
}
.btn:focus {
outline: none;
}
.form {
background-color: var(--white);
display: flex;
align-items: center;
justify-content: center;
flex-direction: column;
padding: 0 3rem;
height: 100%;
text-align: center;
}
.input {
background-color: #fff;
border: none;
padding: 0.9rem 0.9rem;
margin: 0.5rem 0;
width: 100%;
}
@keyframes show {
0%,
49.99% {
opacity: 0;
z-index: 1;
}
50%,
100% {
opacity: 1;
z-index: 5;
}
}
Now we have completed our Sign In/Sign Up form Css Code section. Here is our updated output HTML + CSS.
100+ JavaScript Projects With Source Code ( Beginners to Advanced)
Output
ADVERTISEMENT
ADVERTISEMENT

ADVERTISEMENT
Gym Website Using HTML and CSS (Source Code)
ADVERTISEMENT
Now we add javascript code so we can slide Login and Registration Form for a click button.
ADVERTISEMENT
JavaScript Code For Login and Registration Form:-
const signInBtn = document.getElementById("signIn");
const signUpBtn = document.getElementById("signUp");
const fistForm = document.getElementById("form1");
const secondForm = document.getElementById("form2");
const container = document.querySelector(".container");
signInBtn.addEventListener("click", () => {
     container.classList.remove("right-panel-active");
});
signUpBtn.addEventListener("click", () => {
     container.classList.add("right-panel-active");
});
fistForm.addEventListener("submit", (e) => e.preventDefault());
secondForm.addEventListener("submit", (e) => e.preventDefault());
We will choose every HTML element in the document using the const variable. The form, sign-in button, and sign-up button will be chosen using the getElementById method.
The class list will then be added using the addEventlistener method. Just switch back and forth between the sign-in and sign-up forms. The sign-in form will appear when we click it, and the sign-up form will open when we click the sign-up form.
Final Output Of Login and Sign Up Form in HTML and CSS:-

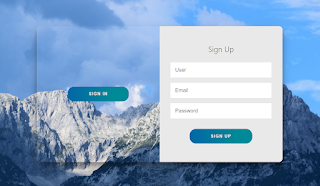
Now we have completed our Responsive Sliding Login and Registration Form. Here is our updated output with HTML, CSS, and JavaScript. you can see the output video and project screenshots. See our other blogs and gain knowledge in front-end development.
Video Output:
Live Preview Of Login and Sign-Up Form:-
Thank you!
Restaurant Website Using HTML and CSS
In this post, we learn how to create a Login and Sign Up Form in HTML and CSS. If we made a mistake or any confusion, please drop a comment to reply or help you in easy learning.
Written by – Code With Random/Anki
Code by -Contact Us For Credit
Which code editor do you use for this Slide Sign In/Sign Up Form coding?
I personally recommend using VS Code Studio, it’s straightforward and easy to use.
What is a Form?
An organised document with a set layout is called a form. Forms are used to gather the necessary data in a logical, useful manner for communication and transfer it to another organisation. You could envision a wide range of different types of documents when you think about a form. You might think of a survey, a service request, a tax return, or a purchase order.
What is the use of signup and sign-in form?
Sign-In form are used to gain access to the website and use its services after entering the credentials of the particular user.
While signup forms are used to create the credentials for the user to gain access to the services of the website.
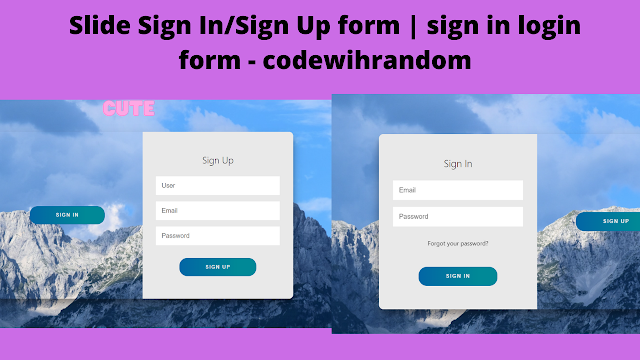



hi can I ask you a question. I try to copy and paste but the output is difference from your output.
Can you explain a bit more about the difference
hi..while i running the code slide of sign up form is not working..pls help me