Hover Image Slider Using HTML, CSS And jQuery
Hello Coder! Welcome To The Codewithrandom Blog. In This Blog, We Learn How To Create A Hover Image Slider Using HTML, CSS, And jQuery.
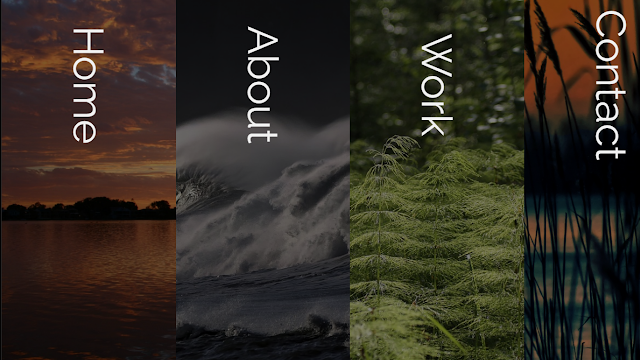
This project is suitable for beginners because the picture and text within it expand as the user hovers over any slide. We will create various image sections inside the hover slider, and within those sections, we will create various images with various sections in accordance with the pictures.
100+ HTML,CSS and JavaScript Projects With Source Code ( Beginners to Advanced)
| Code by | Cameron Fitzwilliam |
| Project Download | Link Available Below |
| Language used | HTML ,CSS and jQuery |
| External link / Dependencies | Yes |
| Responsive | Yes |
Hope You Enjoy Our Blog So Let’s Start With A Basic Html Structure For A Flex Hover Slider.
Html Code For Hover Slider
<!DOCTYPE html>
<html lang="en">
<head>
<meta charset="UTF-8" />
<meta http-equiv="X-UA-Compatible" content="IE=edge" />
<meta name="viewport" content="width=device-width, initial-scale=1.0" />
<title> Flex Hover Slider</title>
<link rel="stylesheet" href="style.css">
</head>
<body>
<div class="flex-container">
<div class="spinner"><p>
<div class="cube1"></div>
<div class="cube2"></div>
Loading...
</p>
</div>
<div class="flex-slide home">
<div class="flex-title flex-title-home">Home</div>
<div class="flex-about flex-about-home"><p>Click here to navigate to the home section of the website</p></div>
</div>
<div class="flex-slide about">
<div class="flex-title">About</div>
<div class="flex-about"><p>Click here to navigate to the About section of the website</p></div>
</div>
<div class="flex-slide work">
<div class="flex-title">Work</div>
<div class="flex-about"><p>Listing relevant snippets of work:</p>
<ul>
<li>First piece of work</li>
<li>Second piece of work</li>
<li>Third piece of work</li>
</ul>
</div>
</div>
<div class="flex-slide contact">
<div class="flex-title">Contact</div>
<div class="flex-about">
<p>Use the contact form below</p>
<form class="contact-form">
<p>Email <input type="text" name="email"></p>
<p>Comment <textarea type="text" name="comment" row="5"></textarea></p>
<p><input type="submit" name="email" value="Send Message"></p>
</form>
</div>
</div>
</div>
<script src="https://cdnjs.cloudflare.com/ajax/libs/jquery/3.1.1/jquery.min.js"></script>
<script src="https://s3-us-west-2.amazonaws.com/s.cdpn.io/769286/jquery.waitforimages.min.js"></script>
</body>
</html>
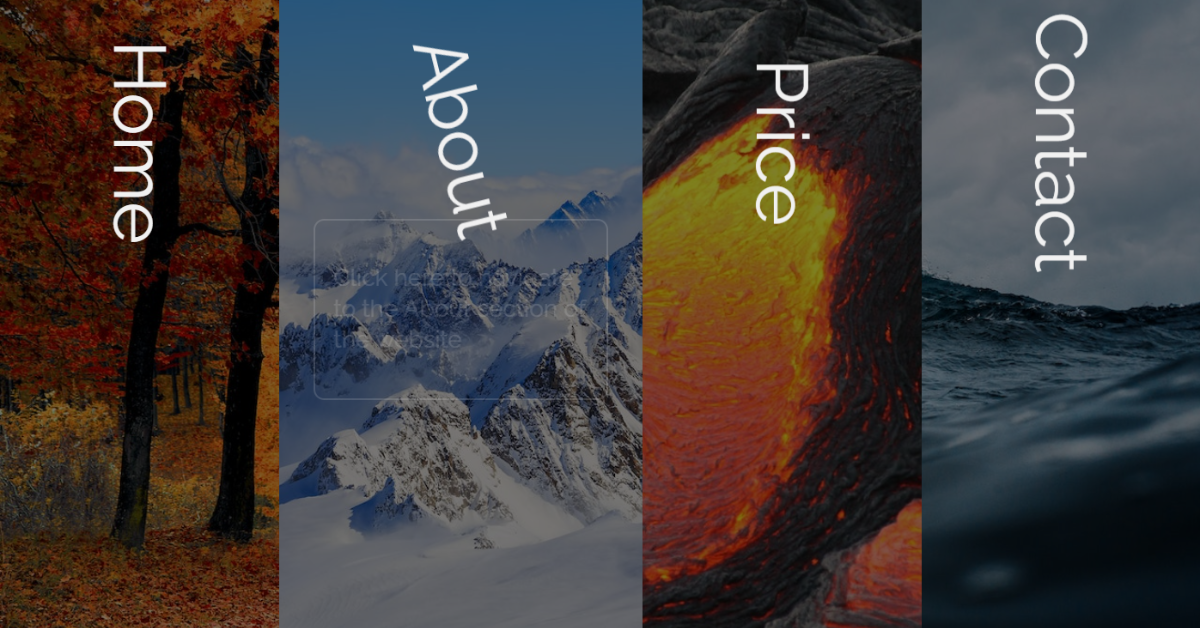
Html and Css Output Of Hover Slider
How to Create Popup Box Using Html and Css?
jQuery Code For Hover Slider
(function () {
    $(".flex-container").waitForImages(
        function () {
            $(".spinner").fadeOut();
        },
        $.noop,
        true
    );
    $(".flex-slide").each(function () {
        $(this).hover(
            function () {
                $(this)
                    .find(".flex-title")
                    .css({ transform: "rotate(0deg)", top: "10%" });
                $(this).find(".flex-about").css({ opacity: "1" });
            },
            function () {
                $(this)
                    .find(".flex-title")
                    .css({ transform: "rotate(90deg)", top: "15%" });
                $(this).find(".flex-about").css({ opacity: "0" });
            }
        );
    });
})();
We’ll use a jQuery function inside of our javascript to build a function that will fade out the picture as the user hovers over it, and then we’ll use the transform and top properties to change the hover slider and add some space to the top. This feature will be developed for every slide.
Final Output Hover Slider Using Html and jQuery

Video Output:
Codepen Preview:
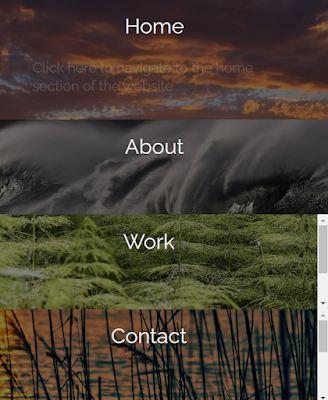
Now We Have Completed Our Javascript Code Section. Here Is Our Updated Output With Html,css And Javascript(Jquery). Hope You Like The Flex Hover Slider.
You Can See The Output Video And Project Screenshots. See Our Other Blogs And Gain Knowledge In Front-end Development.
Sidebar Menu Design Using Html, Css and JavaScript Code
Thank You!
In This Post, We Learn How To Create A Flex Hover Slider Using Simple Html & Css, And Javascript(Jquery). If We Made A Mistake Or Any Confusion, Please Drop A Comment To Reply Or Help You In Easy Learning.
Written By – Code With Random/anki
Codepen By – Cameron Fitzwilliam
Which code editor do you use for Flex Hover Slider coding?
I personally recommend using VS Code Studio, it’s straightforward and easy to use.
is this project responsive or not?
Yes! this is a responsive project
Do you use any external links to create this project?
Yes!
Before we add the structure inside our flex hover slider we need to add some important link inside our html file here inside the project we have used different css and javascript file so first we need to add those link inside the head section and then we have also used jquery framework inside so we need to add the link for our jquery inside the body section before the ending of the body tag.
Portfolio Website using HTML and CSS (Source Code)
<!---Head section---->
    <link rel="stylesheet" href="style.css">

<!----Body section---->
 <script src='https://cdnjs.cloudflare.com/ajax/libs/jquery/3.1.1/jquery.min.js'></script>
    <script src='https://cdnjs.cloudflare.com/ajax/libs/jquery.waitforimages/2.4.0/jquery.waitforimages.min.js'></script>
    <script src="script.js"></script>
Ecommerce Website Using HTML, CSS, & JavaScript (Source Code)
Using the div tags with classes “flex-container” and “spinner” to make a paragraph section and a cube section, we will now give our flex slider structure.
ADVERTISEMENT
Using the div tag and the class “flex-slide home,” we will first construct the home section, and then inside of it, using the div and p> tags, we will add the content for our home section.
ADVERTISEMENT
In a similar manner, we will designate parts for “about,” “price,” and “contact.” The information about the business is contained in the “about” section, the “price” section will have the price added to a hover slider, and the “contact” section will have a contact form added to a flex hover slider.
ADVERTISEMENT
There Is All Html Code For The Flex Hover Slider.
ADVERTISEMENT
50+ HTML, CSS & JavaScript Projects With Source Code
ADVERTISEMENT
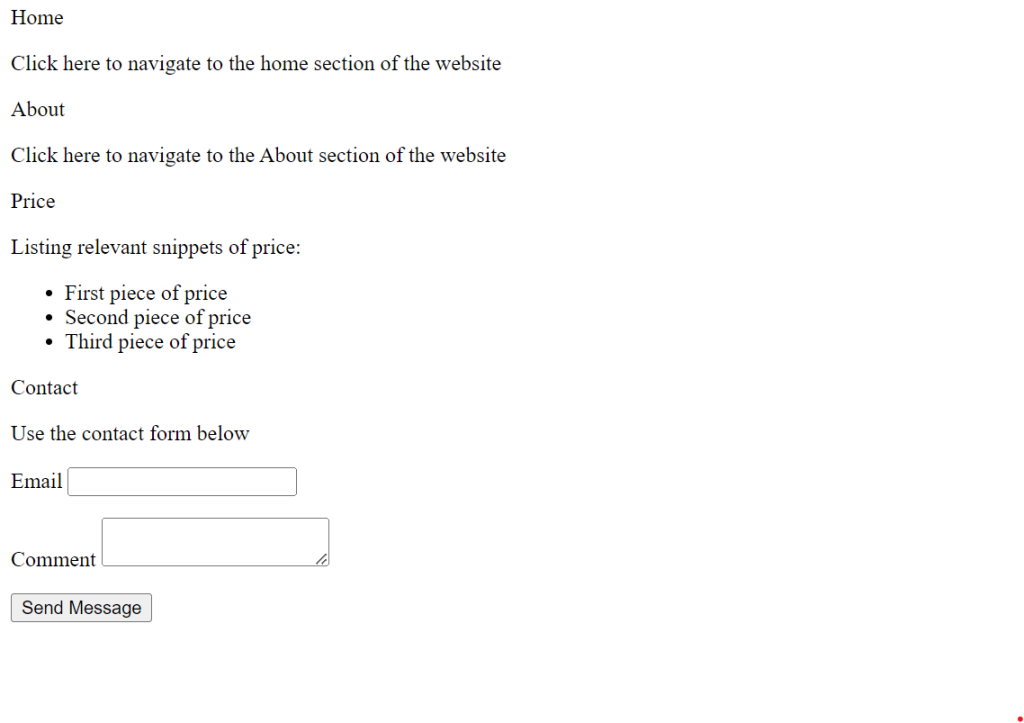
Now, You Can See Output Without Css And Javascript(Jquery), Then We Write Css & Javascript(Jquery) For The Flex Hover Slider.
OUTPUT OF HTML HOVER SLIDER
Css Code For Hover Slider
@import url("https://fonts.googleapis.com/css?family=Raleway");
$defaultSeconds: 3s;
body {
    margin: 0;
    padding: 0;
    font-family: "Raleway", sans-serif;
}
.flex-container {
    position: absolute;
    height: 100vh;
    width: 100%;
    display: -webkit-flex; /* Safari */
    display: flex;
    overflow: hidden;
    @media screen and (max-width: 768px) {
        flex-direction: column;
    }
}
.flex-title {
    color: #f1f1f1;
    position: relative;
    font-size: 6vw;
    margin: auto;
    text-align: center;
    transform: rotate(90deg);
    top: 15%;
    -webkit-transition: all 500ms ease;
    -moz-transition: all 500ms ease;
    -ms-transition: all 500ms ease;
    -o-transition: all 500ms ease;
    transition: all 500ms ease;
    @media screen and (max-width: 768px) {
        transform: rotate(0deg) !important;
    }
}
.flex-about {
    opacity: 0;
    color: #f1f1f1;
    position: relative;
    width: 70%;
    font-size: 2vw;
    padding: 5%;
    top: 20%;
    border: 2px solid #f1f1f1;
    border-radius: 10px;
    line-height: 1.3;
    margin: auto;
    text-align: left;
    transform: rotate(0deg);
    -webkit-transition: all 500ms ease;
    -moz-transition: all 500ms ease;
    -ms-transition: all 500ms ease;
    -o-transition: all 500ms ease;
    transition: all 500ms ease;
    @media screen and (max-width: 768px) {
        padding: 0%;
        border: 0px solid #f1f1f1;
    }
}
.flex-slide {
    -webkit-flex: 1; /* Safari 6.1+ */
    -ms-flex: 1; /* IE 10 */
    flex: 1;
    cursor: pointer;
    -webkit-transition: all 500ms ease;
    -moz-transition: all 500ms ease;
    -ms-transition: all 500ms ease;
    -o-transition: all 500ms ease;
    transition: all 500ms ease;
    @media screen and (max-width: 768px) {
        overflow: auto;
        overflow-x: hidden;
    }
}
.flex-slide p {
    @media screen and (max-width: 768px) {
        font-size: 2em;
    }
}
.flex-slide ul li {
    @media screen and (max-width: 768px) {
        font-size: 2em;
    }
}
.flex-slide:hover {
    -webkit-flex-grow: 3;
    flex-grow: 3;
}
.home {
    height: 100vh;
    background: linear-gradient(rgba(0, 0, 0, 0.5), rgba(0, 0, 0, 0.5)),
        url(https://s3-us-west-2.amazonaws.com/s.cdpn.io/769286/lake-macquarie-71208_1920.jpg);
    background-size: cover;
    background-position: center center;
    background-attachment: fixed;
    @media screen and (min-width: 768px) {
        animation: aboutFlexSlide $defaultSeconds 1;
        animation-delay: 0s;
    }
}
@keyframes aboutFlexSlide {
    0% {
        -webkit-flex-grow: 1;
        flex-grow: 1;
    }
    50% {
        -webkit-flex-grow: 3;
        flex-grow: 3;
    }
    100% {
        -webkit-flex-grow: 1;
        flex-grow: 1;
    }
}
.flex-title-home {
    @media screen and (min-width: 768px) {
        transform: rotate(90deg);
        top: 15%;
        animation: aboutFlexSlide $defaultSeconds 1;
        animation-delay: 0s;
    }
}
@keyframes homeFlextitle {
    0% {
        transform: rotate(90deg);
        top: 15%;
    }
    50% {
        transform: rotate(0deg);
        top: 15%;
    }
    100% {
        transform: rotate(90deg);
        top: 15%;
    }
}
.flex-about-home {
    opacity: 0;
    @media screen and (min-width: 768px) {
        animation: aboutFlexSlide $defaultSeconds 1;
        animation-delay: 0s;
    }
}
@keyframes flexAboutHome {
    0% {
        opacity: 0;
    }
    50% {
        opacity: 1;
    }
    100% {
        opacity: 0;
    }
}
.about {
    background: linear-gradient(rgba(0, 0, 0, 0.5), rgba(0, 0, 0, 0.5)),
        url(https://s3-us-west-2.amazonaws.com/s.cdpn.io/769286/beach-2089959_1280.jpg);
    background-size: cover;
    background-position: center center;
    background-attachment: fixed;
}
.contact-form {
    width: 100%;
}
input {
    width: 100%;
}
textarea {
    width: 100%;
}
.contact {
    background: linear-gradient(rgba(0, 0, 0, 0.5), rgba(0, 0, 0, 0.5)),
        url(https://s3-us-west-2.amazonaws.com/s.cdpn.io/769286/lake-696098_1920.jpg);
    background-size: cover;
    background-position: center center;
    background-attachment: fixed;
}
.work {
    background: linear-gradient(rgba(0, 0, 0, 0.5), rgba(0, 0, 0, 0.5)),
        url(https://s3-us-west-2.amazonaws.com/s.cdpn.io/769286/forest-208517_1280.jpg);
    background-size: cover;
    background-position: center center;
    background-attachment: fixed;
}
r .spinner {
position: fixed;
top: 0;
left: 0;
background: #222;
height: 100%;
width: 100%;
z-index: 11;
margin-top: 0;
color: #fff;
font-size: 1em;
}
.cube1,
.cube2 {
background-color: #fff;
width: 15px;
height: 15px;
position: absolute;
top: 0;
left: 0;
-webkit-animation: sk-cubemove 1.8s infinite ease-in-out;
animation: sk-cubemove 1.8s infinite ease-in-out;
}
.cube2 {
-webkit-animation-delay: -0.9s;
animation-delay: -0.9s;
}
@-webkit-keyframes sk-cubemove {
25% {
-webkit-transform: translateX(42px) rotate(-90deg) scale(0.5);
}
50% {
-webkit-transform: translateX(42px) translateY(42px) rotate(-180deg);
}
75% {
-webkit-transform: translateX(0px) translateY(42px) rotate(-270deg)
scale(0.5);
}
100% {
-webkit-transform: rotate(-360deg);
}
}
@keyframes sk-cubemove {
25% {
transform: translateX(42px) rotate(-90deg) scale(0.5);
-webkit-transform: translateX(42px) rotate(-90deg) scale(0.5);
}
50% {
transform: translateX(42px) translateY(42px) rotate(-179deg);
-webkit-transform: translateX(42px) translateY(42px) rotate(-179deg);
}
50.1% {
transform: translateX(42px) translateY(42px) rotate(-180deg);
-webkit-transform: translateX(42px) translateY(42px) rotate(-180deg);
}
75% {
transform: translateX(0px) translateY(42px) rotate(-270deg) scale(0.5);
-webkit-transform: translateX(0px) translateY(42px) rotate(-270deg)
scale(0.5);
}
100% {
transform: rotate(-360deg);
-webkit-transform: rotate(-360deg);
}
}
Step1: We will first use the import link to add a few Google typefaces to our project before styling our flex hover slider with the new fonts. The padding and margin will now be set to “zero” using the body element, and the font family will be set to “Raleway” using the font-family property.
Gym Website Using HTML and CSS With Source Code
@import url("https://fonts.googleapis.com/css?family=Raleway");
body {
    margin: 0;
    padding: 0;
    font-family: 'Raleway', sans-serif;
}Step2:By utilizing the class selector, we will fix the position to “absolute.” (.flex-container).We will use the width and height properties to specify the container’s breadth and height. We will also use the display and media query properties to specify the container’s display and responsiveness, respectively.
We will similarly apply styling to the title and about section of our image using the class selector. As with the header section, we’ll make the about section 70% wide and assign the opacity to “zero”. As the user hovers over our various parts, the hover effect will be added, and the section’s width will grow. This is accomplished by adding the hover property to each section.
10+ HTML CSS Projects For Beginners (Source Code)
.flex-about {
    opacity: 0;
    color: #f1f1f1;
    position: relative;
    width: 70%;
    font-size: 2vw;
    padding: 5%;
    top: 20%;
    border: 2px solid #f1f1f1;
    border-radius: 10px;
    line-height: 1.3;
    margin: auto;
    text-align: left;
    transform: rotate(0deg);
    -webkit-transition: all 500ms ease;
    -moz-transition: all 500ms ease;
    -ms-transition: all 500ms ease;
    -o-transition: all 500ms ease;
    transition: all 500ms ease;
}

@media screen and (max-width: 768px) {
    .flex-about {
        padding: 0%;
        border: 0px solid #f1f1f1;
    }
}

.flex-slide {
    -webkit-flex: 1;
    /* Safari 6.1+ */
    -ms-flex: 1;
    /* IE 10 */
    flex: 1;
    cursor: pointer;
    -webkit-transition: all 500ms ease;
    -moz-transition: all 500ms ease;
    -ms-transition: all 500ms ease;
    -o-transition: all 500ms ease;
    transition: all 500ms ease;
}

@media screen and (max-width: 768px) {
    .flex-slide {
        overflow: auto;
        overflow-x: hidden;
    }
}

@media screen and (max-width: 768px) {
    .flex-slide p {
        font-size: 2em;
    }
}

@media screen and (max-width: 768px) {
    .flex-slide ul li {
        font-size: 2em;
    }
}

.flex-slide:hover {
    -webkit-flex-grow: 3;
    flex-grow: 3;
}

.home {
    height: 100vh;
    background: linear-gradient(rgba(0, 0, 0, 0.5), rgba(0, 0, 0, 0.5)), url(https://images.pexels.com/photos/33109/fall-autumn-red-season.jpg?crop=entropy&cs=srgb&dl=nature-red-forest-leaves-33109.jpg&fit=crop&fm=jpg&h=853&w=1280);
    background-size: cover;
    background-position: center center;
    background-attachment: fixed;
}

@media screen and (min-width: 768px) {
    .home {
        -moz-animation: aboutFlexSlide;
        -moz-animation-duration: 3s;
        -moz-animation-iteration-count: 1;
        -moz-animation-delay: 0s;
        -webkit-animation: aboutFlexSlide;
        -webkit-animation-duration: 3s;
        -webkit-animation-iteration-count: 1;
        -webkit-animation-delay: 0s;
        animation: aboutFlexSlide;
        animation-duration: 3s;
        animation-iteration-count: 1;
        animation-delay: 0s;
    }
}

@keyframes aboutFlexSlide {
    0% {
        -webkit-flex-grow: 1;
        flex-grow: 1;
    }
    50% {
        -webkit-flex-grow: 3;
        flex-grow: 3;
    }
    100% {
        -webkit-flex-grow: 1;
        flex-grow: 1;
    }
}

@media screen and (min-width: 768px) {
    .flex-title-home {
        transform: rotate(90deg);
        top: 15%;
        -moz-animation: homeFlextitle;
        -moz-animation-duration: 3s;
        -moz-animation-iteration-count: 1;
        -moz-animation-delay: 0s;
        -webkit-animation: homeFlextitle;
        -webkit-animation-duration: 3s;
        -webkit-animation-iteration-count: 1;
        -webkit-animation-delay: 0s;
        animation: homeFlextitle;
        animation-duration: 3s;
        animation-iteration-count: 1;
        animation-delay: 0s;
    }
}

@keyframes homeFlextitle {
    0% {
        transform: rotate(90deg);
        top: 15%;
    }
    50% {
        transform: rotate(0deg);
        top: 15%;
    }
    100% {
        transform: rotate(90deg);
        top: 15%;
    }
}

.flex-about-home {
    opacity: 0;
}

@media screen and (min-width: 768px) {
    .flex-about-home {
        -moz-animation: flexAboutHome;
        -moz-animation-duration: 3s;
        -moz-animation-iteration-count: 1;
        -moz-animation-delay: 0s;
        -webkit-animation: flexAboutHome;
        -webkit-animation-duration: 3s;
        -webkit-animation-iteration-count: 1;
        -webkit-animation-delay: 0s;
        animation: flexAboutHome;
        animation-duration: 3s;
        animation-iteration-count: 1;
        animation-delay: 0s;
    }
}

@keyframes flexAboutHome {
    0% {
        opacity: 0;
    }
    50% {
        opacity: 1;
    }
    100% {
        opacity: 0;
    }
}
Step3: We will now use the background property to style the text within the sections. A linear backdrop will be added, and the width will be set to “100%” using both the input property and the class selector (.contact-form). We will use the fundamental styling attributes, such as width, height, and margin, to apply styling.
.about {
    background: linear-gradient(rgba(0, 0, 0, 0.5), rgba(0, 0, 0, 0.5)), url(https://images.pexels.com/photos/714258/pexels-photo-714258.jpeg?crop=entropy&cs=srgb&dl=mountain-ranges-covered-in-snow-714258.jpg&fit=crop&fm=jpg&h=853&w=1280);
    background-size: cover;
    background-position: center center;
    background-attachment: fixed;
}

.contact-form {
    width: 100%;
}

input {
    width: 100%;
}

textarea {
    width: 100%;
}

.contact {
    background: linear-gradient(rgba(0, 0, 0, 0.5), rgba(0, 0, 0, 0.5)), url(https://images.pexels.com/photos/1295138/pexels-photo-1295138.jpeg?crop=entropy&cs=srgb&dl=ocean-water-wave-photo-1295138.jpg&fit=crop&fm=jpg&h=720&w=1280);
    background-size: cover;
    background-position: center center;
    background-attachment: fixed;
}

.contact input[type="text"] {
    border-radius: 10px;
    height: 40px;
}

.contact textarea[type="text"] {
    height: 40px;
    border-radius: 10px;
}

.contact input[type="submit"] {
    width: 150px;
    height: 40px;
    border-radius: 5px;
    background-color: orangered;
    color: white;
    font-weight: 800;
    text-align: center;
    align-content: center;
}

.price {
    background: linear-gradient(rgba(0, 0, 0, 0.5), rgba(0, 0, 0, 0.5)), url(https://images.pexels.com/photos/235807/pexels-photo-235807.jpeg?crop=entropy&cs=srgb&dl=abstract-active-ash-color-235807.jpg&fit=crop&fm=jpg&h=853&w=1280);
    background-size: cover;
    background-position: center center;
    background-attachment: fixed;
}

.spinner {
    position: fixed;
    top: 0;
    left: 0;
    background: #222;
    height: 100%;
    width: 100%;
    z-index: 11;
    margin-top: 0;
    color: #fff;
    font-size: 1em;
}

.cube1,
.cube2 {
    background-color: #fff;
    width: 15px;
    height: 15px;
    position: absolute;
    top: 0;
    left: 0;
    -webkit-animation: sk-cubemove 1.8s infinite ease-in-out;
    animation: sk-cubemove 1.8s infinite ease-in-out;
}

.cube2 {
    -webkit-animation-delay: -0.9s;
    animation-delay: -0.9s;
}

@-webkit-keyframes sk-cubemove {
    25% {
        -webkit-transform: translateX(42px) rotate(-90deg) scale(0.5);
    }
    50% {
        -webkit-transform: translateX(42px) translateY(42px) rotate(-180deg);
    }
    75% {
        -webkit-transform: translateX(0px) translateY(42px) rotate(-270deg) scale(0.5);
    }
    100% {
        -webkit-transform: rotate(-360deg);
    }
}

@keyframes sk-cubemove {
    25% {
        transform: translateX(42px) rotate(-90deg) scale(0.5);
        -webkit-transform: translateX(42px) rotate(-90deg) scale(0.5);
    }
    50% {
        transform: translateX(42px) translateY(42px) rotate(-179deg);
        -webkit-transform: translateX(42px) translateY(42px) rotate(-179deg);
    }
    50.1% {
        transform: translateX(42px) translateY(42px) rotate(-180deg);
        -webkit-transform: translateX(42px) translateY(42px) rotate(-180deg);
    }
    75% {
        transform: translateX(0px) translateY(42px) rotate(-270deg) scale(0.5);
        -webkit-transform: translateX(0px) translateY(42px) rotate(-270deg) scale(0.5);
    }
    100% {
        transform: rotate(-360deg);
        -webkit-transform: rotate(-360deg);
    }
}
Here Is Our Updated Output With Html And Css Code For Hover Slider.
Html and Css Output Of Hover Slider
How to Create Popup Box Using Html and Css?
jQuery Code For Hover Slider
(function () {
    $(".flex-container").waitForImages(
        function () {
            $(".spinner").fadeOut();
        },
        $.noop,
        true
    );
    $(".flex-slide").each(function () {
        $(this).hover(
            function () {
                $(this)
                    .find(".flex-title")
                    .css({ transform: "rotate(0deg)", top: "10%" });
                $(this).find(".flex-about").css({ opacity: "1" });
            },
            function () {
                $(this)
                    .find(".flex-title")
                    .css({ transform: "rotate(90deg)", top: "15%" });
                $(this).find(".flex-about").css({ opacity: "0" });
            }
        );
    });
})();
We’ll use a jQuery function inside of our javascript to build a function that will fade out the picture as the user hovers over it, and then we’ll use the transform and top properties to change the hover slider and add some space to the top. This feature will be developed for every slide.
Final Output Hover Slider Using Html and jQuery


Video Output:
Codepen Preview:
Now We Have Completed Our Javascript Code Section. Here Is Our Updated Output With Html,css And Javascript(Jquery). Hope You Like The Flex Hover Slider.
You Can See The Output Video And Project Screenshots. See Our Other Blogs And Gain Knowledge In Front-end Development.
Sidebar Menu Design Using Html, Css and JavaScript Code
Thank You!
In This Post, We Learn How To Create A Flex Hover Slider Using Simple Html & Css, And Javascript(Jquery). If We Made A Mistake Or Any Confusion, Please Drop A Comment To Reply Or Help You In Easy Learning.
Written By – Code With Random/anki
Codepen By – Cameron Fitzwilliam




wow super i like it
how to implement this to reactJS