Create Product Card Using HTML and CSS
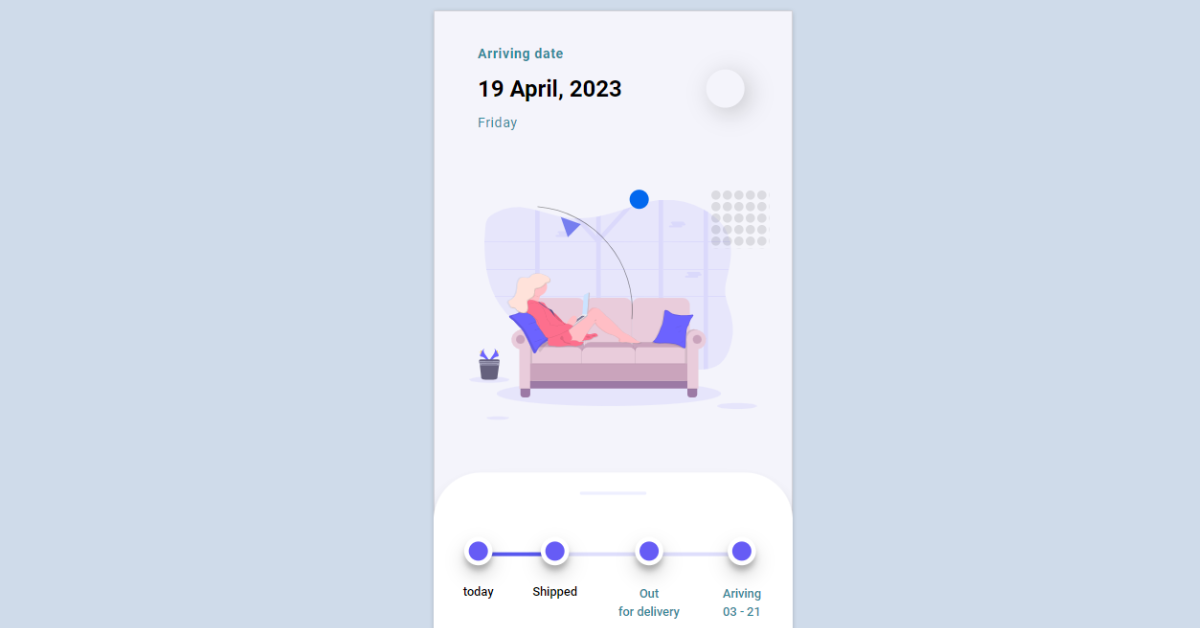
Hello Coder! Welcome to the Codewithrandom blog. In this blog, we learn how to create a Product Card Using HTML and CSS. We use html code for creating the structure of product information. And use Css For Styling our product Card and use JavaScript for this Product delivery Information shown on the card.
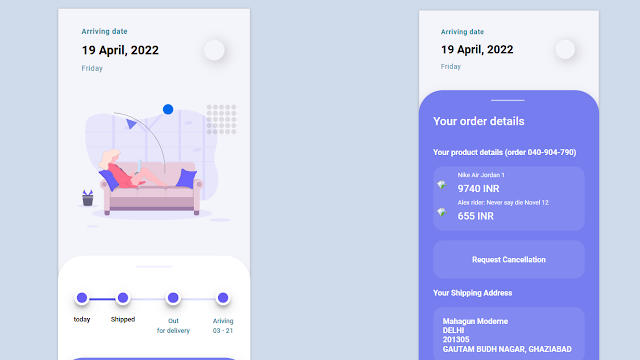
A product card is an essential part of any web store. Product labels should be responsive and designed for mobile and desktop devices.A product card is used in different components of the website it contains the product details price etc.
50+ HTML, CSS and JavaScript Projects With Source Code
| Code by | Aryankapoor |
| Project Download | Link Available Below |
| Language used | HTML ,CSS and JavaScript |
| External link / Dependencies | Yes |
| Responsive | Yes |
Hope you enjoy our blog so let’s start with a basic HTML Structure for a Product Card.
HTML Code For Product Card:-
<body>
<div class="container">
<div class="iphone">
<div class="header">
<div class="order-summary">
<div class="order-status">Arriving date</div>
<div class="order-date">
19 April, 2022
</div>
<div class="order-day">
Friday
</div>
</div>
<div class="action-btn">
<div class="back-btn"><i class="far fa-long-arrow-left"></i></div>
</div>
</div>
<div class="hero-img-container">
<div class="triangle1"></div>
<div class="arc"></div>
<div class="pattern"></div>
<img src="https://drive.google.com/uc?id=15iXUI6DkRr5Zcp0yH5uF2U47ycr-WzUY" class="hero-img">
</div>
<div class="order-status-container">
<div class="status-item first">
<div class="status-circle"></div>
<div class="status-text">
today
</div>
</div>
<div class="status-item second">
<div class="status-circle"></div>
<div class="status-text">
Shipped
</div>
</div>
<div class="status-item">
<div class="status-circle"></div>
<div class="status-text green">
<span>Out</span><span>for delivery</span>
</div>
</div>
<div class="status-item">
<div class="status-circle"></div>
<div class="status-text green">
<span>Ariving</span>
<span>03 - 21</span>
</div>
</div>
</div>
<div class="order-details-container">
<div class="odc-header">
<div class="cta-text">See your product details</div>
<div class="cta-button-container">
<button class="cta-button">View</button>
</div>
</div>
<div class="odc-wrapper">
<div class="odc-header-line">
Your order details
</div>
<div class="odc-header-details">
Your product details (order 040-904-790)
</div>
<div class="product-container">
<div class="product">
<div class="product-photo">
<img src="https://s3.eu-central-1.amazonaws.com/sneakerjagers.com/products/396x396/92074.jpg" class="img-photo">
</div>
<div class="product-desc">
<span>Nike Air Jordan 1</span>
<span>9740 INR</span>
</div>
</div><div class="product">
<div class="product-photo">
<img src="https://s3.eu-central-1.amazonaws.com/sneakerjagers.com/products/396x396/77674.jpg" class="img-photo">
</div>
<div class="product-desc">
<span>Alex rider: Never say die Novel 12</span>
<span>655 INR</span>
</div>
</div>
</div>
<a href="order-cancellationReqtoken12.netlify.app"><div class="cancellation">
Request Cancellation
</div></a>
<div class="shipping-desc">Your Shipping Address</div>
<div class="shipping-address">
Mahagun Moderne<br>
DELHI<br>
201305<br>
GAUTAM BUDH NAGAR, GHAZIABAD
</div>
</div>
</div>
</div>
</div>
</div>
</body>We will first create the container for our product card using the div tag, and then inside the div tag we will create the header for the anticipated delivery using div tag with we will add the heading along with the order of the date.
We will now add an image to our product card using the img tag, and we will create a progress bar using the div tag to monitor the order for our product delivery. Then, using the basic button tag property, we will add the button for our product card. Additionally, using the div tag, we will add the shipping location inside our product card.
There is all the Html code for the Product Card. Now, you can see output without Css and JavaScript. then we write Css & JavaScript for the Product card.
Portfolio Website using HTML and CSS (Source Code)
Html Code Output Only

CSS Code For Product Card:-
@import url('https://fonts.googleapis.com/css?family=Roboto:400,500,700');

* {
  -webkit-font-smoothing: antialiased;
  -moz-osx-font-smoothing: grayscale;
}

body {
  font-family: 'Roboto', sans-serif;
  font-weight: 400;
  background-color: #CFDBEA;
}

a {
  text-decoration: none;
  color: white;
}

.container {
  display: flex;
  justify-content: center;
  align-content: flex-start;
  position:relative;
  height: 100vh;
  width: 100vw;
}

.iphone {
  margin-top: 10px;
  background-color: #F4F4FB;
  height: 812px;
  width: 375px;
  box-shadow: 0 1px 5px -1px rgba(0, 0, 0, 0.3), inset 0 0 0 1px rgba(0, 0, 0, 0.15);
  overflow: hidden;
  position: relative;
  z-index: 2;
  transform:scale(0.8);
  transform-origin: top center;
}

.header {
  display: flex;
  justify-content: space-between;
  align-items: center;
  height: 20%;
}

.order-summary {
  margin-left: 1.5rem;
  padding: 1rem;
  display: flex;
  flex-direction: column;
}

.order-summary > div {
  margin: 6px;
}

.order-status {
  color: #338A9A;
  font-size: 0.9rem;
  font-weight: 700;
  letter-spacing: 0.5px;
}

.order-date {
  font-size: 1.5rem;
  font-weight: 700;
}

.order-day {
  color: #338A9A;
  font-size: 0.9rem;
  font-weight: 300;
  letter-spacing: 0.5px;
}

.back-btn {
  margin-right: 50px;
  font-size: 1rem;
     width: 40px;
    height: 40px;
    border-radius: 50%;
    text-align: center;
    box-shadow: 5px 5px 25px 0px rgba(0,0,0,0.2);
    display: flex;
    justify-content: center;
    align-items: center;
  transition: all 0.2s;
  cursor: pointer;
}

.back-btn:hover {
   transform: scale(1.2);
  box-shadow: 0 14px 28px rgba(0,0,0,0.25), 0 10px 10px rgba(0,0,0,0.22);
}

.hero-img-container {
  width: 100%;
  height: 300px;
   display: flex;
    justify-content: center;
    align-items: center;
  position: relative;
  padding-bottom: 20px;
}

.hero-img-container::before {
   height: 20px;
   width: 20px;
   background-color: #0268EE;
   position: absolute;
  top: 25px;
  right: 150px;
  content:'';
  border-radius: 50%;
}
  .arc {
    border: 1px solid #000;
    display: inline-block;
    min-width: 200px;
    min-height: 200px;
    padding: 0.5em;
    border-radius: 50%;
    border-top-color: transparent;
    border-left-color: transparent;
    border-bottom-color: transparent;
  opacity: 0.4;
    position:absolute;
    transform: rotate(-40deg);
    left: -10px;
}

.pattern {
  width: 50px;
  height: 50px;
 background-image: url("data:image/svg+xml;base64,PHN2ZyB4bWxucz0naHR0cDovL3d3dy53My5vcmcvMjAwMC9zdmcnIHdpZHRoPScxMCcgaGVpZ2h0PScxMCc+CiAgPHJlY3Qgd2lkdGg9JzEwJyBoZWlnaHQ9JzEwJyBmaWxsPSd3aGl0ZScgLz4KICA8Y2lyY2xlIGN4PSc0JyBjeT0nNCcgcj0nNCcgZmlsbD0nYmxhY2snLz4KPC9zdmc+");
  opacity: 0.1;
  position: absolute;
  right: 30px;
  top: 30px;
  transform: scale(1.2);
}

.triangle1 {
  width: 0;
height: 0;
border-style: solid;
border-width: 0 10px 20px 10px;
border-color: transparent transparent #767EEF transparent;
  position: absolute;
  top: 50px;
  left: 130px;
  transform:rotate(-45deg);
}

.hero-img {
  width: 80%;
}

.order-status-container {
  z-index: 3;
  display:flex;
  width: 100%;
  height: 30%;
  justify-content: space-evenly;
  align-items: center;
  background-color: white;
  border-top-right-radius: 50px;
  border-top-left-radius: 50px;
  position: relative;
   box-shadow: 0 14px 28px rgba(0,0,0,0.02), 0 10px 10px rgba(0,0,0,0.2);
}

.order-status-container::before {
  content:'';
  position:absolute;
  width: 70px;
  height: 3px;
  background-color: #EAEBFF;
  opacity: 0.8;
  border-radius: 2px;
  top:20px;
}

.status-item {
  display:flex;
  flex-direction:column;
  justify-content: flex-start;
  align-items: center;
  height: 150px;
  padding-top: 20px;
}

.status-item > div {
   margin: 10px;
}

.status-circle {
  height: 20px;
  width: 20px;
  background-color: #665CF5;
  border-radius: 50%;
  border: 5px solid white;
  box-shadow: 0 10px 20px rgba(0,0,0,0.19), 0 6px 6px rgba(0,0,0,0.23);
  z-index: 5;
  transition: all 0.2s;
  cursor: pointer;
}

.status-circle:hover {
  transform: scale(1.2);
  box-shadow: 0 14px 28px rgba(0,0,0,0.25), 0 10px 10px rgba(0,0,0,0.22);
}

.status-text {
  font-size: 0.8rem;
  font-weight: 500;
}

.status-text span {
  display: block;
  text-align: center;
  padding: 2px;
}

.green {
  color: #338A9A;
}

.first::before {
  content:'';
  height: 4px;
  width: 70px;
  background-color: #5858EF;
  position:absolute;
  z-index:4;
  top: 83px;
  left: 60px;
}

.second::before {
  content:'';
  height: 4px;
  width: 210px;
  background-color: #5858EF;
  position:absolute;
  z-index:4;
  top: 83px;
  left: 100px;
  opacity:0.2;
}

.order-details-container {
  position: relative;
  z-index: 6;
  height: 900px;
  background-color: #767EEF;
  border-top-right-radius: 50px;
  border-top-left-radius: 50px;
  padding-top: 20px;
  transform:translateY(-45px);
  box-shadow: 0 10px 20px rgba(0,0,0,0.19), 0 6px 6px rgba(0,0,0,0.23);
  cursor: default;
}

.odc-header {
  display: flex;
  justify-content: center;
  align-items: flex-start;
}

.cta-text {
  margin-top: 40px;
  margin-right: 25px;
  color: white;
  font-size: 0.9rem;
  text-shadow: 1px 1px 2px rgba(255,255,255,0.18);
}

.cta-button {
  margin-top:20px;
  padding: 20px 40px;
  background-color: #4E4DED;
  border: 0;
  border-radius: 10px;
  color: white;
  font-size: 1rem;
  font-weight: 500;
  box-shadow: 0 10px 20px rgba(0,0,0,0.10), 0 6px 6px rgba(0,0,0,0.05);
  animation: shadow-pulse 1s infinite;
  cursor:pointer;
}

@keyframes shadow-pulse
{
     0% {
          box-shadow: 0 0 0 0px rgba(255, 255, 255, 0.2);
     }
     100% {
          box-shadow: 0 0 0 35px rgba(255, 255, 255, 0);
     }
}

.cta-button:focus {
  outline:none;
}

.order-details-container::before {
  content:'';
  position:absolute;
  width: 70px;
  height: 3px;
  background-color: #EAEBFF;
  opacity: 0.8;
  border-radius: 2px;
  top:20px;
  left: 150px;
}

.odc-wrapper {
  margin:30px;
}

.odc-header-line {
  margin-top:30px;
  color: white;
  font-size: 1.5rem;
  font-weight: 500;
  margin-bottom: 40px
}

.odc-header-details {
  color:white;
  font-weight: bold;
  margin-bottom: 20px;
}

.product-container {
  background-color: #828AF1;
  border-radius: 20px;
  padding: 10px;
}

.product {
  display: flex;
  justify-content: flex-start;
  align-items: center;
}

.product span {
  display: block;
  color: white;
  margin-left: 25px;
  margin-bottom: 8px;
  flex-grow: 1;
}

.product span:first-child {
  font-weight: 300;
  font-size: 0.8rem;
}

.product span:last-child {
  font-weight: 500;
  font-size: 1.3rem;
}

.img-photo {
  width: 90px;
  transform: rotate(-35deg)
}

.cancellation {
  margin-top: 20px;
  background-color: #828AF1;
  border-radius: 20px;
  padding: 30px 20px;
    color:white;
  font-weight: bold;
  margin-bottom: 20px;
  text-align: center;
}

.shipping-desc {
  color:white;
  font-weight: bold;
  margin-bottom: 20px;
}

.shipping-address {
   margin-top: 20px;
  background-color: #828AF1;
  border-radius: 20px;
  padding: 20px 20px;
    color:white;
  font-weight: bold;
  margin-bottom: 20px;

}

.footer {
 position: absolute;
 bottom: 15px;
 right: 15px;
 font-size: 0.9rem;
}

.footer small {
    font-size: 0.7rem;
}

.footer a {
    color: #3273dc;
    cursor: pointer;
    text-decoration: none;
    border-bottom: 2px solid rgba(50,115,220,.1);
    padding-bottom: 2px;
}

.footer a:hover {
    color: #1e57b4;
    border-bottom-color: #1e57b4;
}Step1:In order to create the product card structure, we will first use the div element to create the container for our product card. Then, inside the div tag, we will use the div tag to create the header for the anticipated delivery, where we will add the heading and the date in that order.
Restaurant Website Using HTML And CSS With Source Code
We will now add an image to our product card using the img tag, and we will make a progress bar to monitor the order for our product delivery using the div tag. Then we will add the button for our product card using the basic button tag property, and we will also add the shipping location inside our product card using the div tag.
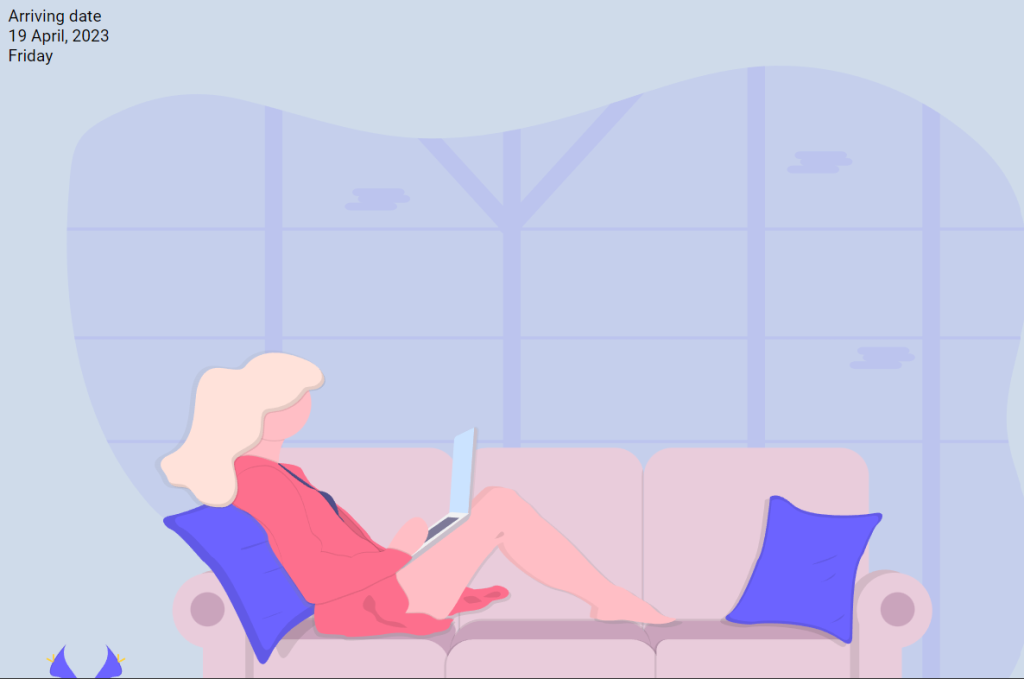
Step2:We will now style our container by adding formatting using the class selector (.cotainer), setting the display property to “flex,” and centering the content using the justify-content property. Our receptacle has the dimensions “100vh” and “100vw,” respectively.
We’ll now style the heading for our product card using the class selector. The display will be set to “flex” using the display property, and the content will be justified to the middle using the justify-content property. We will style our hero picture in addition to the header. We’ll set the width to 100%, the height to 300px using the height property, and the centering of the elements using the align item property.
Ecommerce Website Using HTML, CSS, and JavaScript (Source Code)

Step3 :We’ll do the styling now to the order state. We’ll use the z index property, the display property, and the display properties to change the backdrop colour property to “white,” the display property to “flex,” and the z index property to 3. Following the application of styling to each element, the content will be centered, the display flex and content justification properties will be defined, and each element will receive styling.
Now, using the background colour property, we will set the background of the product card to “purple.” Next, using the media query property, we will add responsiveness so that as the screen size decreases below the preset screen size, the content will automatically change its size.
Here is our updated output With Html and Css.
100+ HTML,CSS and JavaScript Projects With Source Code ( Beginners to Advanced)
Html + Css Output product card
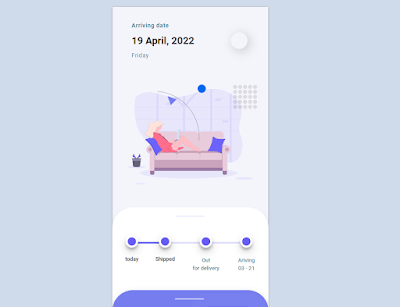
Note: we use JavaScript code for showing the card more information on click on the card and the information pop-up.
JavaScript Code For Product Card
//anime.js library
let drawer_open = false;

document.querySelector(".cta-button").addEventListener("mouseup",function(){
  cta_button_hide.play();
})

document.querySelector(".back-btn").addEventListener("mouseup",function(){
  if(drawer_open) {
  slidedown.play();
  cta_button_show.play();
  }
})

let cta_button_show = anime({
    targets: ['.cta-button','.cta-text'],
    translateY: ['-15','0'],
    opacity: ['0','1'],
    easing: 'easeInOutSine',
    delay: anime.stagger(200),
    autoplay: false,
    // loop: false
  duration: 500,
  complete: function(){
    }
  });

let cta_button_hide = anime({
    targets: ['.cta-button','.cta-text'],
    translateY: ['0','-15'],
    opacity: ['1','0'],
    easing: 'easeInOutSine',
    delay: anime.stagger(200),
    autoplay: false,
    // loop: false
  duration: 500,
  complete: function(){
      slideup.play();
    drawer_open = true;
    }
  });


let slidedown = anime({
    targets: '.order-details-container',
    translateY: ['-560','-40px'],
   duartion: 1000,
    autoplay: false,
    begin: function(){
      show_hideCTA("block");
      drawer_open = false;
    }
})

let slideup = anime({
    targets: '.order-details-container',
    translateY: ['-40px','-560px'],
    autoplay: false,
    begin: function(){
     show_hideCTA("none");
    }
})


function show_hideCTA(param){
    document.querySelector(".cta-button").style.display=param;
     document.querySelector(".cta-text").style.display=param;
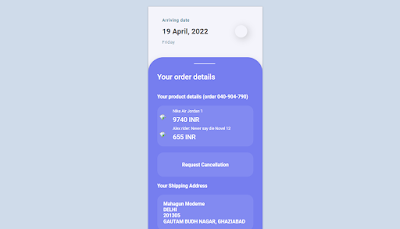
}Final Output Of Product Card Using HTML, CSS, and JavaScript:-

Live Preview Of Product Card:-
Weather App Using Html,Css And JavaScript
Video Output Of Product Card:
Now we have completed our Product Card. Here is our updated output with Html, Css, and JavaScript. Hope you like the Product card. you can see the output video and project screenshots. See our other blogs and gain knowledge in front-end development.
Thank you!
In this post, we learn how to create a Product Card using Html, Css, and JavaScript. If we made a mistake or any confusion, please drop a comment to reply or help you in easy learning.
Written by – Code With Random/Anki
ADVERTISEMENT
Codepen by – Aryankapoor
ADVERTISEMENT
Which code editor do you use for this Product Card coding?
I personally recommend using VS Code Studio, it’s straightforward and easy to use.
ADVERTISEMENT
What is a Product Card?
Any website shop must have a product card. Product labels ought to be mobile and PC device compatible and responsive. The product specifications, price, and other information are included in a product card that is used in various website components.
ADVERTISEMENT
What are the common element used to create a product card?
Images, symbols, buttons, backgrounds, and other components are the most frequently used components when making a product card.
ADVERTISEMENT
