Introduction
Welcome Back, Coder! To our another Codewithrandom blog. In this article, we will learn how to Create an Animated Tab Bar Using HTML, CSS, and JavaScript. This is an animated tab bar, which means when you click on active tabs it contains animation when you switch or click. This article is a beginner-friendly tutorial and you’ll learn How to apply Animations using CSS and JavaScript.
| Code by | abxlfazl khxrshidi |
| Project Download | Link Available Below |
| Language used | HTML , CSS and JavaScript |
| External link / Dependencies | No |
| Responsive | Yes |
50+ HTML, CSS and JavaScript Projects With Source Code
HTML Code For Animated Tab Bar
<html lang="en">
<head>
    <meta charset="UTF-8">
    <meta http-equiv="X-UA-Compatible" content="IE=edge">
    <meta name="viewport" content="width=device-width, initial-scale=1.0">
    <title>Animated Tab Bar v.2</title>
    <link rel="stylesheet" href="style.css">
</head>
<body>
    <menu class="menu">

        <button class="menu__item active">
            <div class="menu__icon" >

                <svg class="icon" xmlns="http://www.w3.org/2000/svg" viewBox="0 0 179.1 145" >

                    <g id="home-anm">
                        <path stroke-linejoin="round"  stroke-linecap="round" d="M70.5,80.1h40.7"/>
                        <path d="M35,64v80"/>
                        <path d="M145.1,143V63"/>
                        <path stroke-linecap="round" stroke-linejoin="round" d="M24.9,70l65.7-50.7L156.3,70"/>
                    </g>

                    <path stroke-linejoin="round" d="M145.1,117.6v33.1c0,1.5-1.2,2.8-2.8,2.8h-28.4c-1.5,0-2.8-1.2-2.8-2.8V126c0-11.3-9.2-20.5-20.5-20.5l0,0
                    c-11.3,0-20.5,9.2-20.5,20.5v27.5h16H37.8c-1.5,0-2.8-1.2-2.8-2.8v-34.2"/>

                </svg>

            </div>
            <strong class="menu__text active">home</strong>
        </button>

        <button class="menu__item">
            <div class="menu__icon" >

                <svg class="icon" xmlns="http://www.w3.org/2000/svg" viewBox="0 0 179.1 145">

                    <g id="strategy-anm" >
                        <path d="M84.1,50.4L72,64.7c-2,2.4-5.2,3.5-8.3,3l-40.1-6.8c-3.2-0.6-5.8,2.4-4.8,5.5L42,127.9c1.2,3.6,4.6,6.1,8.4,6.1
                        h81.6c3.9,0,7.3-2.6,8.5-6.3l21.5-61.4c0.9-3-1.7-6-4.9-5.4l-38.3,6.7c-3,0.6-6.2-0.5-8.2-2.8L97.4,50.2
                        C93.8,46.3,87.6,46.3,84.1,50.4z"/>
                    </g>
                    <path stroke-linecap="round" d="M38.8,153.5h105.5"/>
                    <path stroke-linecap="round" d="M66.8,112.5h49.5"/>
                    <path id="strategy-cir1" stroke-width="0" fill="currentColor" d="M32.4,37.5c0,5.8-4.7,10.5-10.5,10.5s-10.5-4.7-10.5-10.5S16.1,27,21.9,27S32.4,31.7,32.4,37.5z"/>
                    <path id="strategy-cir2" stroke-width="0" fill="currentColor" d="M102.3,23.5c0,5.8-4.7,10.5-10.5,10.5s-10.5-4.7-10.5-10.5S86,13,91.8,13S102.3,17.7,102.3,23.5z"/>
                    <path id="strategy-cir3" stroke-width="0" fill="currentColor" d="M169.6,37.5c0,5.8-4.7,10.5-10.5,10.5s-10.5-4.7-10.5-10.5S153.3,27,159.1,27S169.6,31.7,169.6,37.5z"/>

                </svg>

            </div>
            <strong class="menu__text">strategy</strong>
        </button>

        <button class="menu__item">
            <div class="menu__icon" >

                <svg class="icon"  xmlns="http://www.w3.org/2000/svg" viewBox="0 0 179.1 145" >

                    <g id="period-cir">
                        <path fill="currentColor" stroke-width="0" d="M96.5,141.7c0,3.9-3.1,7-7,7s-7-3.1-7-7s3.1-7,7-7C93.4,134.6,96.5,137.8,96.5,141.7z"/>
                        <path fill="currentColor" stroke-width="0" d="M78.2,126.7c0,3.9-3.1,7-7,7s-7-3.1-7-7c0-3.9,3.1-7,7-7S78.2,122.8,78.2,126.7z"/>
                        <path fill="currentColor" stroke-width="0" d="M110.6,120.5c0,3.9-3.1,7-7,7s-7-3.1-7-7s3.1-7,7-7S110.6,116.6,110.6,120.5z"/>

                    </g>
                    <g id="period-anm">
                        <path stroke-linecap="round" d="M30.8,24.7h118.3 M117.3,71.2l9.7-6.7c0.7-0.4,1.1-1.1,1.1-1.9V24.7H50v37.8"/>
                        <path stroke-linecap="round" d="M149.4,153.3H30.6 M75.5,90.7l-23.1,21.2c-1.6,1.4-2.4,3.4-2.4,5.6v35.9h78.1V113"/>
                        <g id="period-line">
                            <path stroke-linecap="round" d="M50,62.5l40,44.2"/>
                            <path stroke-linecap="round" d="M128.1,111.7L95.2,73.4"/>
                        </g>
                    </g>

                </svg>

            </div>
            <strong class="menu__text">period</strong>
        </button>

        <button class="menu__item">
            <div class="menu__icon" >

                <svg class="icon" xmlns="http://www.w3.org/2000/svg" viewBox="0 0 179.1 145" >

                    <path stroke-linecap="round" d="M94,139c-4.8,1.3-8.8,1.7-11.4,1.8c0,0-18.3,1.1-36.9-11.6c-1.9-1.3-4.7-3.2-7.8-6.2c-1.7-1.6-2.9-2.9-3.4-3.6
                    c0,0-3.6-4.2-6.1-8.6c-4.6-8.4-5.4-18.9-5.5-21l0,0V75.5v-39c0-0.7,0.5-1.3,1.2-1.5l58-14.2c0.2-0.1,0.5-0.1,0.7,0l57.9,14.7
                    c0.7,0.2,1.1,0.8,1.1,1.5v29.7"/>
                    <path id="security-cir" stroke-linecap="round" d="M158.3,120.7c0,18.3-14.8,33.1-33.1,33.1s-33-14.8-33-33.1s14.8-33.1,33.1-33.1S158.3,102.4,158.3,120.7z"/>
                    <g id="security-strok">
                        <path stroke-linecap="round" d="M151.1,104.5l-25,25c-1.3,1.3-3.5,1.3-4.9,0l-9.1-9.1"/>
                        <path stroke-linecap="round" d="M82.6,43L23.1,62.3"/>
                        <path stroke-linecap="round" d="M82.6,68.4L23.1,87.6"/>
                    </g>

                </svg>

            </div>
            <strong class="menu__text">security</strong>
        </button>

        <button class="menu__item">
            <div class="menu__icon" >

                <svg class="icon" xmlns="http://www.w3.org/2000/svg" viewBox="0 0 179.1 145" >

                    <circle cx="90.5" cy="90.2" r="19.7"/>
                    <g id="settings-anm" >
                        <path stroke-linejoin="round" d="M144.7,73.8l-6.2-1c-0.6-1.5-1.2-3-1.9-4.5l3.6-5.1c3.2-4.4,2.7-10.5-1.2-14.3l-7.4-7.4
                        c-2.1-2.1-4.9-3.3-7.8-3.3c-2.3,0-4.5,0.7-6.4,2.1l-5.1,3.6c-1.6-0.7-3.2-1.4-4.8-2l-1-6.1c-0.9-5.4-5.5-9.3-10.9-9.3H85.1
                        c-5.4,0-10,3.9-10.9,9.2L73.1,42c-1.5,0.6-3,1.2-4.5,1.9l-5-3.6c-1.9-1.4-4.1-2.1-6.5-2.1c-3,0-5.8,1.2-7.8,3.3l-7.4,7.4
                        c-3.8,3.8-4.3,9.8-1.2,14.3l3.7,5.2c-0.7,1.5-1.3,3-1.8,4.5l-6.1,1c-5.4,0.9-9.3,5.5-9.3,10.9v10.5c0,5.4,3.9,10,9.2,10.9l6.3,1.1
                        c0.6,1.5,1.2,3,1.9,4.5l-3.6,5c-3.2,4.4-2.7,10.5,1.2,14.3l7.4,7.4c2.1,2.1,4.9,3.3,7.8,3.3c2.3,0,4.5-0.7,6.4-2.1L69,136
                        c1.4,0.6,2.8,1.2,4.2,1.7l1,6.2c0.9,5.4,5.5,9.3,10.9,9.3h10.5c5.4,0,10-3.9,10.9-9.2l1-6.2c1.5-0.6,3-1.2,4.5-1.9l5.1,3.6
                        c1.9,1.4,4.1,2.1,6.5,2.1c3,0,5.7-1.2,7.8-3.3l7.4-7.4c3.8-3.8,4.3-9.8,1.2-14.3l-3.6-5.1c0.7-1.5,1.3-3,1.9-4.5l6.2-1
                        c5.4-0.9,9.3-5.5,9.3-10.9V84.8C153.9,79.3,150.1,74.7,144.7,73.8z"/>
                    </g>

                </svg>

            </div>
            <strong class="menu__text">settings</strong>
        </button>

    </menu>
    <script src="app.js"></script>
</body>
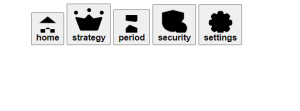
</html>There is all the HTML Code for the Tab Bar Animation. Now, you can see an Output Without Css and JavaScript. then we write Css JavaScript for the Tab Bar Animation.
100+ JavaScript Projects With Source Code ( Beginners to Advanced)
HTML Code output
CSS Code For Tab Bar
@import url("https://fonts.googleapis.com/css2?family=Nunito:wght@800&display=swap");

html {
  box-sizing: border-box;
  --duration: 0.45s;
  --cubic: cubic-bezier(0.4, 0, 0.2, 1);
  --color-1: #d5dadd;
  --color-2: #51d5c2;
}

html *,
html *::before,
html *::after {
  box-sizing: inherit;
}

body {
  margin: 0;
  height: 100vh;
  display: flex;
  overflow: hidden;
  align-items: center;
  justify-content: center;
  background-color: #f0f1f1;
  font-family: "Nunito", sans-serif;
}

.menu {
  margin: 0;
  width: 42em;
  display: flex;
  height: 10.4em;
  user-select: none;
  position: relative;
  align-items: center;
  padding: 0 1.9em 2.5em;
  justify-content: center;
  background-color: #fefefe;
  border-radius: 1em 1em 4.5em 4.5em;
  -webkit-tap-highlight-color: transparent;
}

@media (max-width: 42.625em) {
  .menu {
    font-size: 0.55em;
  }
}

.menu::after {
  height: 5%;
  width: 35%;
  bottom: 10%;
  content: " ";
  position: absolute;
  border-radius: 1em;
  background-color: #f2f3f4;
}

.menu__item {
  all: unset;
  flex-grow: 1;
  display: flex;
  cursor: pointer;
  overflow: hidden;
  padding-top: 0.5em;
  position: relative;
  align-items: center;
  color: var(--color-1);
  justify-content: center;
  transition: flex-grow var(--duration) var(--cubic);
}

.menu__icon {
  font-size: 1.05em;
  stroke: currentColor;
  transition: transform var(--duration) var(--cubic);
}

.menu__item::before {
  top: 9%;
  left: 18.4%;
  width: 1.5em;
  height: 1.5em;
  content: " ";
  position: absolute;
  border-radius: 50%;
  transform: scale(0);
  transform-origin: center;
  background-color: #fdecef;
  transition: transform var(--duration) var(--cubic);
}

.menu__item::after {
  left: 0;
  bottom: 0;
  content: " ";
  height: 0.25em;
  position: absolute;
  border-radius: 2em;
  transform-origin: left center;
  background-color: currentColor;
  width: calc(var(--lineWidth) + 5px);
  transform: translate3d(3em, 0, 0) scaleX(0);
  transition: transform calc(var(--duration) + 0.2s) var(--cubic);
}

.menu__text {
  left: 4.15em;
  font-size: 1.5em;
  position: absolute;
  text-transform: capitalize;
  letter-spacing: 0.01em;
  transform: translate3d(0, 109%, 0);
  transition: transform calc(var(--duration) / 3.7);
}

.menu__item.active {
  flex-grow: 2.7;
  color: var(--color-2);
}

.menu__item.active .menu__icon {
  transform: translate3d(-95%, 0, 0);
}

.menu__item.active::before {
  transform: scale(1);
}

.menu__item.active::after {
  transform: translate3d(6.3em, 0, 0) scaleX(1);
  transition: transform var(--duration) var(--cubic);
}

.menu__text.active {
  transform: translate3d(0, 0, 0);
  transition: transform calc(var(--duration) / 1.5);
}

.icon {
  --duration-icon: 1s;

  fill: none;
  width: 2.5em;
  height: 2.5em;
  display: block;
  stroke-width: 15;
  stroke-miterlimit: 10;
}

.active #home-anm {
  animation: home var(--duration-icon);
}

@keyframes home {
  25% {
    transform: translate3d(0, -0.8em, 0);
  }

  50% {
    transform: translate3d(0, 0.5em, 0);
  }
}

#strategy-anm {
  transform: scaleX(0.85);
  transform-origin: center;
}

.active #strategy-anm {
  animation: strategy var(--duration-icon);
}

@keyframes strategy {
  50% {
    transform: scaleX(1);
  }

  100% {
    transform: scaleX(0.85);
  }
}

.active #strategy-cir1 {
  animation: strategy-cir1 var(--duration-icon);
}

.active #strategy-cir2 {
  animation: strategy-cir2 var(--duration-icon) 0.1s;
}

.active #strategy-cir3 {
  animation: strategy-cir3 var(--duration-icon) 0.2s;
}

@keyframes strategy-cir1 {
  50% {
    transform: translate3d(-0.7em, -0.7em, 0);
  }

  100% {
    transform: translate3d(0, 0, 0);
  }
}

@keyframes strategy-cir2 {
  35% {
    transform: translate3d(0, -0.7em, 0);
  }

  100% {
    transform: translate3d(0, 0, 0);
  }
}

@keyframes strategy-cir3 {
  35% {
    transform: translate3d(0.7em, -0.7em, 0);
  }

  100% {
    transform: translate3d(0, 0, 0);
  }
}

.active #period-anm {
  transform-origin: center 100%;
  animation: period var(--duration-icon);
}

.active #period-cir {
  transform-origin: center;
  animation: period-cir var(--duration-icon);
}

.active #period-line {
  stroke-dasharray: 66;
  animation: period-line calc(var(--duration-icon) / 2.5) reverse;
}

@keyframes period {
  35% {
    transform: scaleY(0.85);
  }

  60%,
  70% {
    transform: scaleY(1.2);
  }

  100% {
    transform: scaleY(1);
  }
}

@keyframes period-cir {
  0% {
    opacity: 0;
  }

  35% {
    opacity: 1;
    transform: translate3d(15%, -55%, 0);
  }

  60% {
    opacity: 0;
    transform: translate3d(-8%, -50%, 0);
  }
}

@keyframes period-line {
  100% {
    stroke-dashoffset: 66;
  }
}

.active #security-cir {
  transform-box: fill-box;
  transform-origin: center;
  animation: security-cir calc(var(--duration-icon) / 1.5);
}

@keyframes security-cir {
  0% {
    transform: scale(0);
  }

  100% {
    transform: scale(1);
  }
}

.active #security-strok {
  stroke-dasharray: 96;
  animation: security-strok calc(var(--duration-icon) / 1.2);
}

@keyframes security-strok {
  0% {
    stroke-dashoffset: 60;
  }

  100% {
    stroke-dashoffset: 230;
  }
}

.active #settings-anm {
  transform-box: fill-box;
  transform-origin: center;
  animation: settings-anm calc(var(--duration-icon) / 1.5);
}

@keyframes settings-anm {
  0% {
    transform: rotate(-60deg);
  }

  50% {
    transform: rotate(60deg);
  }
}
Step1:We will import the Nunito typeface using the Google import. We’ll specify the box size to “border box” using the HTML tag selector.
Ecommerce Website Using HTML, CSS, and JavaScript (Source Code)
The margin will be set to “zero” using the body tag selector, and the height will be set to “100vh” using the height property. The display will be set to “flex” using the display property, and the background will be set to grey using the background property. The typeface will be set to “nunito” using the font property.
@import url('https://fonts.googleapis.com/css2?family=Nunito:wght@800&display=swap');

html {

    box-sizing: border-box ;
    --duration: .45s ;
    --cubic: cubic-bezier(0.4, 0, 0.2, 1) ;
    --color-1: #d5dadd ;
    --color-2: #51d5c2 ;

}

html *,
html *::before,
html *::after {

    box-sizing: inherit ;

}

body {

    margin: 0 ;
    height: 100vh ;
    display: flex ;
    overflow: hidden ;
    align-items: center ;
    justify-content: center ;
    background-color: #f0f1f1 ;
    font-family: 'Nunito', sans-serif ;

}
Step2:The margin will be set to zero using the class identifier “.menu,” the width will be set to “42 px,” the item will be centred using the align property, and responsiveness will be added to our project using the media query property.
.menu {

    margin: 0 ;
    width: 42em ;
    display: flex ;
    height: 10.4em ;
    user-select: none ;
    position: relative ;
    align-items: center ;
    padding: 0 1.9em 2.5em ;
    justify-content: center ;
    background-color: #fefefe ;
    border-radius: 1em 1em 4.5em 4.5em ;
    -webkit-tap-highlight-color: transparent ;

}

@media (max-width: 42.625em) {

  .menu {

    font-size: .55em ;

  }

}

.menu::after {

    height: 5% ;
    width: 35% ;
    bottom: 10% ;
    content: " " ;
    position: absolute ;
    border-radius: 1em ;
    background-color: #f2f3f4 ;


}

.menu__item {

    all: unset ;
    flex-grow: 1 ;
    display: flex ;
    cursor: pointer ;
    overflow: hidden ;
    padding-top: 0.5em ;
    position: relative ;
    align-items: center ;
    color: var(--color-1) ;
    justify-content: center ;
    transition: flex-grow var(--duration) var(--cubic) ;

}Step3:Using the class selector, we will now style the menu images. (icon). We’ll use the display attribute to set the display as block and set the width and height to “2.5” and “2.5,” respectively. The keyframes will now be added to our tab menu effects using the keyframes attribute.
.icon {

    --duration-icon: 1s ;

    fill: none ;
    width: 2.5em ;
    height: 2.5em ;
    display: block ;
    stroke-width: 15 ;
    stroke-miterlimit: 10 ;

}


.active #home-anm {

    animation: home var(--duration-icon) ;
}

@keyframes home {

    25% {

        transform: translate3d(0, -.8em , 0) ;

    }

    50% {

        transform: translate3d(0, .5em , 0) ;

    }


}

#strategy-anm {

    transform: scaleX(.85) ;
    transform-origin: center ;

}

.active #strategy-anm {

    animation: strategy var(--duration-icon) ;

}

@keyframes strategy {

    50% {

        transform: scaleX(1) ;

    }

    100%{

        transform: scaleX(.85) ;

    }

}

.active #strategy-cir1 {

    animation: strategy-cir1 var(--duration-icon);
}

.active #strategy-cir2 {

    animation: strategy-cir2 var(--duration-icon) .1s;
}

.active #strategy-cir3 {

    animation: strategy-cir3 var(--duration-icon) .2s;
}

@keyframes strategy-cir1 {

    50% {

        transform: translate3d(-.7em,-0.7em,0);

    }

    100%{

        transform: translate3d(0,0,0);


    }

}

@keyframes strategy-cir2 {

    35% {

        transform: translate3d(0,-0.7em,0);

    }

    100%{

        transform: translate3d(0,0,0);


    }

}

@keyframes strategy-cir3 {

    35% {

        transform: translate3d(.7em,-0.7em,0);

    }

    100%{

        transform: translate3d(0,0,0);


    }

}


.active #period-anm {

    transform-origin: center 100% ;
    animation: period var(--duration-icon) ;

}

.active #period-cir {

    transform-origin: center ;
    animation: period-cir var(--duration-icon) ;

}

.active #period-line {

    stroke-dasharray: 66 ;
    animation: period-line calc( var(--duration-icon) / 2.5 ) reverse ;

}


@keyframes period {

    35% {

        transform: scaleY(.85) ;

    }

    60% , 70% {

        transform: scaleY(1.2) ;

    }

    100% {

        transform: scaleY(1) ;

    }

}

@keyframes period-cir {

    0%{

       opacity: 0 ;

    }

    35% {

        opacity: 1 ;
        transform: translate3d(15%, -55%, 0) ;

    }

    60%{

        opacity: 0 ;
        transform: translate3d(-8%, -50%, 0) ;

    }

}

@keyframes period-line {


    100% {

        stroke-dashoffset: 66 ;

    }

}


.active #security-cir {

    transform-box: fill-box ;
    transform-origin: center ;
    animation: security-cir calc( var(--duration-icon) / 1.5 ) ;

}

@keyframes security-cir {


    0% {

        transform: scale(0) ;

    }

    100% {

        transform: scale(1) ;

    }

}

.active #security-strok {

    stroke-dasharray: 96;
    animation: security-strok calc( var(--duration-icon) / 1.2 ) ;

}

@keyframes security-strok {


    0% {

        stroke-dashoffset: 60 ;

    }

    100% {

        stroke-dashoffset: 230 ;

    }

}

.active #settings-anm {

    transform-box: fill-box ;
    transform-origin: center ;
    animation: settings-anm calc( var(--duration-icon) / 1.5 ) ;

}

@keyframes settings-anm {


    0% {

        transform: rotate(-60deg);

    }

    50% {

        transform: rotate(60deg);

    }

}
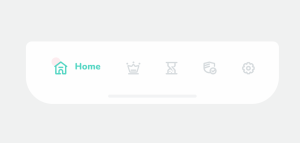
There is all the CSS Code for the Tab Bar Animation. Now, you can see an Output Without JavaScript. then we write JavaScript Code For Main Functiloty for the Tab Bar Animation.
Create Resume/CV Website Using HTML and CSS (Source Code)
CSS Output For Animated Tab Bar
JavaScript Code For Tab Bar Animation
Below You’ll find the JavaScript code for the Animated Tab bar. Javascript will provide the functioning of our HTML and CSS Code.
// Designed by: Hoang Nguyen
// Original image: https://dribbble.com/shots/5919154-Tab-Bar-Label-Micro-Interaction

const buttons = document.querySelectorAll(".menu__item");
let activeButton = document.querySelector(".menu__item.active");

buttons.forEach(item => {

    const text = item.querySelector(".menu__text");
    setLineWidth(text, item);

    window.addEventListener("resize", () => {
        setLineWidth(text, item);
    })

    item.addEventListener("click", function () {
        if (this.classList.contains("active")) return;

        this.classList.add("active");

        if (activeButton) {
            activeButton.classList.remove("active");
            activeButton.querySelector(".menu__text").classList.remove("active");
        }

        handleTransition(this, text);
        activeButton = this;

    });


});


function setLineWidth(text, item) {
    const lineWidth = text.offsetWidth + "px";
    item.style.setProperty("--lineWidth", lineWidth);
}

function handleTransition(item, text) {

    item.addEventListener("transitionend", (e) => {

        if (e.propertyName != "flex-grow" ||
            !item.classList.contains("active")) return;

        text.classList.add("active");

    });

}
We will first pick all of the HTML from the document within our javascript. When we as the user click the button, the list of that icon will be added and the prior class will be removed. Along with that, we will also add animation to our tab menu using the queryselectorAll method and the for each function for the button.
Final Output Of Animated Tab Bar Using HTML,CSS, and JavaScript
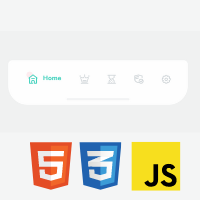
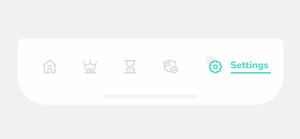
Live Preview Of Tab Bar Animation:
Below you’ll see the Animated Tab Bar Codepen Live preview so that you can analyze and have better visulization.
I hope you like the Tab Bar Animation. you can see the output video and project screenshots. See our other blogs and gain knowledge in front-end development.
Conclusion
So Today we learned how to create an Animated Tab Bar Using HTML, CSS, and JavaScript most efficiently. I hope you learned something new today. If we made a mistake or any confusion, please drop a comment to reply or help you in easy learning.
Article By – Code With Random/Anki
ADVERTISEMENT
Code By – abxlfazl khxrshidi
ADVERTISEMENT
Which code editor do you use for this Tab Bar Animation coding?
What is the Tab Bar Menu?
What are the benefits of the Tab Bar Menu?
1. Easy to navigate
3. User Friendly.
Happy Coding!
ADVERTISEMENT

