Rich Text Editor using HTML, CSS & JavaScript
Introduction
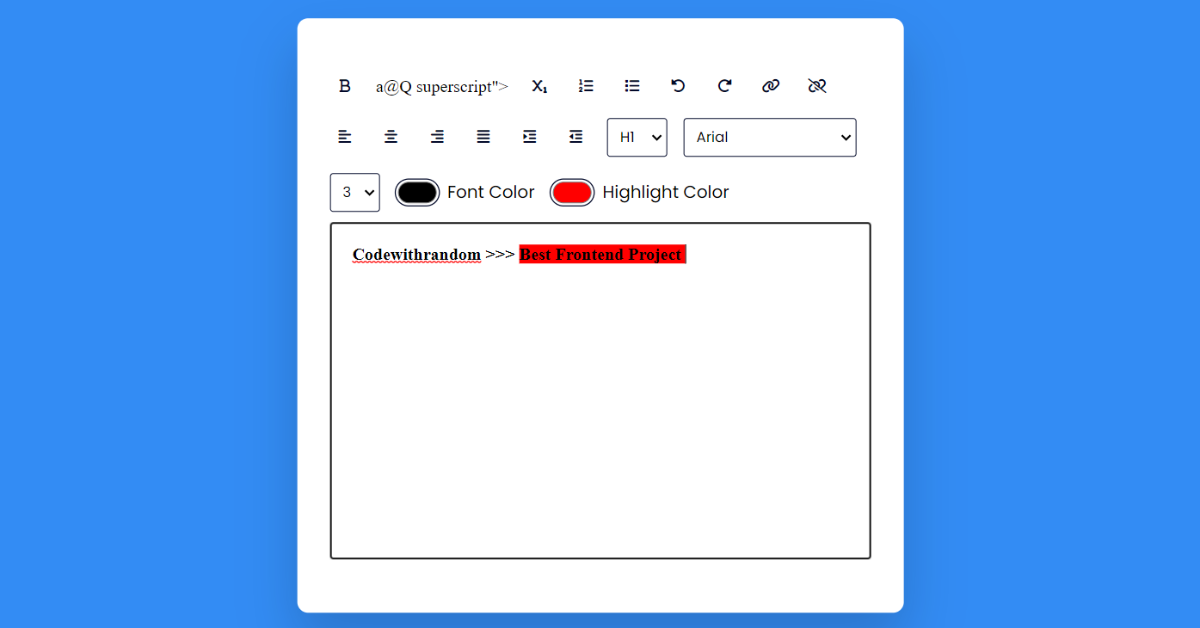
Hello everyone. Welcome to today’s tutorial on Codewithrandom. We’ll learn how to make Rich Text Editor which will generate a text editor in which the user can change the font color can make the character bold & italic can set the font size undo & redo etc. This project will is good for beginners and help them to build their front-end development skills. In Today’s session, We will use HTML, CSS, and JavaScript to complete this Rich Text Editor Project.

Project Description
Step 1
The HTML (Hypertext Markup Language) will help us to create the structure for the list with some necessary attributes and elements to make Rich Text Editor Project.
Step 2
Then we will use CSS (Cascading Stylesheet) which will help us to style or design the project with suitable padding and alignment in the Rich Text Editor Project.
Step 3
At last we will use JS (JavaScript) which will add a logic to make the Rich Text Editor Project responsive from the user end.
I hope you have got an idea about the project.
HTML Code for Rich Text Editor
First we’ll start with creating the structure of the Rich Text Editor project for that as you can see the above code we have used all the necessary elements & attributes to setup the structure. Let us know code the CSS part to add styling and aligned the tags.
<html lang="en">
  <head>
    <meta name="viewport" content="width=device-width, initial-scale=1.0" />
    <title>Rich Text Editor</title>
    <!-- FontAwesome Icons -->
    <link
      rel="stylesheet"
      href="https://cdnjs.cloudflare.com/ajax/libs/font-awesome/6.1.1/css/all.min.css"
    />
    <!-- Google Fonts -->
    <link
      href="https://fonts.googleapis.com/css2?family=Poppins&display=swap"
      rel="stylesheet"
    />
    <!-- Stylesheet -->
    <link rel="stylesheet" href="style.css" />
  </head>
  <body>
    <div class="container">
      <div class="options">
        <!-- Text Format -->
        <button id="bold" class="option-button format">
          <i class="fa-solid fa-bold"></i>
        </button>a@Q
        superscript"></i>
        </button>
        <button id="subscript" class="option-button script">
          <i class="fa-solid fa-subscript"></i>
        </button>

        <!-- List -->
        <button id="insertOrderedList" class="option-button">
          <div class="fa-solid fa-list-ol"></div>
        </button>
        <button id="insertUnorderedList" class="option-button">
          <i class="fa-solid fa-list"></i>
        </button>

        <!-- Undo/Redo -->
        <button id="undo" class="option-button">
          <i class="fa-solid fa-rotate-left"></i>
        </button>
        <button id="redo" class="option-button">
          <i class="fa-solid fa-rotate-right"></i>
        </button>

        <!-- Link -->
        <button id="createLink" class="adv-option-button">
          <i class="fa fa-link"></i>
        </button>
        <button id="unlink" class="option-button">
          <i class="fa fa-unlink"></i>
        </button>

        <!-- Alignment -->
        <button id="justifyLeft" class="option-button align">
          <i class="fa-solid fa-align-left"></i>
        </button>
        <button id="justifyCenter" class="option-button align">
          <i class="fa-solid fa-align-center"></i>
        </button>
        <button id="justifyRight" class="option-button align">
          <i class="fa-solid fa-align-right"></i>
        </button>
        <button id="justifyFull" class="option-button align">
          <i class="fa-solid fa-align-justify"></i>
        </button>
        <button id="indent" class="option-button spacing">
          <i class="fa-solid fa-indent"></i>
        </button>
        <button id="outdent" class="option-button spacing">
          <i class="fa-solid fa-outdent"></i>
        </button>

        <!-- Headings -->
        <select id="formatBlock" class="adv-option-button">
          <option value="H1">H1</option>
          <option value="H2">H2</option>
          <option value="H3">H3</option>
          <option value="H4">H4</option>
          <option value="H5">H5</option>
          <option value="H6">H6</option>
        </select>

        <!-- Font -->
        <select id="fontName" class="adv-option-button"></select>
        <select id="fontSize" class="adv-option-button"></select>

        <!-- Color -->
        <div class="input-wrapper">
          <input type="color" id="foreColor" class="adv-option-button" />
          <label for="foreColor">Font Color</label>
        </div>
        <div class="input-wrapper">
          <input type="color" id="backColor" class="adv-option-button" />
          <label for="backColor">Highlight Color</label>
        </div>
      </div>
      <div id="text-input" contenteditable="true"></div>
    </div>
    <!--Script-->
    <script src="script.js"></script>
  </body>
</html>
Weather App Using Html,Css And JavaScript
CSS Code for Rich Text Editor
Second comes the CSS code in which we have styled for the structure we have padded as well as aligned the Rich Text Editor project so that it is properly situated and doesn’t get messy with suitable CSS elements. Now we have created the structure using HTML and styled the webpage using CSS its time to add the functionality using JavaScript in this project.
* {
  padding: 0;
  margin: 0;
  box-sizing: border-box;
}
body {
  background-color: #338cf4;
}
.container {
  background-color: #ffffff;
  width: 90vmin;
  padding: 50px 30px;
  position: absolute;
  transform: translate(-50%, -50%);
  left: 50%;
  top: 50%;
  border-radius: 10px;
  box-shadow: 0 25px 50px rgba(7, 20, 35, 0.2);
}
.options {
  display: flex;
  flex-wrap: wrap;
  align-items: center;
  gap: 15px;
}
button {
  height: 28px;
  width: 28px;
  display: grid;
  place-items: center;
  border-radius: 3px;
  border: none;
  background-color: #ffffff;
  outline: none;
  color: #020929;
}
select {
  padding: 7px;
  border: 1px solid #020929;
  border-radius: 3px;
}
.options label,
.options select {
  font-family: "Poppins", sans-serif;
}
.input-wrapper {
  display: flex;
  align-items: center;
  gap: 8px;
}
input[type="color"] {
  -webkit-appearance: none;
  -moz-appearance: none;
  appearance: none;
  background-color: transparent;
  width: 40px;
  height: 28px;
  border: none;
  cursor: pointer;
}
input[type="color"]::-webkit-color-swatch {
  border-radius: 15px;
  box-shadow: 0 0 0 2px #ffffff, 0 0 0 3px #020929;
}
input[type="color"]::-moz-color-swatch {
  border-radius: 15px;
  box-shadow: 0 0 0 2px #ffffff, 0 0 0 3px #020929;
}
#text-input {
  margin-top: 10px;
  border: 1px solid #dddddd;
  padding: 20px;
  height: 50vh;
}
.active {
  background-color: #e0e9ff;
}
100+ JavaScript Projects With Source Code ( Beginners to Advanced)
JavaScript Code for Rich Text Editor
Last stage of the project the JavaScript in which we have added the logical and coded as per the requirement with some conditions. We have made each define function responsive from the user end and added logic to it so that it can figure out when to execute. Let us see the Final Output of the project Rich Text Editor using HTML, CSS & JavaScript (Source Code).
let optionsButtons = document.querySelectorAll(".option-button");
let advancedOptionButton = document.querySelectorAll(".adv-option-button");
let fontName = document.getElementById("fontName");
let fontSizeRef = document.getElementById("fontSize");
let writingArea = document.getElementById("text-input");
let linkButton = document.getElementById("createLink");
let alignButtons = document.querySelectorAll(".align");
let spacingButtons = document.querySelectorAll(".spacing");
let formatButtons = document.querySelectorAll(".format");
let scriptButtons = document.querySelectorAll(".script");

//List of fontlist
let fontList = [
  "Arial",
  "Verdana",
  "Times New Roman",
  "Garamond",
  "Georgia",
  "Courier New",
  "cursive",
];

//Initial Settings
const initializer = () => {
  //function calls for highlighting buttons
  //No highlights for link, unlink,lists, undo,redo since they are one time operations
  highlighter(alignButtons, true);
  highlighter(spacingButtons, true);
  highlighter(formatButtons, false);
  highlighter(scriptButtons, true);

  //create options for font names
  fontList.map((value) => {
    let option = document.createElement("option");
    option.value = value;
    option.innerHTML = value;
    fontName.appendChild(option);
  });

  //fontSize allows only till 7
  for (let i = 1; i <= 7; i++) {
    let option = document.createElement("option");
    option.value = i;
    option.innerHTML = i;
    fontSizeRef.appendChild(option);
  }

  //default size
  fontSizeRef.value = 3;
};

//main logic
const modifyText = (command, defaultUi, value) => {
  //execCommand executes command on selected text
  document.execCommand(command, defaultUi, value);
};

//For basic operations which don't need value parameter
optionsButtons.forEach((button) => {
  button.addEventListener("click", () => {
    modifyText(button.id, false, null);
  });
});

//options that require value parameter (e.g colors, fonts)
advancedOptionButton.forEach((button) => {
  button.addEventListener("change", () => {
    modifyText(button.id, false, button.value);
  });
});

//link
linkButton.addEventListener("click", () => {
  let userLink = prompt("Enter a URL");
  //if link has http then pass directly else add https
  if (/http/i.test(userLink)) {
    modifyText(linkButton.id, false, userLink);
  } else {
    userLink = "http://" + userLink;
    modifyText(linkButton.id, false, userLink);
  }
});

//Highlight clicked button
const highlighter = (className, needsRemoval) => {
  className.forEach((button) => {
    button.addEventListener("click", () => {
      //needsRemoval = true means only one button should be highlight and other would be normal
      if (needsRemoval) {
        let alreadyActive = false;

        //If currently clicked button is already active
        if (button.classList.contains("active")) {
          alreadyActive = true;
        }

        //Remove highlight from other buttons
        highlighterRemover(className);
        if (!alreadyActive) {
          //highlight clicked button
          button.classList.add("active");
        }
      } else {
        //if other buttons can be highlighted
        button.classList.toggle("active");
      }
    });
  });
};

const highlighterRemover = (className) => {
  className.forEach((button) => {
    button.classList.remove("active");
  });
};

window.onload = initializer();
Output
Live Preview of Rich Text Editor using HTML, CSS & JavaScript (Source Code)
See the Pen
Text by Harsh Sawant (@harshh9)
on CodePen.
We have Successfully created our Rich Text Editor using HTML, CSS & JavaScript (Source Code). You can use this project for your personal needs and the respective lines of code are given with the code pen link mentioned above.
If you find out this Blog helpful, then make sure to search code with random on google for Front End Projects with Source codes and make sure to Follow the Code with Random Instagram page.
Code Idea – codingartist
Written By – Harsh Sawant
Code By – @harshh9


