JQuery Vertical Carousel Using HTML,CSS And JAVASCRIPT Code
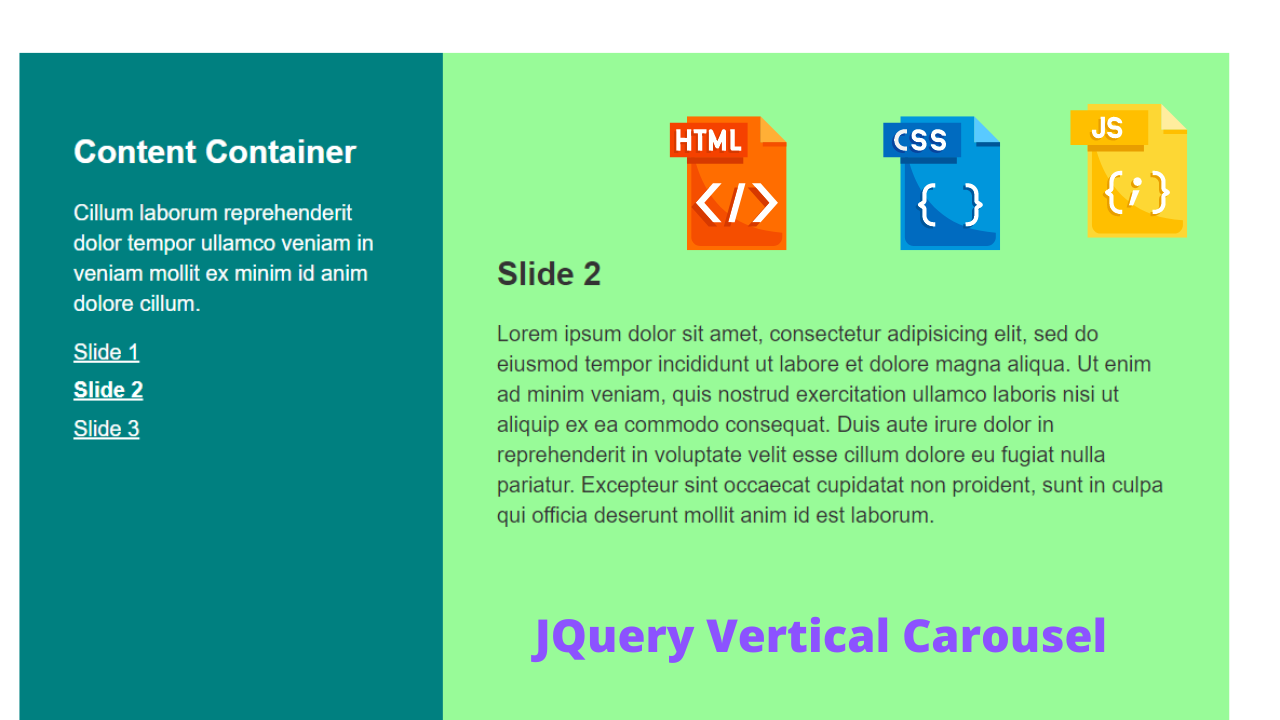
Hey Guys, Welcome To Our Blog, In Today’s Blog We Are Going To See How To Create An JQuery Vertical Carousel With HTML and CSS.
So, Let’s Begin Our User Profile Card Project By Adding The Source Codes. For That, First, We Are Using The Html Code.
HTML CODE For Vertical Carousel
<!DOCTYPE html>
<html lang="en">
<head>
    <meta charset="UTF-8">
    <meta name="viewport" content="width=device-width, initial-scale=1.0">
    <title>Slider</title>
</head>
<body>


<link rel="stylesheet" href="slider.css">

<section class="slider">

    <div class="content_container">

        <h1>Content Container</h1>

        <p>Cillum laborum reprehenderit dolor tempor ullamco veniam in veniam mollit ex minim id anim dolore cillum.</p>

        <ul class="slide_navigation">
            <li><a href="#slide_1" class="active">Slide 1</a></li>
            <li><a href="#slide_2">Slide 2</a></li>
            <li><a href="#slide_3">Slide 3</a></li>
        </ul>
    </div>


    <div class="slides">
        <div class="slide">
            <div class="inner_content">
                <h1>Slide 1</h1>
                <p>Lorem ipsum dolor sit amet, consectetur adipisicing elit, sed do eiusmod
                tempor incididunt ut labore et dolore magna aliqua. Ut enim ad minim veniam,
                quis nostrud exercitation ullamco laboris nisi ut aliquip ex ea commodo
                consequat. Duis aute irure dolor in reprehenderit in voluptate velit esse
                cillum dolore eu fugiat nulla pariatur. Excepteur sint occaecat cupidatat non
                proident, sunt in culpa qui officia deserunt mollit anim id est laborum.</p>
            </div>
        </div>

        <div class="slide">
            <div class="inner_content">
                <h1>Slide 2</h1>
                <p>Lorem ipsum dolor sit amet, consectetur adipisicing elit, sed do eiusmod
                tempor incididunt ut labore et dolore magna aliqua. Ut enim ad minim veniam,
                quis nostrud exercitation ullamco laboris nisi ut aliquip ex ea commodo
                consequat. Duis aute irure dolor in reprehenderit in voluptate velit esse
                cillum dolore eu fugiat nulla pariatur. Excepteur sint occaecat cupidatat non
                proident, sunt in culpa qui officia deserunt mollit anim id est laborum.</p>
            </div>
        </div>

        <div class="slide">
            <div class="inner_content">
                <h1>Slide 3</h1>
                <p>Lorem ipsum dolor sit amet, consectetur adipisicing elit, sed do eiusmod
                tempor incididunt ut labore et dolore magna aliqua. Ut enim ad minim veniam,
                quis nostrud exercitation ullamco laboris nisi ut aliquip ex ea commodo
                consequat. Duis aute irure dolor in reprehenderit in voluptate velit esse
                cillum dolore eu fugiat nulla pariatur. Excepteur sint occaecat cupidatat non
                proident, sunt in culpa qui officia deserunt mollit anim id est laborum.</p>
            </div>
        </div>
    </div>
</section>

<script src="slider.js"></script>

</body>
</html>
In this HTML Code we first adding link for CSS inside of head tag. After that we opening an body tag and start adding contents. First we creating an section class with name slider and then adding heading with h1 and navigation links with separate div class.
Second We have created three separate div class with different name for making changes in it with different attributes.
50+ Front-end Projects With Source Code | Front-end Projects With Source Code
Inside of that we are adding an heading with some paragraphs in it . The paragraphs were repeated three times with difference in heading and para contents. Then we closing all the div and section class.
Now we opening an script tag with source slider.js for adding vertical carousel using J query. Before that we should make our content more attractive So for that we were using the CSS code which is given below.
CSS CODE For Vertical Carousel
body{
    justify-content: center;
    font-family: sans-serif;
    align-items: center;
    display: flex;
    height: 100vh;
    margin: 0;
    padding: 0 40px;
}

p{
    line-height: 1.4;
}

a{
    color: inherit;
}

ul{
    list-style: none;
    padding: 0;
}

ul > * + *{
    margin-top: 10px;
}

li{
    display: block;
}

li a.active{
    font-weight: bold;
}

.slider{
    background-color: teal;
    max-width: 1400px;
    color: #fff;

    grid-template-columns: 35% 65%;
    position: relative;
    display: grid;

}

.slider .content_container{
    padding: 40px;
}

.slider .slides{
    overflow-y: auto;
    max-height: 500px;
    scrollbar-width: none;
}

.slider .slides::-webkit-scrollbar{
    display: none;
}

.slider .slides .slide{
    min-height: calc(100% - 80px);
    background-color: skyblue;
    display: flex;
    padding: 40px;
    color: #333;
    align-items: center;
}

.slider .slides .slide:nth-child(even){
    background-color: palegreen;
}
Now the CSS code were added successfully. In the first section of code we are adding the flex box properties with margins and paddings which is inside of body section. Then We adding some colors and line height properties by calling out the names of tag.
In Second Section, we styling out nav links which is inside list tags by adding font weight and display properties in it for making weight in fonts and making the links to display in same line also active class function determines the current nav which is done using CSS.
body{
    justify-content: center;
    font-family: sans-serif;
    align-items: center;
    display: flex;
    height: 100vh;
    margin: 0;
    padding: 0 40px;
}

p{
    line-height: 1.4;
}

a{
    color: inherit;
}

ul{
    list-style: none;
    padding: 0;
}

ul > * + *{
    margin-top: 10px;
}

li{
    display: block;
}

li a.active{
    font-weight: bold;
}
In this Third section , we just adding out the grid template properties and other common properties like max-width , display , position , and background color on it by calling the class names created using Div.
Also with Nth child property we are adding a background color which impact changes color when starts with carousel vertically.
.slider{
    background-color: teal;
    max-width: 1400px;
    color: #fff;

    grid-template-columns: 35% 65%;
    position: relative;
    display: grid;

}

.slider .content_container{
    padding: 40px;
}

.slider .slides{
    overflow-y: auto;
    max-height: 500px;
    scrollbar-width: none;
}

.slider .slides::-webkit-scrollbar{
    display: none;
}

.slider .slides .slide{
    min-height: calc(100% - 80px);
    background-color: skyblue;
    display: flex;
    padding: 40px;
    color: #333;
    align-items: center;
}

.slider .slides .slide:nth-child(even){
    background-color: palegreen;
}
Now We have done with the CSS part. So let’s we move on to the JS(J query) part for making the real vertical carousel. The JS part is given down below.
Portfolio Website Using HTML CSS And JAVASCRIPT ( Source Code)
JAVASCRIPT(J Query) Code For Vertical Carousel
(function () {
    "use strict";

    // Vertical Slider object
    const vertical_slider = {

        // Slide class name
        slider_class: ".slider",

        // Show slide
        show_slide: function (slide_id, context_item) {
            const slide_container = context_item.closest(this.slider_class).querySelector(".slides");
            if (slide_container) {
                const slides = slide_container.querySelectorAll(".slide");
                if (slides && slides[slide_id]) {

                    // Scroll to active slide
                    slide_container.scrollTo({
                        top: slides[slide_id].offsetTop,
                        behavior: "smooth"
                    });


                    // Set active context item
                    const active_context_item = context_item.closest(".slide_navigation").querySelector(".active");
                    if (active_context_item) {
                        active_context_item.classList.remove("active");
                    }

                    context_item.classList.add("active");
                }
            }
        },

        // Initialize slide
        init_slider: function (slider) {

            const navigation_items = slider.querySelectorAll(".slide_navigation a");

            if (navigation_items) {
                Object.keys(navigation_items).forEach(function (key) {
                    navigation_items[key].onclick = function (e) {
                        e.preventDefault();

                        vertical_slider.show_slide(key, navigation_items[key]);
                    };
                });
            }

        },

        // Initialize sliders
        init: function () {

            // Iterate over each slider
            document.querySelectorAll(this.slider_class).forEach((slider) => this.init_slider(slider));

        }
    };

    // Initialize sliders
    vertical_slider.init();
}());
In the first stanza of J Query we are adding an function and inside of function class we are fixing an variable name vertical_ slider with constant data type and then fixing the slider class to .slider which means calling out specific div class that contains this name.
SHOWING SLIDES:
Now we are adding the code for showing the slides and for that we again creating an function and passing two parameters slide_id, context_item and selecting the div class .slides using the variable as context_item with query_selector property and making the sliides to scroll for active class and then the behavious to smooth.
The Code for above explanation is down.
ADVERTISEMENT
(function () {
    "use strict";

    // Vertical Slider object
    const vertical_slider = {

        // Slide class name
        slider_class: ".slider",

        // Show slide
        show_slide: function (slide_id, context_item) {
            const slide_container = context_item.closest(this.slider_class).querySelector(".slides");
            if (slide_container) {
                const slides = slide_container.querySelectorAll(".slide");
                if (slides && slides[slide_id]) {

                    // Scroll to active slide
                    slide_container.scrollTo({
                        top: slides[slide_id].offsetTop,
                        behavior: "smooth"
                    });
ADVERTISEMENT
Now the variable context item will be played as current active slide by assigning the values to new variable(active_context_item) with JS query selector property. Now for removing the active class when not in use we make condition on it using if loop with classList.item(“.remove”).
ADVERTISEMENT
ADVERTISEMENT
Create Quiz App Using Html,Css And Javascript (Source Code)
ADVERTISEMENT
const active_context_item = context_item.closest(".slide_navigation").querySelector(".active");
                    if (active_context_item) {
                        active_context_item.classList.remove("active");
                    }

                    context_item.classList.add("active");
                }
            }
        },
Further the code we are using is only for initializing the slides and make slide on it. For that the foreach is used which makes to compare all the values and assign the values to it which is added inside it.
init_slider: function (slider) {

            const navigation_items = slider.querySelectorAll(".slide_navigation a");

            if (navigation_items) {
                Object.keys(navigation_items).forEach(function (key) {
                    navigation_items[key].onclick = function (e) {
                        e.preventDefault();

                        vertical_slider.show_slide(key, navigation_items[key]);
                    };
                });
            }

        },

        // Initialize sliders
        init: function () {

            // Iterate over each slider
            document.querySelectorAll(this.slider_class).forEach((slider) => this.init_slider(slider));

        }
    };

    // Initialize sliders
    vertical_slider.init();
}());
Now We have successfully added the J query for the vertical carousel project. And the project is came to end but before we could use the code and output given in the below Output Section.
FINAL OUTPUT For Vertical Carousel
We have Successfully created our J Query Vertical Carousel with HTML & CSS. You can use this project for your personnel needs and the respective lines of code are given with the code pen link mentioned below.
Create Otp Input Field Html Css Javascript ( Source Code)
If you find out this Blog helpful, then make sure to search code with random on google for Front End Projects with Source codes and make sure to Follow the Code with Random Instagram page.
REFER CODE – Alex Oliver
WRITTEN BY – Ragunathan S


