Price Range Slider Using HTML , CSS & JavaScript
Hello, programmers! In this blog, we Create a Price Range Slider Using HTML, CSS, and Javascript. This project is intended for total beginners, and it will teach us how to make a slider using some fundamental HTML ideas and how to apply gradient styling using CSS. We will add the price value using JavaScript.
A user interface element called a pricing slider enables customers to pick a price range or filter products according to their spending limit. It’s a common feature on e-commerce websites since it gives customers an easy method to look for goods within their budget.
10+ HTML CSS Projects For Beginners (Source Code)

The price slider commonly takes the form of a bar with two draggable handles that stand in for the lowest and highest costs. The products falling inside that price range will be displayed after users drag the handles to establish their chosen price range.
| Code by | Alexey |
| Project Download | Link Available Below |
| Language used | HTML ,CSS and JavaScript |
| External link / Dependencies | No |
| Responsive | Yes |
We all know that managing a code is important while building a project so that it will be easy for the user to use that code in future as well . So we will follow the same method we will be creating the different file for creating our project.
- index.html -defines the element structure that would be displayed on the page through the HTML layout.
- style.css- includes styling CSS code. We may style the various parts with CSS to improve the visual appeal.
- Index.js – includes JavaScript programming.The javascript concepts will helps us in adding the sliding value to the slider.
Language Translator Using HTML and JavaScript Code
Step1: Adding Some Basic HTML.
<!DOCTYPE html>
<html lang="en">

<head>
    <meta charset="UTF-8">
    <meta name="viewport" content="width=device-width, initial-scale=1.0">
    <meta http-equiv="X-UA-Compatible" content="ie=edge">
    <title>Price Slider</title>
    <link rel="stylesheet" href="style.css">
</head>

<body>
    <h1>Price Slider</h1>
    <div> <span id="rangeValue">0</span>
 <Input type="range" name "" value="0" min="0
" max="1000" onChange="rangeSlide(this.value)" onmousemove="rangeSlide(this.value)">
</Input>
</div>
    <script src="index.js"></script>
</body>

</html>
We have used the basic HTML concepts to add a price slider structure .
Before beginning to add structure to our price slider. We need to update some links. Because we utilised three distinct files for our HTML, CSS, and Javascript in this project, we need to link them all together. To do this, please include the links for our CSS and Javascript.
Weather App Using Html,Css And Javascript (Source Code )
<link rel="stylesheet" href="style.css" /> //Add this link into the head section
of our HTML.
<script src="index.js"></script>
//Add this link inside the body just before the closing body tag of our HTML.
Some sliders function like a range slider or something similar, as you may have noticed. A price slider will be made in a similar manner.
- Using the h1 heading tag we will add a heading to our price selector webpage.
- Now we will create a div which will the container for our slider value and slider.
- Now using the span tag with id (rangeValue) we set its value to be “zero”.
- Now using the input type as “range ” we will add a slider to our webpage.
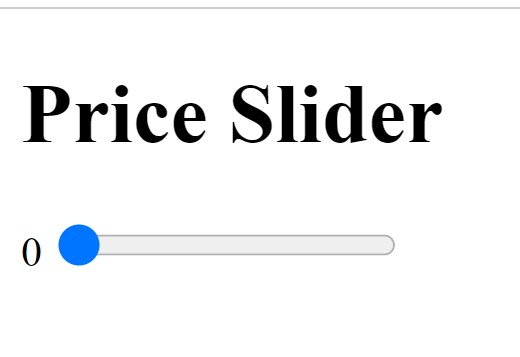
Now we have added a basic structure for our price slider webpage. Now let’s have a look at our price slider structure.
Output:

Step 2: Adding the CSS Code.
ADVERTISEMENT
@import url("https://fonts.googleapis.com/css2?family=Poppins:wght@300&display=swap");
* {
    margin: 0;
    padding: 0;
    font-family: "Poppins", sans-serif;
}
body {
    display: flex;
    justify-content: center;
    align-items: center;
    min-height: 100vh;
    background: #0d064c;
    background: linear-gradient(117deg, #0d064c 0, #740887 100%);
}
h1 {
    color: white;
    margin-bottom: 200px;
    font-size: 4rem;
}
div {
    position: absolute;
}
#rangeValue {
    position: relative;
    display: block;
    text-align: center;
    font-size: 6em;
    color: #999;
    font-weight: 400;
}
.range {
    width: 400px;
    height: 15px;
    background: #111;
    outline: none;
    border-radius: 15px;
    overflow: hidden;
    box-shadow: inset 0 0 5px rgba(0, 0, 0, 1);
}
.range::-webkit-slider-thumb {
    width: 15px;
    height: 15px;
    border-radius: 50%;
    background: #00fd0a;
    cursor: pointer;
    border: 4px solid #333;
    box-shadow: -407px 0 0 400px #00fd0a;
}
50+ HTML, CSS & JavaScript Projects With Source Code
ADVERTISEMENT
Step1:We’ll start by including a Google Font called Poppins with a 300 px font weight. The primary font family for our entire website will be this one.
Now that the padding and margin have been set to “zero,” the font family “Poppins” has been selected for our entire price slider webpage using the global selector.
ADVERTISEMENT
@import url("https://fonts.googleapis.com/css2?family=Poppins:wght@300&display=swap");
* {
    margin: 0;
    padding: 0;
    font-family: "Poppins", sans-serif;
}
Step2: We will now style our HTML body by adding a body element to it. Its display was set to “flex.” We will justify content to the centre using the justify-content attribute. By combining the colours “dark blue” and “peach,” we will now build a linear gradient with an angle of 117 degrees using the background property.
ADVERTISEMENT
body {
    display: flex;
    justify-content: center;
    align-items: center;
    min-height: 100vh;
    background: #0d064c;
    background: linear-gradient(117deg, #0d064c 0, #740887 100%);
}

ADVERTISEMENT
How to Build a Tip Calculator Using HTML, CSS & JavaScript
Step3: We will now style the webpage’s heading. We will give our header a white colour using the colour property. We will now give our heading a bottom margin of 200 pixels using the margin-bottom attribute. Our heading’s size is set to “4 rem” using the font-size property.
Additionally, we added additional design to our pricing slider container (div). We made its stance “absolute.”
h1 {
    color: white;
    margin-bottom: 200px;
    font-size: 4rem;
}
div {
    position: absolute;
}

Step4: Using the id selector (#rangeValue), we will style our rangeValue element. The display was set to “block,” and we will set its position to be relative. We will now add text-alignment as “centre” to our range value utilising the text-align property. For our range value, the font-size, font-color, and font-weight are all set to “6 em,” “grey,” and “400,” respectively.
How To Create OTP Input Field Using HTML , CSS & Javascript
#rangeValue {
    position: relative;
    display: block;
    text-align: center;
    font-size: 6em;
    color: #999;
    font-weight: 400;
}
Step5: Our range slider’s width and height are now set to “400px” and “15px,” respectively, using the class selector (.range). A black ground was also included to the range. We will give our range slider a little curvature by using a boundary radius of 15 pixels. Using the box shadow property, we also added a box shadow.
.range {
    width: 400px;
    height: 15px;
    background: #111;
    outline: none;
    border-radius: 15px;
    overflow: hidden;
    box-shadow: inset 0 0 5px rgba(0, 0, 0, 1);
}
.range::-webkit-slider-thumb {
    width: 15px;
    height: 15px;
    border-radius: 50%;
    background: #00fd0a;
    cursor: pointer;
    border: 4px solid #333;
    box-shadow: -407px 0 0 400px #00fd0a;
}
Let’s look at our output now that we have added all the styling to our OTP input webpage.
Output:

Step3: Adding Javascript Code
function rangeSlide(value)
{ document.getElementById("rangeValue").innerHTML = value; }
In javascript we have just used the simple javascript concept . Here first of all we have created a function called rangeSlider with a paramter (value) . Now inside the function using the document.getElementById we will select our rangeValue HTML we will insert the value of our slider into our rangevalue using the innerHTML method.
Now we created our own custom price slider using HTML ,CSS & Javascript . Let’s take a look at the video output of our project.
Output:
A simple project that you create when still starting out as a web developer is a price slider. if you intend to apply this project in practice. The findings are displayed to the user, and I then advise employing this price slider in e-commerce websites, as most do nowadays. So the link below might be useful for you if you’re a beginner trying to build your own e-commerce website.
100+ JavaScript Projects With Source Code ( Beginners to Advanced)
Live Preview Of Price Range Slider:
E-Commerce Website Using Html,Css and JavaScript
All of that has to do with creating our price slider. As a result, I think you have a fundamental knowledge of input, its different forms, and how styling is used to make websites seem good. We value the time you have taken to read this.
Using HTML, CSS, and Javascript, we have now successfully developed our pricing slider. Copying this project into your IDE will allow you to utilise it immediately. We trust you fully grasped the project. Please feel free to remark if you are uncertain.
If you find out this Blog helpful, then make sure to search code with random on google for Front End Projects with Source codes and make sure to Follow the Code with Random Instagram page.
What is a price slider in HTML?
The price slider commonly takes the form of a bar with two draggable handles that stand in for the lowest and highest costs. The products falling inside that price range will be displayed after users drag the handles to establish their chosen price range.
Can I use a price slider to filter results on my website?
Yes, a price slider can be used as a filtering mechanism to allow users to refine search results based on price range.


