Create Pokemon Cards Using HTML and CSS
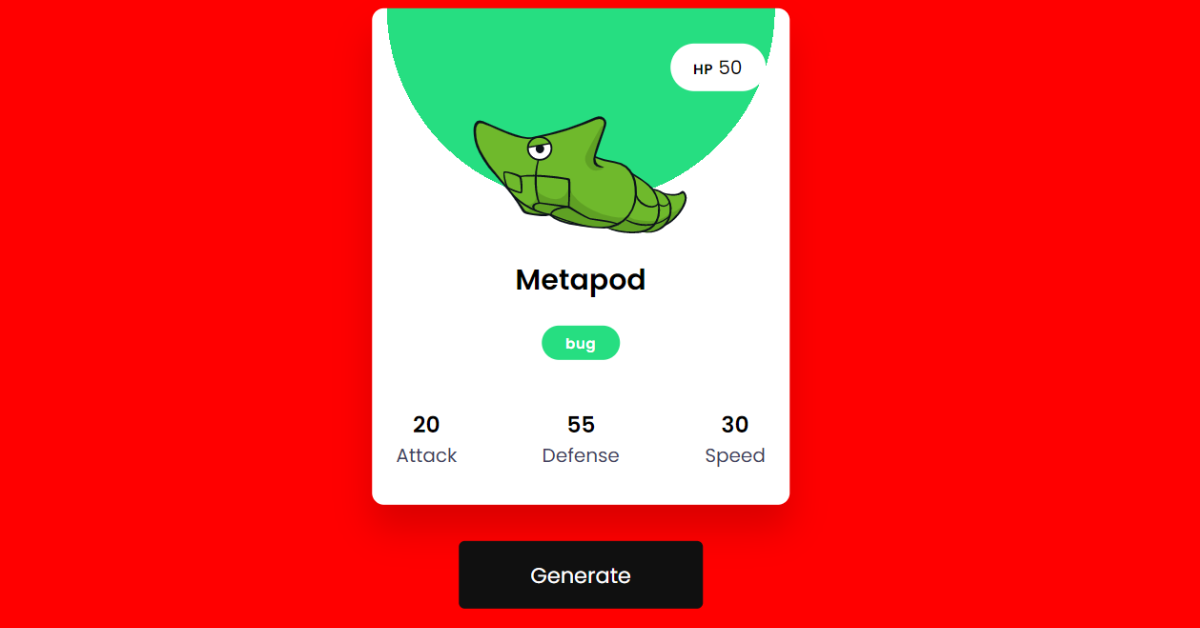
Hello Coder! Welcome to today’s tutorial on Codewithrandom. We’ll learn how to make Random Pokémon Card Using Html and Css. Pokémon as we all know our childhood is attached to this show. You all have seen Pokémon and had a hobby of collecting cards and playing them with your friends or trading them with them. Now let’s create a project which will randomly display a pokemon card.

In Today’s Pokemon CSS Card Project, We will use Only HTML, CSS, and JavaScript to complete this Project.
50+ HTML, CSS & JavaScript Projects With Source Code
| Code by | CodingArtist |
| Project Download | Link Available Below |
| Language used | HTML,CSS and JavaScript |
| External link / Dependencies | Yes |
| Responsive | Yes |
Pokemon Cards Structure :-
The HTML(Hypertext Markup Language) Code will display the structure in which the generated card will be displayed.
The CSS(Cascading Stylesheet) Code will style the defined structure and set the alignment that how space or width should be given to display the card.
And lastly, the JavaScript Code will help to shuffle the card add some logic and make it user responsive.
I hope you have got an idea about the project.
HTML Code for Pokémon Card:-
<html lang="en">
  <head>
    <meta name="viewport" content="width=device-width, initial-scale=1.0" />
    <title>Pokemon Card Generator</title>
    <link href="https://fonts.googleapis.com/css2?family=Poppins:wght@400;600&display=swap"
      rel="stylesheet"
    />
    <link rel="stylesheet" href="style.css" />
  </head>
  <body>
    <div class="container">
      <div id="card"></div>
      <button id="btn">Generate</button>
    </div>
    <script src="script.js"></script>
  </body>
</html>
To add the basic structure for our pokemon card, we must include a few critical links within our html files. Because CSS and JavaScript were used independently in this case, we must connect to them in our HTML; their link must be inserted inside the head tag. Furthermore, because we used fonts in our project, we must include Google Fonts links in the HTML head area.
<!-- Google Fonts -->
<link href="https://fonts.googleapis.com/css2?family=Poppins:wght@400;600&display=swap" rel="stylesheet" />
<!-- Stylesheet -->
<link rel="stylesheet" href="style.css" />
 <!-- Script -->
<script src="script.js"></script>
Now to add structure, using the div tag with the class “container,” we will create the main container for our pokemon card, and inside it, using the div tag, we will create a div section for displaying the random card, and then, using the button tag, we will create a button for generating different pokemon cards.
Ecommerce Website Using HTML, CSS, & JavaScript (Source Code)
This HTML code includes the complete code for the card generator. In this code, we made a card in the container and a generate button. Let’s look at the CSS code used to design the card generator.
HTML Output:

ADVERTISEMENT
ADVERTISEMENT
ADVERTISEMENT
CSS Code For Pokémon Card:-
ADVERTISEMENT
ADVERTISEMENT
* {
    padding: 0;
    margin: 0;
    box-sizing: border-box;
    font-family: "Poppins", sans-serif;
  }
  body {
    background-color: red;
  }
  .container {
    width: 350px;
    position: absolute;
    transform: translate(-50%, -50%);
    top: 50%;
    left: 50%;
  }
  #card {
    position: relative;
    width: 100%;
    padding: 30px 20px;
    box-shadow: 0 20px 30px rgba(0, 0, 0, 0.15);
    border-radius: 10px;
  }
  #card img {
    display: block;
    width: 180px;
    max-height: 200px;
    position: relative;
    margin: 20px auto;
  }
  .hp {
    width: 80px;
    background-color: #ffffff;
    text-align: center;
    padding: 8px 0;
    border-radius: 30px;
    margin-left: auto;
    font-weight: 400;
  }
  .poke-name {
    text-align: center;
    font-weight: 600;
  }
  .types {
    display: flex;
    justify-content: space-around;
    margin: 20px 0 40px 0;
  }
  .hp span,
  .types span {
    font-size: 12px;
    letter-spacing: 0.4px;
    font-weight: 600;
  }
  .types span {
    padding: 5px 20px;
    border-radius: 20px;
    color: #ffffff;
  }
  .stats {
    display: flex;
    align-items: center;
    justify-content: space-between;
    text-align: center;
  }
  .stats p {
    color: #404060;
  }
  #btn {
    display: block;
    padding: 15px 60px;
    font-size: 18px;
    background-color: #101010;
    color: #ffffff;
    position: relative;
    margin: 30px auto;
    border: none;
    border-radius: 5px;
  }
Step1:We’ll set the spacing and margin to “zero,” the box sizing property to “border box,” and the font-family property to “Poppins” using the universal selector (*).
We will now style the body and apply a white background to the body of our Pokemon card using the body tag selector.
* {
    padding: 0;
    margin: 0;
    box-sizing: border-box;
    font-family: "Poppins", sans-serif;
}

body {
    background-color: #eff3ff;
}Step2:We will now style our card case. Using the position property, we will assign the width of our container to “, the position to “absolute”, and the top and left spaces to “50%”.
Restaurant Website Using HTML and CSS
We will now apply styling to the card and image. We will assign the position to “relative,” the width to “180 px,” and the maximum height to 200 px using the position and width properties.
 .container {   width: 350px;
    position: absolute;
    transform: translate(-50%, -50%);
    top: 50%;
    left: 50%;
}

#card {
    position: relative;
    width: 100%;
    padding: 30px 20px;
    box-shadow: 0 20px 30px rgba(0, 0, 0, 0.15);
    border-radius: 10px;
}

#card img {
    display: block;
    width: 180px;
    max-height: 200px;
    position: relative;
    margin: 20px auto;
}Step3:The styling will now be applied to each element in our structure individually. We’ll make use of some fundamental styling elements like width, height, and object alignment. The pokemon name’s typeface size will be set to 60 px, and the text will be center-aligned using the align item property.
In a similar manner, we will add styling to the icon. We will set the display to “block,” the font color to “white,” and the border radius to “5 px” using the color and border-radius properties, respectively.
.hp {
    width: 80px;
    background-color: #ffffff;
    text-align: center;
    padding: 8px 0;
    border-radius: 30px;
    margin-left: auto;
    font-weight: 400;
  }
  .poke-name {
    text-align: center;
    font-weight: 600;
  }
  .types {
    display: flex;
    justify-content: space-around;
    margin: 20px 0 40px 0;
  }
  .hp span,
  .types span {
    font-size: 12px;
    letter-spacing: 0.4px;
    font-weight: 600;
  }
  .types span {
    padding: 5px 20px;
    border-radius: 20px;
    color: #ffffff;
  }
  .stats {
    display: flex;
    align-items: center;
    justify-content: space-between;
    text-align: center;
  }
  .stats p {
    color: #404060;
  }
  #btn {
    display: block;
    padding: 15px 60px;
    font-size: 18px;
    background-color: #101010;
    color: #ffffff;
    position: relative;
    margin: 30px auto;
    border: none;
    border-radius: 5px;
  }
In this CSS code we have styled the defined structure and the for the displaying of the cards and the button which will display it. And later on we have also styled the name of the pokemon card which should be displayed along with the said. Let us code the Javascript to make it user responsive.
Simple Portfolio Website Using Html And Css With Source Code
CSS output:

Responsive Resume/CV Website Using HTML & CSS
JavaScript Code for Pokémon Card Generator:-
const typeColor = {
    bug: "#26de81",
    dragon: "#ffeaa7",
    electric: "#fed330",
    fairy: "#FF0069",
    fighting: "#30336b",
    fire: "#f0932b",
    flying: "#81ecec",
    grass: "#00b894",
    ground: "#EFB549",
    ghost: "#a55eea",
    ice: "#74b9ff",
    normal: "#95afc0",
    poison: "#6c5ce7",
    psychic: "#a29bfe",
    rock: "#2d3436",
    water: "#0190FF",
  };
  const url = " https://pokeapi.co/api/v2/pokemon/";
  const card = document.getElementById("card");
  const btn = document.getElementById("btn");

  let getPokeData = () => {
    // Generate a random number between 1 and 150
    let id = Math.floor(Math.random() * 150) + 1;
    // Combine the pokeapi url with pokemon id
    const finalUrl = url + id;
    // Fetch generated URL
    fetch(finalUrl)
      .then((response) => response.json())
      .then((data) => {
        generateCard(data);
      });
  };

  //Generate Card

  let generateCard = (data) => {
    // Get necessary data and assign it to variables
    console.log(data);
    const hp = data.stats[0].base_stat;
    const imgSrc = data.sprites.other.dream_world.front_default;
    const pokeName = data.name[0].toUpperCase() + data.name.slice(1);
    const statAttack = data.stats[1].base_stat;
    const statDefense = data.stats[2].base_stat;
    const statSpeed = data.stats[5].base_stat;

    // Set themeColor based on pokemon type
    const themeColor = typeColor[data.types[0].type.name];
    console.log(themeColor);
    card.innerHTML = `
          <p class="hp">
            <span>HP</span>
              ${hp}
          </p>
          <img src=${imgSrc} />
          <h2 class="poke-name">${pokeName}</h2>
          <div class="types">

          </div>
          <div class="stats">
            <div>
              <h3>${statAttack}</h3>
              <p>Attack</p>
            </div>
            <div>
              <h3>${statDefense}</h3>
              <p>Defense</p>
            </div>
            <div>
              <h3>${statSpeed}</h3>
              <p>Speed</p>
            </div>
          </div>
    `;
    appendTypes(data.types);
    styleCard(themeColor);
  };
  let appendTypes = (types) => {
    types.forEach((item) => {
      let span = document.createElement("SPAN");
      span.textContent = item.type.name;
      document.querySelector(".types").appendChild(span);
    });
  };
  let styleCard = (color) => {
    card.style.background = `radial-gradient(circle at 50% 0%, ${color} 36%, #ffffff 36%)`;
    card.querySelectorAll(".types span").forEach((typeColor) => {
      typeColor.style.backgroundColor = color;
    });
  };

  btn.addEventListener("click", getPokeData);
  window.addEventListener("load", getPokeData);
In this Javascript code, we assigned a font color to each card name and then connected to an API that contains Pokemon cards. Then we added the logical portion, which specifies how the card will be displayed, and we made the buttons user-responsive.
Using the Pokemon API, we will retrieve the card and then apply the arithmetic within our javascript. Using the random() function, we will generate random cards each time, and then show the random Pokemon card to the user using the innerdisplay property. Each time the user selects the generate button, a new card is generated.
100+ JavaScript Projects With Source Code ( Beginners to Advanced)
Let us see the final output of the project How to Make Pokémon Card using HTML, CSS and JavaScript.

Create Otp Input Field Html Css Javascript ( Source Code)
Video Output CSS Pokemon Card:
Final Output CSS Pokémon Card:-
You can use this project for your personal needs and the respective lines of code are given with the code pen link mentioned above.
If you find out this Blog helpful, then make sure to search code with random on google for Front End Projects with Source codes and make sure to Follow the Code with Random Instagram page.
Written By – Harsh Sawant
Code By – @harshh9


