Learn How to Create Table in HTML (Tutorial of Learn HTML Table)
Today we’ll learn about how to create a table in HTML With examples. In today’s topic, we’ll cover Rows, Data, Headings, and Borders In Table.
Let’s Get Started !!
What is Table in HTML?
One might wonder what exactly is Table or how can we define a Table?
The table is nothing but the representation of data in structured rows and columns, they are widely used in the Share Markets for Stockpricing purposes as well as in the Banking sectors or in Sports for displaying the Scores.
Creating a Table in HTML
1. Define the <table> element
<table>
</table>
In the above piece of code, we have defined the opening and closing table tags. They are the base of the whole table in HTML.
50+ HTML, CSS & JavaScript Projects With Source Code
2. Adding Rows & Data
<table>
    <!--Row 1-->
    <tr></tr>
    <!--Row 2-->
    <tr></tr>
    <!--Row 3-->
    <tr></tr>
</table>
In the above code, we’ve added 3 rows in the Table element table rows are added via <tr> tag. Now, let’s add some data to the rows.
<table>
    <!--Row 1-->
    <tr></tr>
    <!--Row 2-->
    <tr>
        <!--Table data-->
        <td>5</td>
        <td>3</td>
    </tr>
    <!--Row 3-->
    <tr>
        <!--Table data-->
        <td>20</td>
        <td>15</td>
    </tr>
</table>
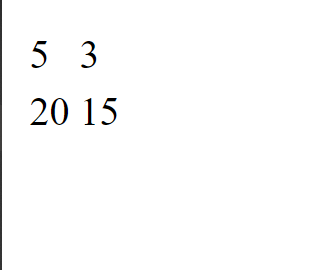
As you might have noticed we’ve added the <td> tags i.e Table data, in between the Row tags along with the content in between them.
It should display the output as follows :
From the output above users can’t quite understand what exactly are we trying to present in the table. For better understanding let’s add some headings to the table.
3. Adding a Heading
<table>
<!--Row 1-->
<tr>
<!--Table Heading-->
<th> </th>
<th>Rachel</th>
<th>Joey</th>
</tr>
<!--Row 2-->
<tr>
<!--Table data-->
<th>No. of places visited</th>
<td>5</td>
<td>3</td>
</tr>
<!--Row 3-->
<tr>
<!--Table data-->
<th>No. of friends</th>
<td>20</td>
<td>15</td>
</tr>
</table>
In the above code to add the Headings, we have used the <th> tag.
What is Flexbox in CSS? Learn flexbox With Example
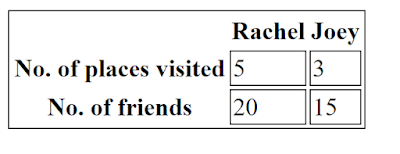
Output:-
 |
| Table with added headings |
Just after adding some headings, we can tell exactly what the data in the table is about.
4. Adding borders
Even though we have successfully represented the data, It is still not visually appealing to the users, to deal with this we have to add Borders so that the table is more convenient to read.
We’ll be using some CSS for adding the borders instead of the Border attribute.
<style>
table,
td {
border: 1px solid black;
}
</style>
<table>
<!--Row 1-->
<tr>
<!--Table Heading-->
<th> </th>
<th>Rachel</th>
<th>Joey</th>
</tr>
<!--Row 2-->
<tr>
<!--Table data-->
<th>No. of places visited</th>
<td>5</td>
<td>3</td>
</tr>
<!--Row 3-->
<tr>
<!--Table data-->
<th>No. of friends</th>
<td>20</td>
<td>15</td>
</tr>
</table>
100+ JavaScript Projects With Source Code ( Beginners to Advanced)
Output:
Summary:
We’ve successfully created a basic HTML table. We have covered the Rows, Data, Headings, and Borders in this post. As to why I used CSS for the border it’s just given me much more control and keeps the code clean.
ADVERTISEMENT
Leave a comment below and let me know which way you’ll use for borders.
Written By: @Om Bandiwan
ADVERTISEMENT



wow, that is so easy to understand…
Good one..