Card Hover Effect using HTML and CSS
Welcome to the Codewithrandom blog. In this blog, We learn how to create a Card Hover Effect. We use HTML and CSS for Card Hover Effect.
I hope you enjoy our blog so let’s start with a basic html structure for the Card Hover Effect.
HTML Code For Card Hover Effect
 <section class="section-prices">
<h2 class="section-header">Our Pricing</h2>
<div class="list-boxs">
<div class="card starter">
<div class="head">
Starter
</div>
<div class="ticket">$5.90</div>
<div class="body">
<p>
Lorem ipsum dolor sit amet, consectetur adipiscing elit, sed do eiusmod tempor incididunt ut labore et
dolore
magna
aliqua. Ut enim ad minim veniam, quis nostrud exercitation ullamco laboris nisi ut aliquip ex ea commodo
consequat.
</p>
<button class="btn">Order Now</button>
</div>
</div>
<div class="card standard">
<div class="head">
Standard
</div>
<div class="ticket">$10.50</div>
<div class="body">
<p>
Lorem ipsum dolor sit amet, consectetur adipiscing elit, sed do eiusmod tempor incididunt ut labore et
dolore
magna
aliqua. Ut enim ad minim veniam, quis nostrud exercitation ullamco laboris nisi ut aliquip ex ea commodo
consequat.
</p>
<button class="btn">Order Now</button>
</div>
</div>
<div class="card premium">
<div class="head">
Premium
</div>
<div class="ticket">$15.90</div>
<div class="body">
<p>
Lorem ipsum dolor sit amet, consectetur adipiscing elit, sed do eiusmod tempor incididunt ut labore et
dolore
magna
aliqua. Ut enim ad minim veniam, quis nostrud exercitation ullamco laboris nisi ut aliquip ex ea commodo
consequat.
</p>
<button class="btn">Order Now</button>
</div>
</div>
</div>
</section>
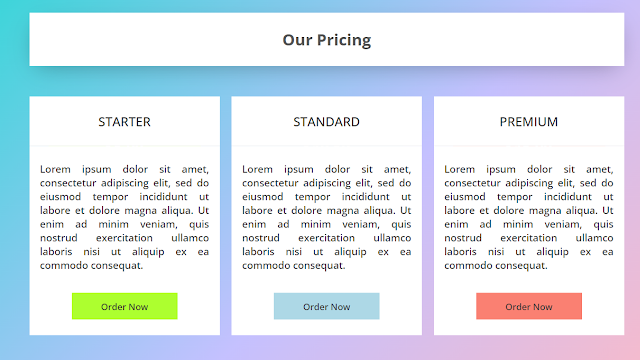
There is all the html code for the Card Hover Effect. Now, you can see output without Css. Then we write Css for the Styling Card and give Hover Effect.
Portfolio Website using HTML and CSS (Source Code)
Html Code Output
HTML Code For Card Hover Effect
@import url('https://fonts.googleapis.com/css2?family=Open+Sans:wght@300;500;700&display=swap');
:root {
--ticket-height: 60px;
--color-blue: lightblue;
--color-orange: salmon;
--color-green: greenyellow;
}
* {
margin: 0;
padding: 0;
box-sizing: border-box;
}
body {
min-height: 100vh;
display: flex;
align-items: center;
justify-content: center;
background-color: #F1F1F1;
font-family: 'Open Sans', sans-serif;
background-image: linear-gradient(-225deg, #2CD8D5 0%, #C5C1FF 56%, #FFBAC3 100%);
}
.section-prices {
padding: 1.5rem 1rem;
}
.section-prices .section-header {
background-color: #FFF;
margin-bottom: 1rem;
padding: 1.5rem 1rem;
text-align: center;
color: #555;
font-weight: 700;
box-shadow: 0 10px 35px -10px rgba(0, 0, 0, .3);
}
.list-boxs {
display: flex;
justify-content: space-between;
flex-wrap: wrap;
}
.list-boxs .card {
width: 32%;
text-align: center;
position: relative;
max-width: 300px;
}
.list-boxs .card .head,
.list-boxs .card .body {
background-color: #FFF;
padding: 1.5rem 1rem;
}
.list-boxs .card .head {
color: #333;
font-size: 1.2rem;
text-transform: uppercase;
transform: translateY(30px);
transition: transform .3s linear;
border-bottom: 1px solid #F2F2F2;
}
.list-boxs .card:hover .head {
transform: translateY(0);
box-shadow: 0 -5px 10px rgba(0, 0, 0, .1);
}
.list-boxs .card .ticket {
color: #FFF;
width: 80%;
margin: 0 auto;
padding: 1rem;
font-size: 1.4rem;
font-weight: bold;
height: var(--ticket-height);
box-shadow: inset 0px 6px 6px -5px rgba(0, 0, 0, .25),
inset 0px -6px 6px -5px rgba(0, 0, 0, .25);
}
.list-boxs .starter .ticket {
background-color: var(--color-green);
}
.list-boxs .standard .ticket {
background-color: var(--color-blue);
}
.list-boxs .premium .ticket {
background-color: var(--color-orange);
}
.list-boxs .card .body {
transform: translateY(-30px);
transition: transform .3s linear;
}
.list-boxs .card:hover .body {
transform: translateY(0);
box-shadow: 0 5px 10px rgba(0, 0, 0, .1);
}
.list-boxs .card p {
font-size: .95rem;
color: #333;
text-align: justify;
}
.list-boxs .card .btn {
margin-top: 2rem;
padding: .6rem 1rem;
outline: none;
font-size: .85rem;
font-family: 'Open Sans', sans-serif;
font-weight: 500;
min-width: 160px;
border: 1px solid #555;
background-color: #555;
color: #333;
cursor: pointer;
transition: all .2s linear;
}
.list-boxs .card .btn:hover {
box-shadow: 0 5px 10px 1px rgba(0, 0, 0, .15);
}
.list-boxs .starter .btn {
background: var(--color-green);
border-color: var(--color-green);
}
.list-boxs .standard .btn {
background: var(--color-blue);
border-color: var(--color-blue);
}
.list-boxs .premium .btn {
background: var(--color-orange);
border-color: var(--color-orange);
}
@media screen and (max-width: 750px) {
.list-boxs {
justify-content: space-around;
}
.list-boxs .card {
width: 45%;
}
}
@media screen and (max-width: 550px) {
.list-boxs .card {
width: 95%;
}
}
We have completed our Card Hover Effect Project. Here is our final updated output HTML + CSS.
50+ HTML, CSS & JavaScript Projects With Source Code
Final Output Of Card Hover Effect using HTML and CSS
Here is our updated output with CSS. I hope you like the Card Hover Effect. You can see output project screenshots. See our other blogs and gain knowledge in front-end development.
100+ JavaScript Projects With Source Code ( Beginners to Advanced)
Thank you!
In this post, we learn how to create a Card Hover Effect using HTML and CSS. If we made a mistake or any confusion, please drop a comment to reply or help you learn easily.
Written by – Code With Random/Anki
code by – Ayoub Mkira


