How to Create Camera Icon Using HTML and CSS
Welcome to Code With Random blog. In this blog, We learn how we create a Camera Icon. We use HTML, CSS, and JavaScript for this Camera Icon. Hope you enjoy our blog so let’s start with a basic HTML structure for a Camera Icon.
Happy exploring and learning !!
HTML Code For Camera Icon
<!DOCTYPE html>
<html lang="en">
<head>
<meta charset="UTF-8" />
<meta http-equiv="X-UA-Compatible" content="IE=edge" />
<meta name="viewport" content="width=device-width, initial-scale=1.0" />
<title>Camera Icon</title>
<link rel="stylesheet" href="style.css" />
</head>
<body>
<svg id="mainSVG" xmlns="http://www.w3.org/2000/svg" viewBox="200 150 400 300">
<defs>
<filter id="glow" x="-100%" y="-100%" width="250%" height="250%">
<feGaussianBlur stdDeviation="15" result="coloredBlur" />
<feOffset dx="0" dy="0" result="offsetblur"></feOffset>
<feFlood id="glowAlpha" flood-color="red" flood-opacity="1"></feFlood>
<feComposite in2="offsetblur" operator="in"></feComposite>
<feMerge>
<feMergeNode/>
<feMergeNode in="SourceGraphic"></feMergeNode>
</feMerge>
</filter>
<filter id="bevel" filterUnits="objectBoundingBox" x="-10%" y="-10%" width="150%" height="150%">
<feGaussianBlur in="SourceAlpha" stdDeviation="2" result="blur"/>
<feSpecularLighting in="blur" surfaceScale="5" specularConstant="0.125" specularExponent="10" result="specOut" lighting-color="white">
<fePointLight x="-5000" y="-10000" z="20000"/>
</feSpecularLighting>
<feComposite in="specOut" in2="SourceAlpha" operator="in" result="specOut2"/>
<feComposite in="SourceGraphic" in2="specOut2" operator="arithmetic" k1="0" k2="1" k3="1" k4="0" result="litPaint" />
</filter>
<filter id="shadow" x="-100%" y="-100%" width="250%" height="250%">
<feGaussianBlur stdDeviation="5" result="coloredBlur" />
<feOffset dx="-0" dy="2" result="offsetblur"></feOffset>
<feFlood id="glowAlpha" flood-color="#000" flood-opacity="0.65"></feFlood>
<feComposite in2="offsetblur" operator="in"></feComposite>
<feMerge>
<feMergeNode/>
<feMergeNode in="SourceGraphic"></feMergeNode>
</feMerge>
</filter>
</defs>
<g id="icon" fill="#44484D">
<rect x=360.73 y=275 width="70.27" height="50" rx="7.5" fill="#555b60"/>
<path id="lens" d="M419.36,303.25l30.12,17.39a3.75,3.75,0,0,0,5.62-3.25V282.61a3.75,3.75,0,0,0-5.62-3.25l-30.12,17.39A3.75,3.75,0,0,0,419.36,303.25Z" fill="#555b60"/>
</g>
<g id="shad" filter="url(#shadow)">
<g id="mainLine" filter="url(#glow)">
<line filter="url(#bevel)" x1="360.73" y1="260.73" x2="439.27" y2="343.72" fill="none" stroke="#ed002d" stroke-linecap="round" stroke-miterlimit="10" stroke-width="7"/>
</g>
</g>
</svg>
<script src="https://unpkg.co/gsap@3/dist/gsap.min.js"></script>
<script src="https://s3-us-west-2.amazonaws.com/s.cdpn.io/16327/DrawSVGPlugin3.min.js"></script>
<script src="index.js"></script>
</html>
Portfolio Website Using HTML CSS And JAVASCRIPT ( Source Code)
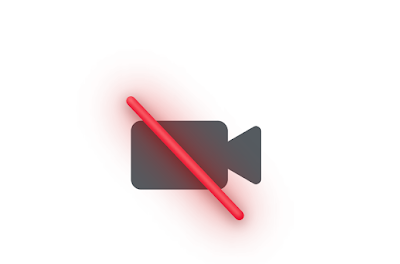
There is all the HTML code for the Camera Icon. Now, you can see output without CSS, then we write CSS & JavaScript for the Camera Icon.
output
CSS Code For Camera Icon
body {
background-color: #111;
overflow: hidden;
text-align:center;
display: flex;
align-items: center;
justify-content: center;
}
body,
html {
height: 100%;
width: 100%;
margin: 0;
padding: 0;
}
svg {
width: 100%;
height: 100%;
visibility: hidden;
cursor: pointer;
}
Here is our updated output CSS.
Ecommerce Website Using HTML, CSS, & JavaScript (Source Code)
Output
JavaScript Code For Camera Icon
let select = s => document.querySelector(s),
selectAll = s => document.querySelectorAll(s),
mainSVG = select('#mainSVG')
gsap.set('svg', {
visibility: 'visible'
})
gsap.set('#icon', {
transformOrigin: '50% 50%'
})
let state = true;
let doClick = () => {
let tl = gsap.timeline({
defaults: {
ease: 'elastic(0.2, 0.48)',
duration: 0.4
}
});
if(state) {
tl.to('line', {
drawSVG: '0% 100%',
x: 0,
y: -0
})
.to('#icon', {
scale: 1,
y: 5,
fill: '#44484D',
}, 0)
.fromTo('#lens', {
x: 0
}, {
x: -3
}, 0)
} else {
tl.to('line', {
drawSVG: '50% 50%',
x: 25,
y: 19
})
.to('#icon', {
y: 0,
scale: 1.3,
fill: '#555b60'
}, 0)
.fromTo('#lens', {
x: -3
}, {
x: 0,
ease: 'expo',
}, 0)
}
}
mainSVG.onclick = () => {
gsap.killTweensOf(mainSVG.onclick);
state = !state;
doClick();
}
gsap.delayedCall(2, mainSVG.onclick)
Final Output Of Camera Icon
50+ Html, Css &Javascript Projects With Source Code
We have completed our javascript section, Here is our updated output with javascript. Hope you like the Camera Icon. you can see the output video and project screenshots. See our other blogs and gain knowledge in front-end development.
In this post, we learn How to Make a Camera Icon Using HTML, CSS, and javascript. If we made a mistake or any confusion, please drop a comment to reply or help you learn easily.
Thank You And Happy Learning!!!
Written by – Code With Random/Anki





Finally I got amazing html css projects. Thanks for sharing this tutorial with source code.
Saved it. Which theme do you use?