Hey learners! Welcome to another blog of Codewithrandom,. today we’re going to learn how to Create a Personal Portfolio Website Using HTML and CSS With Source Code. A portfolio can be compared to a digital resume that displays a user’s skills for a client. A developer’s portfolio is a website they use to advertise their abilities so that employers can recruit them based on their skill set.
Personal Portfolio Website Using HTML and CSS With Source Code
Personal Portfolio Website is a very common design, if you want to showcase your skills and work online then Portfolio Website will help you a lot.
By following these instructions, you can simply make this Personal Portfolio Responsive website in HTML CSS Code. Simply by adhering to the procedures mentioned below, you will be able to develop this amazing personal portfolio website.
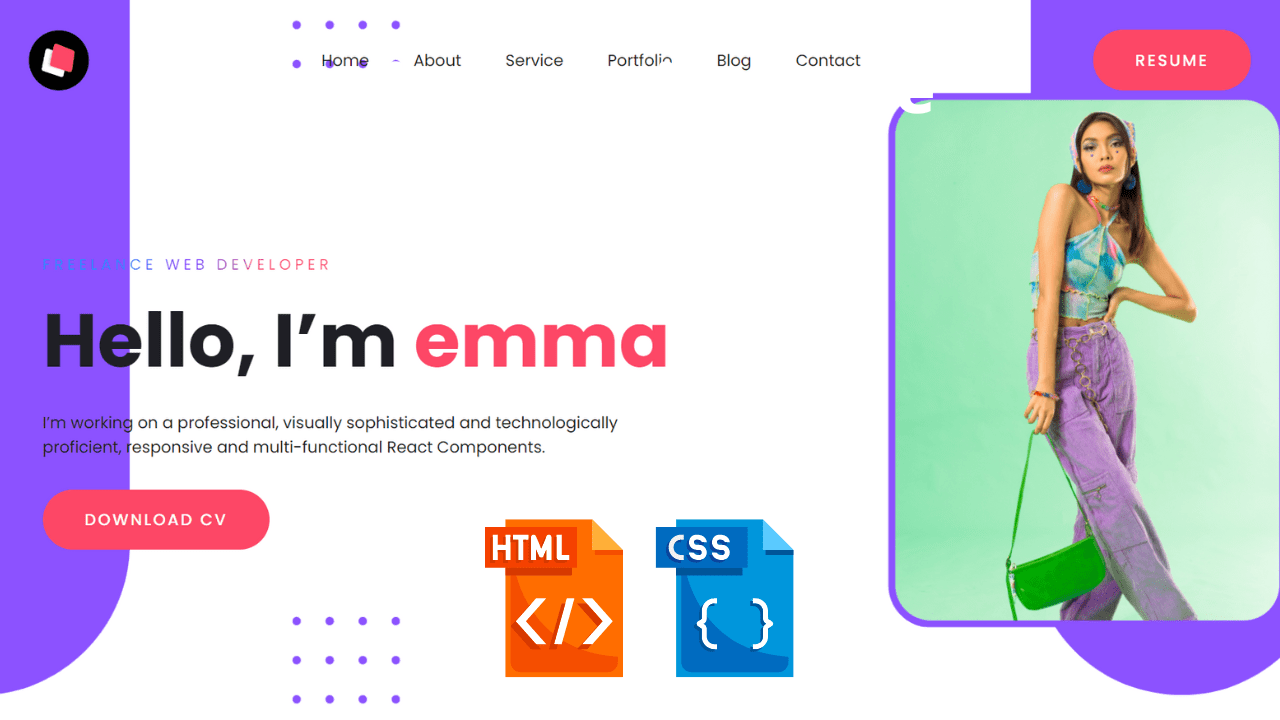
On this portfolio website, there is a button on the right, some navigation links in the middle, and a navigation bar with a logo on the left. The next step is to click the “Download CV” button that is located next to the text that describes the author’s name and occupation on the left side of this website, as shown in the image.
Before we dive into the project’s step-by-step solution, we need to understand some general concepts about personal portfolio websites using HTML and CSS.
HTML, CSS, and JavaScript Projects With Source Code
| Code by | Ninja_webTech |
| Project Download | Link Available below |
| Language used | HTML and Css |
| External link / Dependencies | No |
| Responsive | No |
HTML,CSS and JavaScript Projects With Source Code
Live Preview Of Personal Portfolio Website Source Code
Output:-
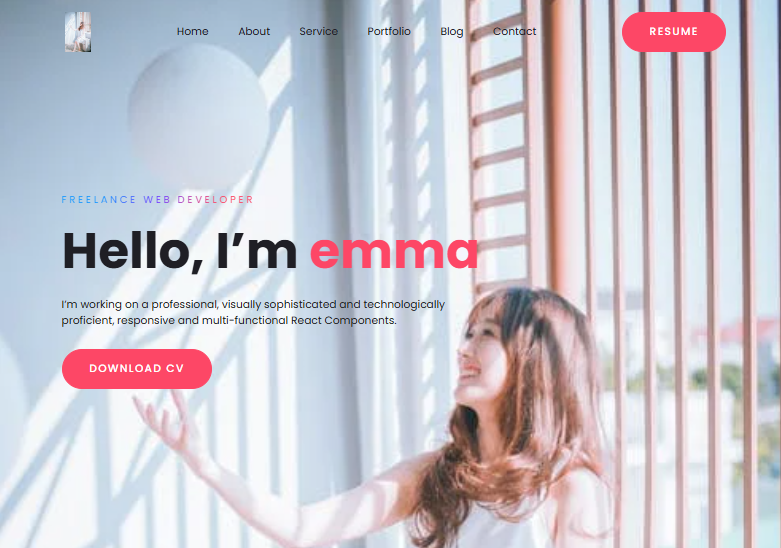
If you like this portfolio and would want the source code, I have included all the codes for this program below the link to this program, from which you can quickly obtain the source files of this program. By adding your own unique touches, you can use this portfolio to advance it.
Gym Website Using HTML and CSS With Source Code
Personal Portfolio Website HTML Code:-
<!DOCTYPE html>
<html lang="en">
  <head>
    <meta charset="UTF-8" />
    <title>Personal Portfolio Website</title>
    <!----CSS link----->
    <link rel="stylesheet" href="style.css" />
  </head>
  <body>
    <div class="hero">
      <nav>
        <img src="./img/logo.png" class="logo" />
        <ul>
          <li><a href="#">Home</a></li>
          <li><a href="#">About</a></li>
          <li><a href="#">Service</a></li>
          <li><a href="#">Portfolio</a></li>
          <li><a href="#">Blog</a></li>
          <li><a href="#">Contact</a></li>
        </ul>
        <a href="#" class="btn">Resume</a>
      </nav>

      <div class="content">
        <span class="title">Freelance Web Developer</span>
        <h1>Hello, I’m <span>emma</span></h1>
        <p>
          I’m working on a professional, visually sophisticated and
          technologically proficient, responsive and multi-functional React
          Components.
        </p>
        <a href="#" class="btn">Download CV</a>
      </div>
    </div>
  </body>
</html>
You have to create HTML and CSS File For this Site. After creating these files just paste the following codes into your file.
Restaurant Website Using HTML And CSS With Source Code
Step 1- Create an HTML file called index.html and put the provided codes inside of it. Keep in mind that the images used on this website (which you can grab from GitHub) must be placed in a file with the.html extension for them to display.
Step 2- We’ll start with the header of our portfolio before moving on to the navbar. We will build the section of our navbar using the <nav> tag, and we will add various menu items using the unordered list in our navbar.
Step 3- Now, we’ll use the div tag to build a content area where the user may add their qualifications and educational history. We’ll also provide a download link inside our portfolio so other users can access our résumé.
Output Of Html Code For Personal Portfolio
Restaurant Website Using HTML and CSS
Personal Portfolio Website CSS Code
@import url("https://fonts.googleapis.com/css2?family=Poppins:wght@400;500;600;700&display=swap");

* {
  margin: 0;
  padding: 0;
  box-sizing: border-box;
  font-family: "Poppins", sans-serif;
}
a {
  text-decoration: none;
}
.hero {
  width: 100%;
  height: 100vh;
  background: url(img/bg.png);
  background-size: cover;
}
nav {
  display: flex;
  align-items: center;
  justify-content: space-between;
  padding: 30px 100px;
}
.logo {
  max-height: 60px;
}
nav ul li {
  list-style: none;
  display: inline-block;
  padding: 10px 20px;
}
nav ul li a {
  color: #1d1d24;
  position: relative;
  padding: 5px 0;
}
nav ul li a:hover {
  color: #fd4766;
}
nav ul li a:after {
  content: "";
  position: absolute;
  left: 0;
  width: 0;
  height: 3px;
  background: #fd4766;
  transition: 0.3s;
  bottom: 0;
}
nav ul li a:hover:after {
  width: 100%;
}
.btn {
  color: #fff;
  font-size: 16px;
  text-transform: uppercase;
  letter-spacing: 2px;
  padding: 16px 40px;
  border-radius: 500px;
  display: inline-block;
  font-weight: 500;
  transition: all 0.4s ease-in-out;
  background-size: 152% 100%;
  background: #fd4766;
  border: 2px solid #fd4766;
}
.btn:hover {
  background: transparent;
  border-color: #fd4766;
  color: #fd4766;
}
.content {
  position: absolute;
  top: 35%;
  left: 8%;
}
.content .title {
  color: #0a0a0a;
  font-size: 15px;
  text-transform: uppercase;
  letter-spacing: 4px;
  display: inline-block;
  margin-bottom: 20px;
  background: linear-gradient(
    120deg,
    #1c99fe 20.69%,
    #7644ff 50.19%,
    #fd4766 79.69%
  );
  -webkit-background-clip: text;
  -webkit-text-fill-color: transparent;
}
.content h1 {
  color: #1f1f25;
  font-size: 75px;
  font-weight: 900;
  line-height: 90px;
  text-transform: inherit;
  width: 70%;
}
.content h1 span {
  color: #fd4766;
}
.content p {
  width: 55%;
  color: #202020;
  margin-top: 25px;
  margin-bottom: 30px;
}
Second Step, you have to create a CSS file with the name of style.css and paste the given codes in your CSS file. Remember, you’ve to create a file with a .css extension.
The E-Book we have launched contains not only hand-crafted lessons on HTML, CSS, Javascript, and Bootstrap But also contains hundreds of projects and interview questions on front-end web development. Here is the link to the E-Book – Master Frontend Development: Zero to Hero
Personal Website Using HTML and CSS Final Output:-
You have completed learning Personal Portfolio Website Using HTML And CSS With Source Code. I hope I have explained to you in this tutorial how I created this Personal Portfolio Website.
if you have any confusion Comment below or you can contact us by filling out our Contact Us form from the home section. 🤞🎉
To learn more about front-end development, see our other posts on Codewithrandom.
I hope you enjoyed reading this. Tell your other developers about this. You can explore our website for more such animation effects.
Thanks for visiting our website
Stay with us😊🌹
Follow on Instagram For Interesting Coding Post :- codewith_random