Hello, folks in this post we will learn about how to create a Student Profile Page using Html and Css in deep, every concept of this project is going to be simple and beginner-friendly. Also, we will add skill, education, and more sections into this student profile ui so, let’s deep dive into it and start creating.
Student Profile Page Using HTML and CSS
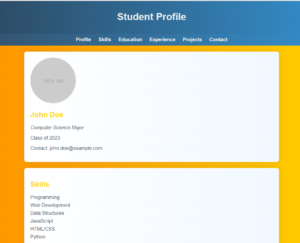
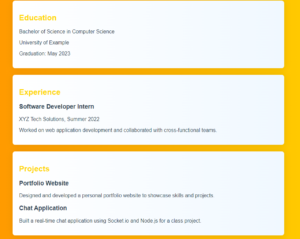
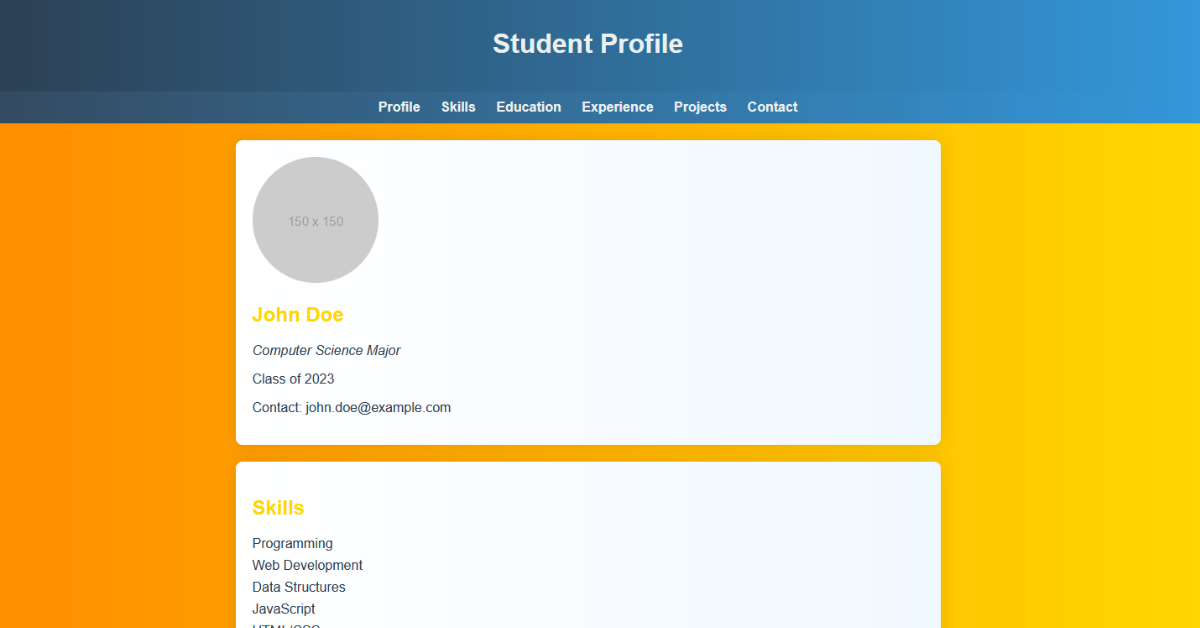
in the above image, you can see the student’s profile, which is good but for this UI you have to use HTML, CSS, and Javascript code so, you can create a webpage like this
Video preview Of Student Profile Page:-
I am going to embed a video, so you can see how student profile works with animation. because I have added an animation also in this student profile UI
100 Day , 100 HTML CSS JavaScript Projects
Live Preview Of Project:-
I am adding a frame that shows a live preview of the full project, so you can explore it by hand.
Html Code:-
In the following html code, we have a header tag. Inside the header tag, we have a h2 element with tittle student profile after closing the header tag we have a nav tag like.
<nav>
<a href="#profile">Profile</a>
<a href="#skills">Skills</a>
<a href="#education">Education</a>
<a href="#experience">Experience</a>
<a href="#projects">Projects</a>
<a href="#contact">Contact</a>
</nav>
after that, we have a section called skill which contains student skills like programming, web-development anything students know. we have many sections like skill which contain their corresponding information.
HTML Code is written below
<!DOCTYPE html>
<html lang="en">
<head>
  <meta charset="UTF-8">
  <meta name="viewport" content="width=device-width, initial-scale=1.0">
  <title>Student Profile</title>
</head>
<body>
  <header>
    <h1 style="font-size: 2em;">Student Profile</h1>
  </header>

  <nav>
    <a href="#profile">Profile</a>
    <a href="#skills">Skills</a>
    <a href="#education">Education</a>
    <a href="#experience">Experience</a>
    <a href="#projects">Projects</a>
    <a href="#contact">Contact</a>
  </nav>

  <section id="profile" class="animate">
    <img src="https://via.placeholder.com/150" alt="Student Photo">
    <h2 style="color: #FFD700;">John Doe</h2>
    <p style="color: #2c3e50; font-style: italic;">Computer Science Major</p>
    <p style="color: #2c3e50;">Class of 2023</p>
    <p style="color: #2c3e50;">Contact: [email protected]</p>
  </section>

  <section id="skills" class="animate">
    <h2 style="color: #FFD700;">Skills</h2>
    <ul>
      <li>Programming</li>
      <li>Web Development</li>
      <li>Data Structures</li>
      <li>JavaScript</li>
      <li>HTML/CSS</li>
      <li>Python</li>
    </ul>
  </section>

  <section id="education" class="animate">
    <h2 style="color: #FFD700;">Education</h2>
    <p style="color: #2c3e50;">Bachelor of Science in Computer Science</p>
    <p style="color: #2c3e50;">University of Example</p>
    <p style="color: #2c3e50;">Graduation: May 2023</p>
  </section>

  <section id="experience" class="animate">
    <h2 style="color: #FFD700;">Experience</h2>
    <h3 style="color: #2c3e50;">Software Developer Intern</h3>
    <p style="color: #2c3e50;">XYZ Tech Solutions, Summer 2022</p>
    <p style="color: #2c3e50;">Worked on web application development and collaborated with cross-functional teams.</p>
  </section>

  <section id="projects" class="animate">
    <h2 style="color: #FFD700;">Projects</h2>
    <h3 style="color: #2c3e50;">Portfolio Website</h3>
    <p style="color: #2c3e50;">Designed and developed a personal portfolio website to showcase skills and projects.</p>
    <h3 style="color: #2c3e50;">Chat Application</h3>
    <p style="color: #2c3e50;">Built a real-time chat application using Socket.io and Node.js for a class project.</p>
  </section>

  <section id="contact" class="animate">
    <h2 style="color: #FFD700;">Contact</h2>
    <p style="color: #2c3e50;">Email: [email protected]</p>
    <p style="color: #2c3e50;">LinkedIn: linkedin.com/in/johndoe</p>
    <p style="color: #2c3e50;">GitHub: github.com/johndoe</p>
  </section>
</body>
</html>
In the above html code we added student contact information also, so contact information give adds a better look to the student profile at the bottom
CSS Code
One of the best parts of our project is designing the html structure and giving a proper student profile. In the following css code, we have to align the menu to the top with a proper navigation of every section then we have to align all the sections with responsive design and a proper box shadow and section title of each.
CSS Code is written below:-
body {
      font-family: 'Arial', sans-serif;
      margin: 0;
      padding: 0;
      background: linear-gradient(to right, #FF8C00, #FFD700);
      color: #333;
    }

    header {
      background: linear-gradient(to right, #2c3e50, #3498db);
      color: #ecf0f1;
      padding: 1em;
      text-align: center;
    }

    nav {
      background: linear-gradient(to right, #34495e, #3498db);
      padding: 10px;
      text-align: center;
    }

    nav a {
      color: #ecf0f1;
      text-decoration: none;
      margin: 0 10px;
      font-weight: bold;
      transition: color 0.3s ease-in-out;
    }

    nav a:hover {
      color: #FFD700;
    }

    section {
      max-width: 800px;
      margin: 20px auto;
      background: linear-gradient(to right, #fff, #f0f8ff);
      padding: 20px;
      border-radius: 8px;
      box-shadow: 0 0 20px rgba(0, 0, 0, 0.1);
    }

    img {
      border-radius: 50%;
      max-width: 100%;
      height: auto;
    }

    h2 {
      color: #2c3e50;
    }

    h3 {
      color: #FFD700;
    }

    p {
      color: #555;
    }

    ul {
      list-style-type: none;
      padding: 0;
    }

    li {
      margin-bottom: 8px;
      color: #2c3e50;
    }

    .animate {
      animation: fadeIn 1s ease-in-out;
    }

    @keyframes fadeIn {
      from {
        opacity: 0;
        transform: translateY(-20px);
      }
      to {
        opacity: 1;
        transform: translateY(0);
      }
    }
We are using external css linking, css can be linked to html by two methods first one is external css and the second one is internal css. We also used inline css styling here to define the color of each.
Conclusion
This tutorial teaches you to make a cool student profile webpage using simple html and css. It explains step by step, covering the header, navigation, and sections for skills, education, and more. The html sets up the structure, while the css makes it look good. We added extras like a live preview and a video demo to make it fun.
Designed for beginners, this guide keeps it easy. You can watch the live preview, check the video, and play with the code. It’s not just about coding; it’s about creating a great-looking profile. So, dive in, get creative, and enjoy making your awesome student profile with a sprinkle of coding magic. Happy coding!
ADVERTISEMENT
Can I customize the colors and styles of the student profile easily?
Absolutely! The CSS code provided is designed to be easily customizable. You can change colors, fonts, and styles to make the profile uniquely yours.
ADVERTISEMENT
Is JavaScript necessary for creating the student profile, or can I skip it?
JavaScript adds animation to the profile, but it’s optional. The HTML and CSS alone will give you a static, stylish profile. Feel free to add JavaScript for extra flair!
ADVERTISEMENT
I’m new to coding—will I be able to follow this tutorial?
Absolutely! yes even if you started coding journey you can follow this tutorial
ADVERTISEMENT
