How to Create a Todo List using JavaScript?
In this tutorial, we will create a Todo list app entirely in JavaScript. If you are a beginner who is tired of studying from boring theoretical tutorials, you have come to the right place because we will build this To-Do list app from the ground up. Don’t worry; I’ve gone over each and every step of creating our To-Do List app.
We will be able to add new tasks to be completed, delete tasks, and mark tasks as completed in this app.
50+ HTML, CSS & JavaScript Projects With Source Code
| Code by | Bolarinwa Comfort Ajayi |
| Project Download | Link Available Below |
| Language used | HTML , CSS and JavaScript |
| External link / Dependencies | Yes |
| Responsive | Yes |
This to-do list was created with the assistance of HTML, CSS, and JavaScript. HTML and CSS were used to help design it, and JavaScript was used to make it work.
Mostly “to-do list” used for Organize and prioritize your tasks with using HTML, CSS, and JavaScript.
Four task we can perform in a TODO list are:
- Add tasks
- Update tasks
- Read tasks
- Delete tasks
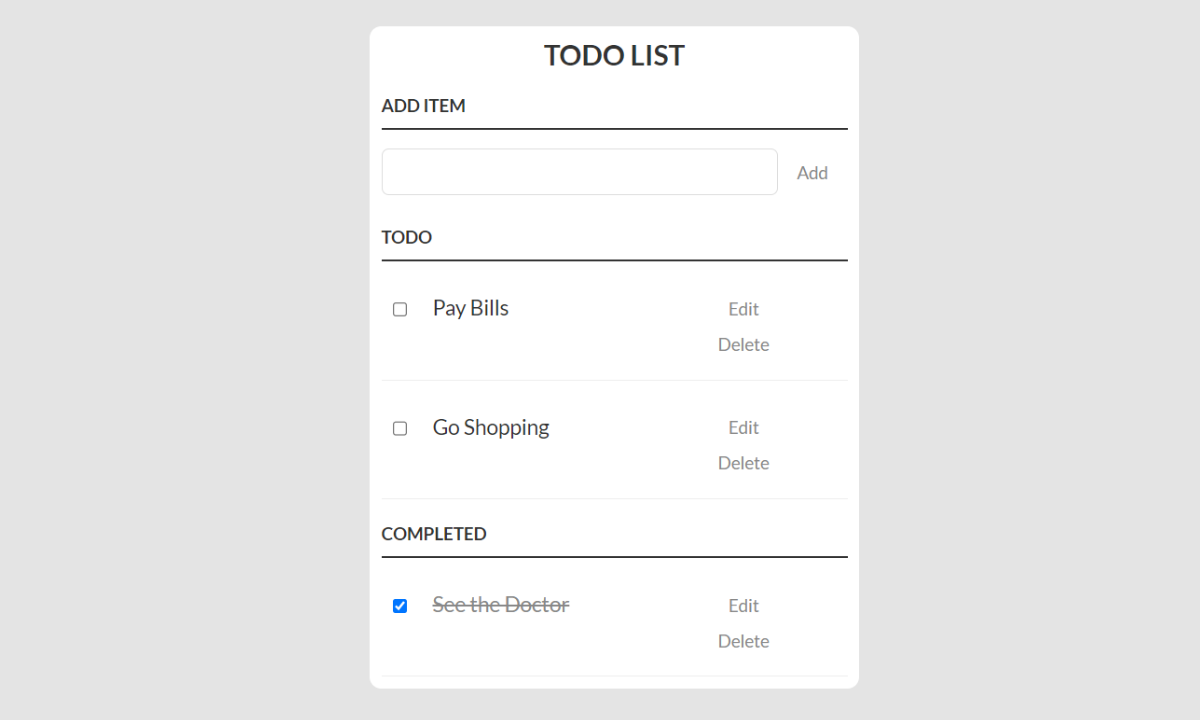
Let’s Take a look at our todo list app👇
I hope you have a general idea of the project. If you want to follow along, simply copy the code and paste it into your IDE.
So, without further do, let’s get started on the coding.
Ecommerce Website Using HTML, CSS, & JavaScript (Source Code)
In JavaScript to create this To-Do List App To begin, you must create three files: an HTML file, a CSS file, and a JavaScript file. Simply copy and paste the given codes into your file after you’ve created these files. You can also get the source code files for this to-do app by clicking the download button below.
Step1: Lets Start with adding some Basic HTML
First, create an HTML file called index.html and paste the following codes into it. Always save the file with the.html extension.
ADVERTISEMENT
<!DOCTYPE html>
<html lang="en">
  <head>
    <meta charset="UTF-8">
    <meta http-equiv="X-UA-Compatible" content="IE=edge">
    <meta name="viewport" content="width=device-width, initial-scale=1.0">
    <title>To do List</title>
    <link rel="stylesheet" href="style.css">
</head>
<body>
    <div class="container">
        <h2>TODO LIST</h2>
        <h3>Add Item</h3>
        <p>
            <input id="new-task" type="text"><button>Add</button>
        </p>

        <h3>Todo</h3>
        <ul id="incomplete-tasks">
            <li><input type="checkbox"><label>Pay Bills</label><input type="text"><button class="edit">Edit</button><button class="delete">Delete</button></li>
            <li><input type="checkbox"><label>Go Shopping</label><input type="text" value="Go Shopping"><button class="edit">Edit</button><button class="delete">Delete</button></li>
        </ul>

        <h3>Completed</h3>
        <ul id="completed-tasks">
            <li><input type="checkbox" checked><label>See the Doctor</label><input type="text"><button class="edit">Edit</button><button class="delete">Delete</button></li>
        </ul>
    </div>
<script src="index.js"></script>
</body>
</html>
ADVERTISEMENT
this tutorial primarily focuses on teaching JavaScript concepts, I assume you are familiar with HTML syntax and can easily understand the above code, but we will still discuss what is happening in this HTML file briefly.
ADVERTISEMENT
ADVERTISEMENT
First and foremost, we’ve created the main container with div tags, which will house our to-do list. We will now create our project’s main heading using the H2 heading tag. We will add a subheading to “add item” using the H3 tag.
ADVERTISEMENT
Now, we’ll add the input box and its side, as well as an add button, using the input tag.
10+ HTML CSS Projects For Beginners (Source Code)
We will now add another subheading to our “Todo Task” using the H3 tag. Now, we’ll add two sample Todo tasks with an input box and a button to the unorder list.
(Note: Please keep in mind that the tasks we’ve added to our To-Do list are just examples. You can change or remove them as you see fit. )
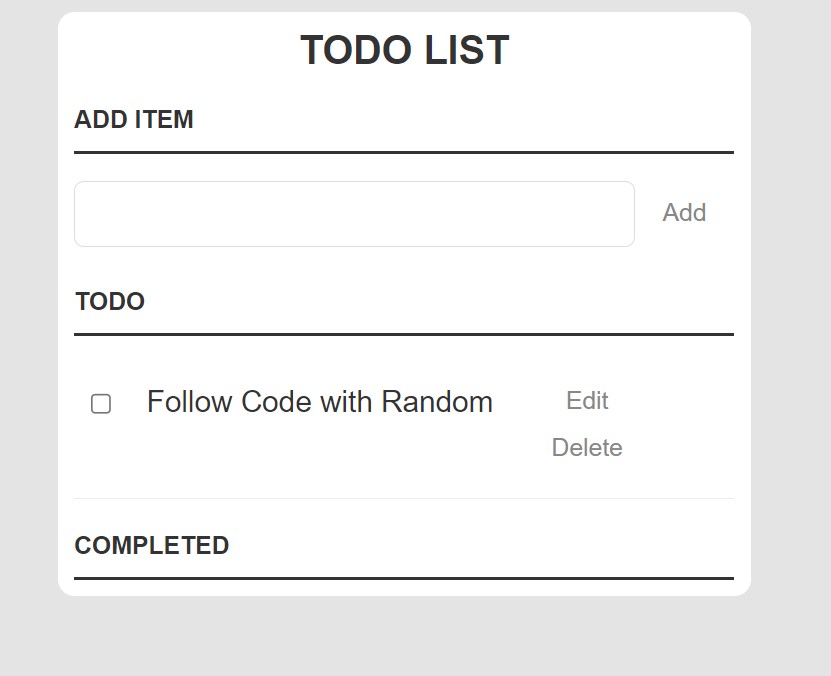
Let’s take a look at the output of our To-Do list now that we’ve added the basic structure.
Output:
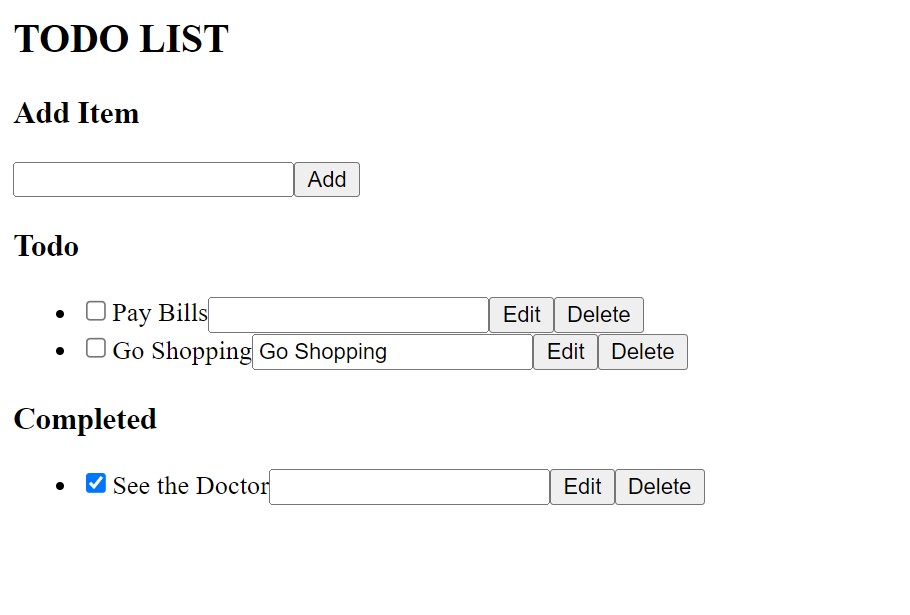
Step2: Adding the CSS Code.
Cascading Style Sheets (CSS) is a markup language for describing the presentation of a document written in HTML or XML. CSS, like HTML and JavaScript, is a key component of the World Wide Web.
Now we will look at our CSS code.
/* Basic Style */

body {
    color: #333;
    font-family: Lato, sans-serif;
    background-color:#e4e4e4;
}

.container {
    display: block;
    width: 400px;
    margin: 10px auto 100px;
    background-color:#fff;
    padding:0px 10px 10px 10px;
    border-radius:10px
}

h2 {
    text-align:center;
    padding-top:10px;
    margin-bottom:0px;
}

ul {
    margin: 0;
    padding: 0;
}

li * {
    float: left;
}

li,
h3 {
    clear: both;
    list-style: none;
}

input,
button {
    outline: none;
}

button {
    background: none;
    border: 0px;
    color: #888;
    font-size: 15px;
    width: 60px;
    margin: 10px 0 0;
    font-family: Lato, sans-serif;
    cursor: pointer;
}

button:hover {
    color: #333;
}


/* Heading */

h3,
label[for='new-task'] {
    color: #333;
    font-weight: 700;
    font-size: 15px;
    border-bottom: 2px solid #333;
    padding: 20px 0 10px;
    margin: 0;
    text-transform: uppercase;
}

input[type="text"] {
    margin: 0;
    font-size: 18px;
    line-height: 18px;
    height: 18px;
    padding: 10px;
    border: 1px solid #ddd;
    background: #fff;
    border-radius: 6px;
    font-family: Lato, sans-serif;
    color: #888;
}

input[type="text"]:focus {
    color: #333;
}


/* New Task */

label[for='new-task'] {
    display: block;
    margin: 0 0 20px;
}

input#new-task {
    float: left;
    width: 318px;
}

p > button:hover {
    color: #0FC57C;
}


/* Task list */

li {
    overflow: hidden;
    padding: 20px 0;
    border-bottom: 1px solid #eee;
}

li > input[type="checkbox"] {
    margin: 0 10px;
    position: relative;
    top: 15px;
}

li > label {
    font-size: 18px;
    line-height: 40px;
    width: 237px;
    padding: 0 0 0 11px;
}

li > input[type="text"] {
    width: 226px;
}

li > .delete:hover {
    color: #CF2323;
}


/* Completed */

#completed-tasks label {
    text-decoration: line-through;
    color: #888;
}


/* Edit Task */

ul li input[type=text] {
    display: none;
}

ul li.editMode input[type=text] {
    display: block;
}

ul li.editMode label {
    display: none;
}
After we’ve added the CSS code, we’ll go over it step by step. To save time, you can simply copy this code and paste it into your IDE. Let us now understand our code step by step.
Restaurant Website Using HTML and CSS
Step1:We’ll now add some basic styling to our website. We will add the background colour, font colour, and font family to our webpage using the body tag.
We’ll now style the container of our to-do list with the class selector. The display has been added as a block. The width has been set to “400px.” We’ve also increased the margin on our container. The background colour has been set to “white.” We also increased the border radius.
/* Basic Style */

body {
    color: #333;
    font-family: Lato, sans-serif;
    background-color:#e4e4e4;
}

.container {
    display: block;
    width: 400px;
    margin: 10px auto 100px;
    background-color:#fff;
    padding:0px 10px 10px 10px;
    border-radius:10px
}
Step2: Now we’ll use the tag selector to style the element of our to-do list app, and we’ll add some basic styling to our to-do list.
We will now add the text alignment as centre to the main heading of our “Todo list app” using HTML 2.
Using the UL and Li tags, we now set the margin and padding to “0,” with the direction set to float left.
We will add the background as “none” using the button tag. The font size has been set to “15 px.” The top margin was also set to 10px, and the cursor was set to “pointer.”
h2 {
    text-align:center;
    padding-top:10px;
    margin-bottom:0px;
}

ul {
    margin: 0;
    padding: 0;
}

li * {
    float: left;
}

li,
h3 {
    clear: both;
    list-style: none;
}

input,
button {
    outline: none;
}

button {
    background: none;
    border: 0px;
    color: #888;
    font-size: 15px;
    width: 60px;
    margin: 10px 0 0;
    font-family: Lato, sans-serif;
    cursor: pointer;
}

button:hover {
    color: #333;
}
Step3: We will now style the to-do task section. Using the id selector (#task), we will set the width to “318px” and the direction to float left. Now, by selecting the child button tag with the parent paragraph tag, we will add the hover property to our button and the colour green when hovering over the add button.
Interest Calculator using HTML, CSS and JavaScript
To hide excessive content, we’ll add the overflow property as hidden to the LI tag. We also set the top and bottom padding to “20 px.” We also added the border bottom to our list.
h3,
label[for='new-task'] {
    color: #333;
    font-weight: 700;
    font-size: 15px;
    border-bottom: 2px solid #333;
    padding: 20px 0 10px;
    margin: 0;
    text-transform: uppercase;
}

input[type="text"] {
    margin: 0;
    font-size: 18px;
    line-height: 18px;
    height: 18px;
    padding: 10px;
    border: 1px solid #ddd;
    background: #fff;
    border-radius: 6px;
    font-family: Lato, sans-serif;
    color: #888;
}

input[type="text"]:focus {
    color: #333;
}


/* New Task */

label[for='new-task'] {
    display: block;
    margin: 0 0 20px;
}

input#new-task {
    float: left;
    width: 318px;
}

p > button:hover {
    color: #0FC57C;
}


/* Task list */

li {
    overflow: hidden;
    padding: 20px 0;
    border-bottom: 1px solid #eee;
}

li > input[type="checkbox"] {
    margin: 0 10px;
    position: relative;
    top: 15px;
}

li > label {
    font-size: 18px;
    line-height: 40px;
    width: 237px;
    padding: 0 0 0 11px;
}

li > input[type="text"] {
    width: 226px;
}

li > .delete:hover {
    color: #CF2323;
}
This is how I styled my To-Do List app, which you can easily understand by reading it once because I also added comments describing the role of the code. You can also create your own style. In the comments section, please include a link to your style. I’d love to see all of your unique styling.
Now that we’ve successfully added CSS to our webpage, let’s take a look at our output after we’ve styled it.
Output:

Step3: Adding the Javascript Code.
var taskInput = document.getElementById("new-task"); //new-task
var addButton = document.getElementsByTagName("button")[0]; //first button
var incompleteTasksHolder = document.getElementById("incomplete-tasks"); //incomplete-tasks
var completedTasksHolder = document.getElementById("completed-tasks"); //completed-tasks

//New Task List Item
var createNewTaskElement = function(taskString) {
    //Create List Item
    var listItem = document.createElement("li");

    //input (checkbox)
    var checkBox = document.createElement("input"); // checkbox
    //label
    var label = document.createElement("label");
    //input (text)
    var editInput = document.createElement("input"); // text
    //button.edit
    var editButton = document.createElement("button");
    //button.delete
    var deleteButton = document.createElement("button");

    //Each element needs modifying

    checkBox.type = "checkbox";
    editInput.type = "text";

    editButton.innerText = "Edit";
    editButton.className = "edit";
    deleteButton.innerText = "Delete";
    deleteButton.className = "delete";

    label.innerText = taskString;

    //Each element needs appending
    listItem.appendChild(checkBox);
    listItem.appendChild(label);
    listItem.appendChild(editInput);
    listItem.appendChild(editButton);
    listItem.appendChild(deleteButton);

    return listItem;
}

//Add a new task
var addTask = function() {
    console.log("Add task...");
    //Create a new list item with the text from #new-task:
    var listItem = createNewTaskElement(taskInput.value);
    //Append listItem to incompleteTasksHolder
    incompleteTasksHolder.appendChild(listItem);
    bindTaskEvents(listItem, taskCompleted);

    taskInput.value = "";
}

//Edit an existing task
var editTask = function() {
    console.log("Edit task...");

    var listItem = this.parentNode;

    var editInput = listItem.querySelector("input[type=text");
    var label = listItem.querySelector("label");

    var containsClass = listItem.classList.contains("editMode");

    //if the class of the parent is .editMode
    if (containsClass) {
        //Switch from .editMode
        //label text become the input's value
        label.innerText = editInput.value;
    } else {
        //Switch to .editMode
        //input value becomes the label's text
        editInput.value = label.innerText;
    }

    //Toggle .editMode on the list item
    listItem.classList.toggle("editMode");

}

//Delete an existing task
var deleteTask = function() {
    console.log("Delete task...");
    var listItem = this.parentNode;
    var ul = listItem.parentNode;

    //Remove the parent list item from the ul
    ul.removeChild(listItem);
}

//Mark a task as complete
var taskCompleted = function() {
    console.log("Task complete...");
    //Append the task list item to the #completed-tasks
    var listItem = this.parentNode;
    completedTasksHolder.appendChild(listItem);
    bindTaskEvents(listItem, taskIncomplete);
}

//Mark a task as incomplete
var taskIncomplete = function() {
    console.log("Task incomplete...");
    //Append the task list item to the #incomplete-tasks
    var listItem = this.parentNode;
    incompleteTasksHolder.appendChild(listItem);
    bindTaskEvents(listItem, taskCompleted);
}

var bindTaskEvents = function(taskListItem, checkBoxEventHandler) {
    console.log("Bind list item events");
    //select taskListItem's children
    var checkBox = taskListItem.querySelector("input[type=checkbox]");
    var editButton = taskListItem.querySelector("button.edit");
    var deleteButton = taskListItem.querySelector("button.delete");

    //bind editTask to edit button
    editButton.onclick = editTask;

    //bind deleteTask to delete button
    deleteButton.onclick = deleteTask;

    //bind checkBoxEventHandler to checkbox
    checkBox.onchange = checkBoxEventHandler;
}

// var ajaxRequest = function() {
// 	console.log("AJAX request");
// }

//Set the click handler to the addTask function
addButton.addEventListener("click", addTask);
//addButton.addEventListener("click", ajaxRequest);

//cycle over incompleteTasksHolder ul list items
for (var i = 0; i < incompleteTasksHolder.children.length; i++) {
    //bind events to list item's children (taskCompleted)
    bindTaskEvents(incompleteTasksHolder.children[i], taskCompleted);
}

//cycle over completedTasksHolder ul list items
for (var i = 0; i < completedTasksHolder.children.length; i++) {
    //bind events to list item's children (taskIncomplete)
    bindTaskEvents(completedTasksHolder.children[i], taskIncomplete);
}
Storing the HTML Values
First, let’s save the HTML elements that we’ll be using in various functionalities using constant variable.
Using the document.getelementby() method, we store HTML elements in constants along with their tag names and IDs. The elements with id are new-task, incomplete task, and completed task, and the element with tag name is button.
Calculator Using HTML,CSS & JavaScript With Source Code
Now we’ll make a new variable (createNewTaskElement) and add the function (taskString). This is the function we will use to add a new list item to our to-do list using document.CreateElement Using this document.createElement, we will add an inputbox, label, and button to our to-do list app.
We’ll use the append() method to append all of these list items. This method is used to insert a collection of objects or string objects after the element’s last child.
Adding the new Task
To add a new task, we’ll make a new variable called addTask and store the value of the anonymus function in it. Using this function, we will create a variable called listItem to store our new list, which we will create using createNewTaskElement, which will generate a new list item with the text from (#new-task), and we will insert that list item into the incomplete task holder using the append method.
Create Glassmorphism Login Form Using HTML and CSS
Edit the Task
Now we will add the edit functionality to our todo list for the we will create a new variable editTask and will add a function to it. This function will help us to do editing in our to do list app . In this function we have declared variable called listItem and using the parent.node property we will store the parent value to our ListItem.
var containsClass = listItem.classList.contains(“editMode”);
Now creating a variable called containsClass we will store the (editMode) class to our containClass variable.
We will now add the editable functionality using the condition statement. We will determine whether or not our containClass variable contains the editMode class. If so, it will exit the editmode class and append the label value to our input value; otherwise, it will return to editMode. We’ve added a toggle for adding or removing the editMode class.
Delete Task
Now we will add the delete functionality to our todo list for the we will create a new variable deleteTask and will add a function to it. This function will help us to do delete task in our to do list app . In this function we have declared variable called listItem and using the parent.node property we will store the parent value to our ListItem.
Create Simple Music Player With JAVASCRIPT Code
Using the remove method we will delete the any list item.
Now as we add the basic function to add , edit and delete functionality in our todo list we will now look at how we can add taskcompleted and incomplete task function we will follow the same process . we just have to add the append method to insert the vlaue to the child element and then we will bind the task using the BindTaskEvents() method.
Now we will add an eventlistener “click” to addTask function we will run a for loop and it will check wheter the task is completed or not so accrodingly it will add those item in the particular section.
Now we have added all the functionality to our Todo List app and our application is working great without any problem.
Now let’s take a look at video output for better understanding of our project.
Final Output Of Todo List:
Codepen Preview Of Todo List Project
Now We have Successfully completed our Todo List Project using HTML , CSS and javascript. You can use this project directly by copying into your IDE. WE hope you understood the project , If you have any doubt feel free to comment!!
Google Search Bar Using HTML And CSS (Source Code)
I’ll get back to you as soon as possible.
If you find out this Blog helpful, then make sure to search code with random on google for Front End Projects with Source codes and make sure to Follow the Code with Random Instagram page.
Thanks for reading, and happy coding!
Which code editor do you use for Todo List coding?
I personally recommend using VS Code Studio, it’s straightforward and easy to use.
is this project responsive or not?
Yes! this is a responsive project
What is the use of Todo list?
Important tasks that an individual must accomplish each day are added to to-do lists. A to-do list aids the user in remembering duties so they can complete each one carefully and effectively.
