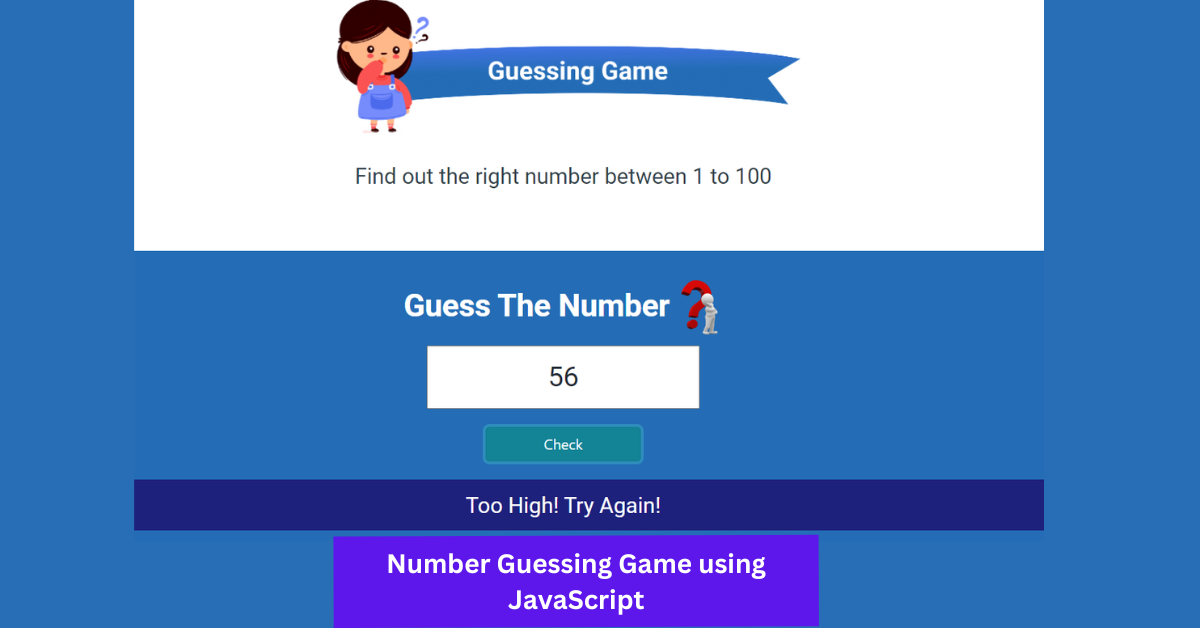
In this article, we’ll generate a random Number Guessing Game in javascript using the math function, then run a conditional statement and ask the user to guess the number. If the user correctly guesses the number, the display will say “huhu congratulations,” and if the guessed number is greater than the random number, the display will say “huhu congratulations.”
Number Guessing Game using JavaScript
Let’s take a look at our project.
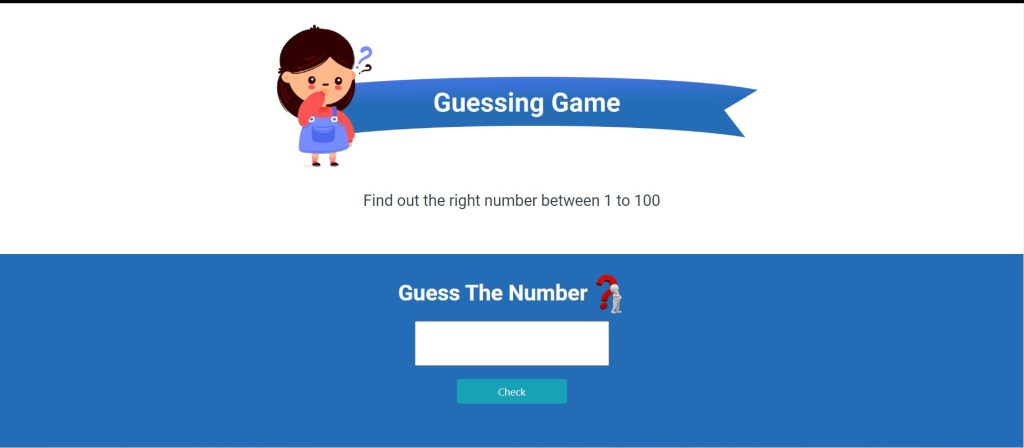
Now we’ll go over our code step by step, and I hope you’ll understand the project by the end. If you have any questions, please leave a comment or read the article again; I believe you will understand quickly.
Step1 Adding the Structure Using HTML & adding some style to our Code.
First and foremost, we will include some bootstrap import links in our webpage’s head section so that we can use our bootstrap classes. Now we’ll add a heading to our page by putting the h1 tag inside a div tag, which will contain our bootstrap classes to style the entire heading container.
Using Bootstrap, we will now add another div container with a white background colour. In addition, we will insert an image and a paragraph into our container to prompt the user to guess a number between 1 and 100.
Now we’ll add the most important section, which will include an image asking the user to guess the number, an input box typed as text for the user to enter a value, and a button to check the number. At this point, the button is simply normal; it has no functionality. We will add the functionality in the following steps.
Let’s examine our HTML code with Bootstrap classes👇.
<!DOCTYPE html>
<html>

<head>
    <link rel="stylesheet" href="https://stackpath.bootstrapcdn.com/bootstrap/4.5.2/css/bootstrap.min.css" integrity="sha384-JcKb8q3iqJ61gNV9KGb8thSsNjpSL0n8PARn9HuZOnIxN0hoP+VmmDGMN5t9UJ0Z" crossorigin="anonymous" />
    <script src="https://code.jquery.com/jquery-3.5.1.slim.min.js" integrity="sha384-DfXdz2htPH0lsSSs5nCTpuj/zy4C+OGpamoFVy38MVBnE+IbbVYUew+OrCXaRkfj" crossorigin="anonymous"></script>
    <script src="https://cdn.jsdelivr.net/npm/[email protected]/dist/umd/popper.min.js" integrity="sha384-9/reFTGAW83EW2RDu2S0VKaIzap3H66lZH81PoYlFhbGU+6BZp6G7niu735Sk7lN" crossorigin="anonymous"></script>
    <script src="https://stackpath.bootstrapcdn.com/bootstrap/4.5.2/js/bootstrap.min.js" integrity="sha384-B4gt1jrGC7Jh4AgTPSdUtOBvfO8shuf57BaghqFfPlYxofvL8/KUEfYiJOMMV+rV" crossorigin="anonymous"></script>
</head>

<body>
    <div class="name-container text-right d-flex flex-row justify-content-end">
        <h1 class="name-heading p-3">Swaroop Guessing Game</h1>
    </div>
    <div class="container-fluid bg-container">
        <div class="row bg-white">
            <div class="col-12 col-md-6 m-auto bg-white pt-5 pb-5">
                <img class="guess-game-img" src="https://d1tgh8fmlzexmh.cloudfront.net/ccbp-dynamic-webapps/guess-game-img.png" />
                <p class="text-center game-description">
                    Find out the right number between 1 to 100
                </p>
            </div>
        </div>
        <div class="row">
            <div class="col-12 guess-bg-container text-center">
                <h1 class="guess-heading">
                    Guess The Number
                    <img class="guess-number-image" src="https://d1tgh8fmlzexmh.cloudfront.net/ccbp-dynamic-webapps/guess-number-img.png" />
                </h1>
                <input type="text" class="user-input" id="userInput" />
                <div>
                    <button class="btn btn-info check-guess" onclick="checkGuess()">
                        Check
                    </button>
                </div>
                <p class="game-result" id="gameResult"></p>
            </div>
        </div>
    </div>
</body>

</html>
Output:

This is how our project looks now that we’ve added the bootstrap and HTML structure to our webpage. We will now add some CSS to our project to make it more visually appealing.
Step2 Adding the CSS to our Wepage.
@import url("https://fonts.googleapis.com/css2?family=Bree+Serif&family=Caveat:wght@400;700&family=Lobster&family=Monoton&family=Open+Sans:ital,wght@0,400;0,700;1,400;1,700&family=Playfair+Display+SC:ital,wght@0,400;0,700;1,700&family=Playfair+Display:ital,wght@0,400;0,700;1,700&family=Roboto:ital,wght@0,400;0,700;1,400;1,700&family=Source+Sans+Pro:ital,wght@0,400;0,700;1,700&family=Work+Sans:ital,wght@0,400;0,700;1,700&display=swap");

.name-heading {
    color: #183b65;
    font-family: "Roboto";
    font-size: 14px;
}

.name-container {
    background-color: #dbdbdb;
}

.bg-container {
    background-color: #246db6;
    height: 100vh;
}

.guess-game-img {
    width: 100%;
}

.game-description {
    font-family: "Roboto";
    font-weight: 500;
    font-size: 24px;
    color: #323f4b;
    margin-top: 20px;
}

.guess-bg-container {
    background-color: #246db6;
    padding-bottom: 30px;
    padding-top: 30px;
}

.guess-heading {
    font-family: "Roboto";
    font-weight: bold;
    color: white;
    font-size: 34px;
}

.guess-number-image {
    width: 50px;
}

.user-input {
    width: 300px;
    font-family: "Roboto";
    font-weight: 500;
    font-size: 30px;
    color: #1f2933;
    padding: 10px;
    text-align: center;
}

.game-result {
    font-family: "Roboto";
    font-weight: 500;
    font-size: 24px;
    color: #ffffff;
    padding: 10px;
}

.check-guess {
    border-radius: 5px;
    padding: 10px;
    margin: 20px;
    width: 170px;
}
To give our project a more appealing appearance, we will go over our CSS code step by step.
- We’ll start by importing some Google fonts to add some font style to our webpage.
- We will style the heading of our webpage using the class selector (.name-heading). We’ll make our heading “dark-blue.” The font size is 14 px.
- Using the name Container we will add the background color as grey to our heading container.
@import url("https://fonts.googleapis.com/css2?family=Bree+Serif&family=Caveat:wght@400;700&family=Lobster&family=Monoton&family=Open+Sans:ital,wght@0,400;0,700;1,400;1,700&family=Playfair+Display+SC:ital,wght@0,400;0,700;1,700&family=Playfair+Display:ital,wght@0,400;0,700;1,700&family=Roboto:ital,wght@0,400;0,700;1,400;1,700&family=Source+Sans+Pro:ital,wght@0,400;0,700;1,700&family=Work+Sans:ital,wght@0,400;0,700;1,700&display=swap");

.name-heading {
    color: #183b65;
    font-family: "Roboto";
    font-size: 14px;
}

.name-container {
    background-color: #dbdbdb;
}
- We will now style our image and paragraph sections with the (.bg-container) class. We will add the background colour “blue” and height “100vh” here, and set the width of the (.guess-game-img) to “100%.”
- We’ll now style our paragraph. We chose “Roboto” as the font family and “500” as the font weight. The colour is set to “dark blue black,” and the font size is set to “24px.”
.bg-container {
    background-color: #246db6;
    height: 100vh;
}

.guess-game-img {
    width: 100%;
}

.game-description {
    font-family: "Roboto";
    font-weight: 500;
    font-size: 24px;
    color: #323f4b;
    margin-top: 20px;
}- Our input box and button will now be styled. The user input box’s width is set to 300 pixels, and “robot” is the font family. The font is designed to be a dark black on grey colour. The text was likewise set to “center.”
- Similarly for the game result we set its font-family as “Roboto” with font-size as 24px and the font color we set to the “white”.
100+ Front-end Projects for Web developers (Source Code)
We will add the random number generator to our project once we have thoroughly created our random guessing game, but first we will examine our results.
Output:

Step2 Adding the Javascript to our Wepage.
let gameResult = document.getElementById("gameResult");
let userInput = document.getElementById("userInput");
let randomNumber = Math.ceil(Math.random() * 100);

function checkGuess() {
    let guessedNumber = parseInt(userInput.value);
    if (guessedNumber > randomNumber) {
        gameResult.textContent = "Too High! Try Again!";
        gameResult.style.backgroundColor = "#1e217c";
    } else if (guessedNumber < randomNumber) {
        gameResult.textContent = "Too Low! Try Again!";
        gameResult.style.backgroundColor = "#1e217c";
    } else if (guessedNumber === randomNumber) {
        gameResult.textContent = "Congractulations! You Got it Right!";
        gameResult.style.backgroundColor = "green";
    } else {
        gameResult.textContent = "Please Provide a Valid Input";
        gameResult.style.color = "red";
    }
}
We’ll choose our HTML utilising the document first. We will choose our HTML element and enter its value into the variables using the getElementById method.
Our random number between 1 and 100 will now be stored in a variable we’ll call randomNumber.
We’ll utilise the math.random method to generate a number in order to generate a random integer.
We’ll now develop a check-guess function. First we will receive input from the user, and then using parseInt we will transform the value to an integer.
Now we will add a conditional statement: if the size of the guessed number is bigger than the random number, the game result content will show “Too High”; similarly, if the number is too low, it will show “Too Low.”
If the Random number = guessed number than message will show up “congratulation ,you got it right”.
Final Output Of Number Guessing Game Javascript:
Codepen Preview Of This Project
Now We have Successfully created our javascript random guessing number. You can use this project directly by copying into your IDE. WE hope you understood the project , If you any doubt feel free to comment!!
Create Otp Input Field Html Css Javascript ( Source Code)
Hello there, coders!! In a previous article, we learned how to create a portfolio with Bootstrap and jQuery. If you haven’t already done so, click the link below. In this article, we’ll create another bootstrap and javascript project to demonstrate how we can use bootstrap to add styles to our project and javascript to add functionality to our random guessing game.
Portfolio Website Using HTML CSS And JAVASCRIPT ( Source Code)
ADVERTISEMENT
If you find out this Blog helpful, then make sure to search code with random on google for Front End Projects with Source codes and make sure to Follow the Code with Random Instagram page.
ADVERTISEMENT
