Creating an Image Editor Using HTML ,CSS and Javascript
Hello friends! In this blog post, you will discover how to develop a basic Image Editor using HTML, CSS, and JavaScript.
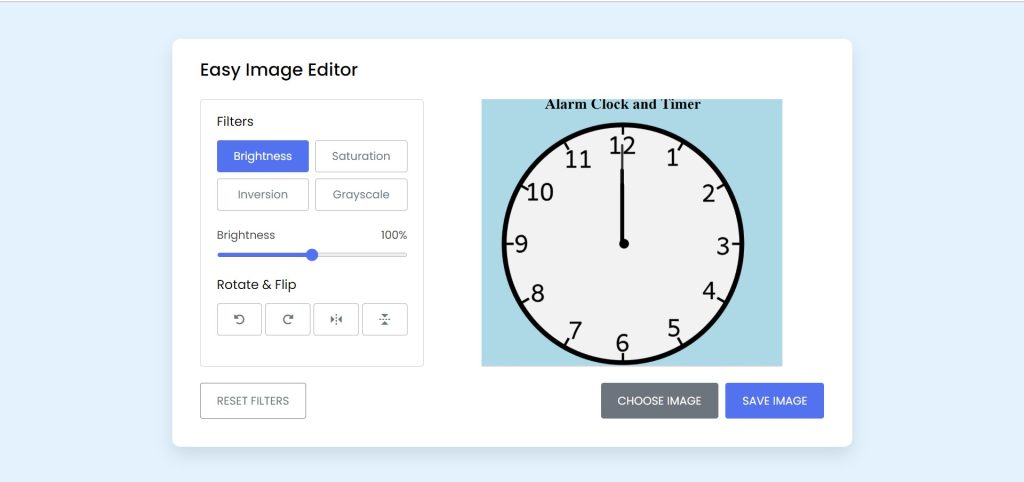
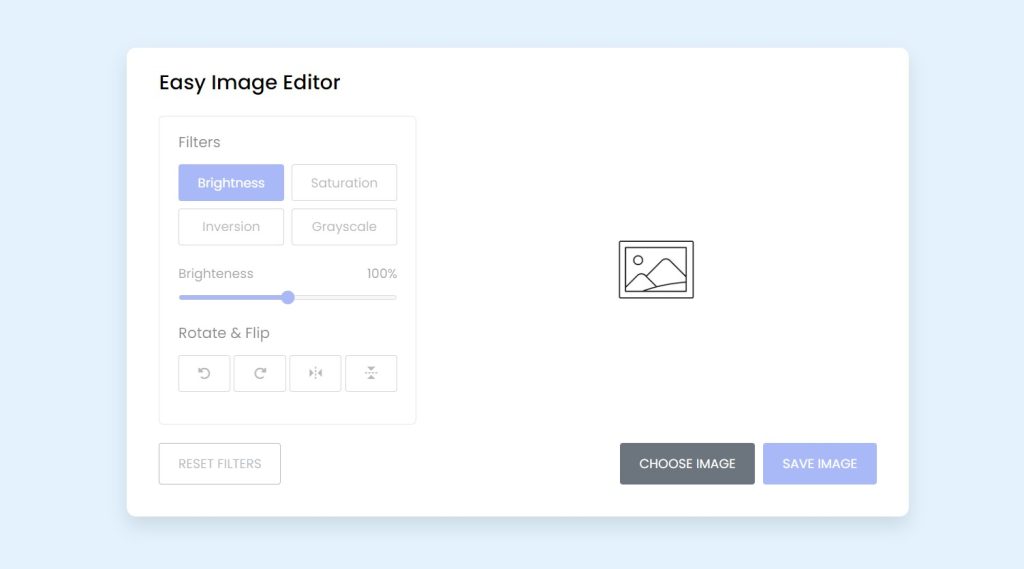
A Simple Image Editor that can be used to change the image values will be designed by us. As seen in the preview image, users can add filters to their images such as grayscale, inversion, saturation, and brightness adjustment. Users can also flip or rotate the photographs, and they can save their altered images.
50+ HTML, CSS & JavaScript Projects With Source Code
I hope you have a general idea of what the project entails. In our article, we will go over this project step by step.
The three sections of this task are the HTML, CSS, and Javascript sections. In these parts, we’ll learn how to create our image editor step-by-step.
Step1: Adding some basic HTML Code
HTML stands for HyperText Markup Language. This is a markup language. Its main job is to give our project structure. We will provide our project structure by utilising this markup language. So let’s look at our HTML code.
We start with the HTML file. First, copy the code below and paste it into your HTML file inside your IDE.
<!DOCTYPE html>
<html lang="en" dir="ltr">

<head>
    <meta charset="utf-8">
    <title>Image Editor in JavaScript</title>
    <link rel="stylesheet" href="style.css">
    <meta name="viewport" content="width=device-width, initial-scale=1.0">
    <link rel="stylesheet" href="https://unpkg.com/[email protected]/css/boxicons.min.css">
    <link rel="stylesheet" href="https://cdnjs.cloudflare.com/ajax/libs/font-awesome/6.1.1/css/all.min.css" />
</head>

<body>
    <div style="display:block">
        <div class="container disable">
            <h2>Easy Image Editor</h2>
            <div class="wrapper">
                <div class="editor-panel">
                    <div class="filter">
                        <label class="title">Filters</label>
                        <div class="options">
                            <button id="brightness" class="active">Brightness</button>
                            <button id="saturation">Saturation</button>
                            <button id="inversion">Inversion</button>
                            <button id="grayscale">Grayscale</button>
                        </div>
                        <div class="slider">
                            <div class="filter-info">
                                <p class="name">Brighteness</p>
                                <p class="value">100%</p>
                            </div>
                            <input type="range" value="100" min="0" max="200">
                        </div>
                    </div>
                    <div class="rotate">
                        <label class="title">Rotate & Flip</label>
                        <div class="options">
                            <button id="left"><i class="fa-solid fa-rotate-left"></i></button>
                            <button id="right"><i class="fa-solid fa-rotate-right"></i></button>
                            <button id="horizontal"><i class='bx bx-reflect-vertical'></i></button>
                            <button id="vertical"><i class='bx bx-reflect-horizontal'></i></button>
                        </div>
                    </div>
                </div>
                <div class="preview-img">
                    <img src="https://cdn.shopify.com/s/files/1/0533/2089/files/placeholder-images-image_large.png?format=jpg&quality=90&v=1530129081"
                        alt="preview-img">
                </div>
            </div>
            <div class="controls">
                <button class="reset-filter">Reset Filters</button>
                <div class="row">
                    <input type="file" class="file-input" accept="image/*" hidden>
                    <button class="choose-img">Choose Image</button>
                    <button class="save-img">Save Image</button>
                </div>
            </div>
        </div>
    </div>
    <script src="index.js"></script>

</body>

</html>
We must update certain links before we can start to arrange our copy to the clipboard. In order to complete this project, we had to connect the three distinct files we utilized for our HTML, CSS, and JavaScript. In order to achieve this, kindly place links to our CSS inside the header. All of the links for the various icons that we utilized in our project must be embedded. You must include the Javascript file inside the HTML’s body if you want to link it to our HTML file.
10+ Javascript Projects For Beginners With Source Code
//Head section
<link rel="stylesheet" href="style.css">
<link rel="stylesheet" href="https://unpkg.com/[email protected]/css/boxicons.min.css">
<link rel="stylesheet" href="https://cdnjs.cloudflare.com/ajax/libs/font-awesome/6.1.1/css/all.min.css" />
//Body Section
<script src="index.js"></script>
Simple Portfolio Website Using Html And Css With Source Code
Now let’s Add the structure for our Image Editor.
- We’ll make a div first, then apply an inline style. We’ll change the display to “block.” In order to make our image editor’s main container, we will now create a second div with the class container disabled.
- We’ll now add a heading to our image editor using <h2> tag.
- We will add a label for filters using the div element with the class “filter” and, again using the div tag, we will build a button tag option for brightness, saturation, inversion, and grayscale.
- We will now have a % slider to modify the image brightness percentage using the input type range.
- We will now use the button tag , inside the button tag we will add the icon for image rotation using font-awesome tags with class.
- Now we’ll construct an area where the preview of the image we’re going to change will appear. We will build the container for the preview of our image using the div tag and class preview.
- The controls for the reset, choose image, and save picture will now be added to a section that we will develop. All of them will be made using the button tag.
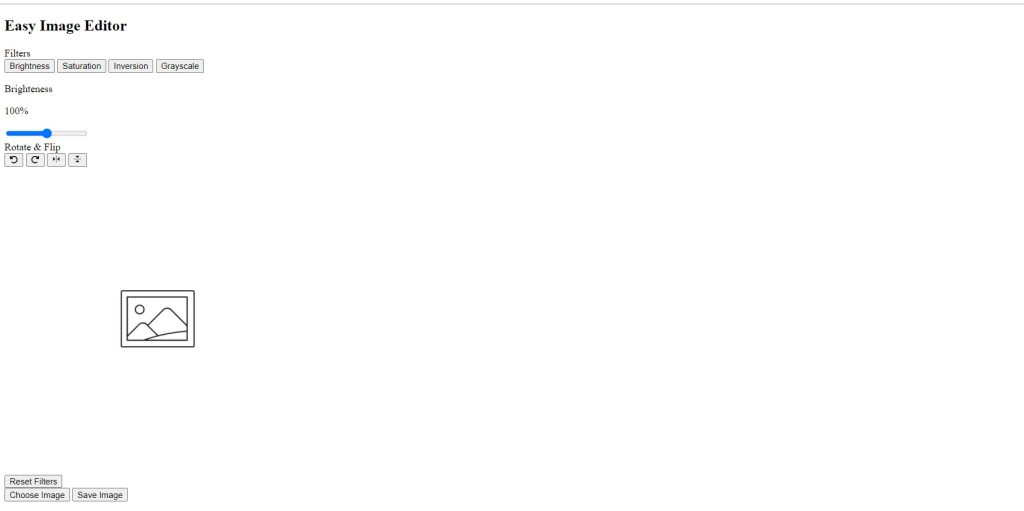
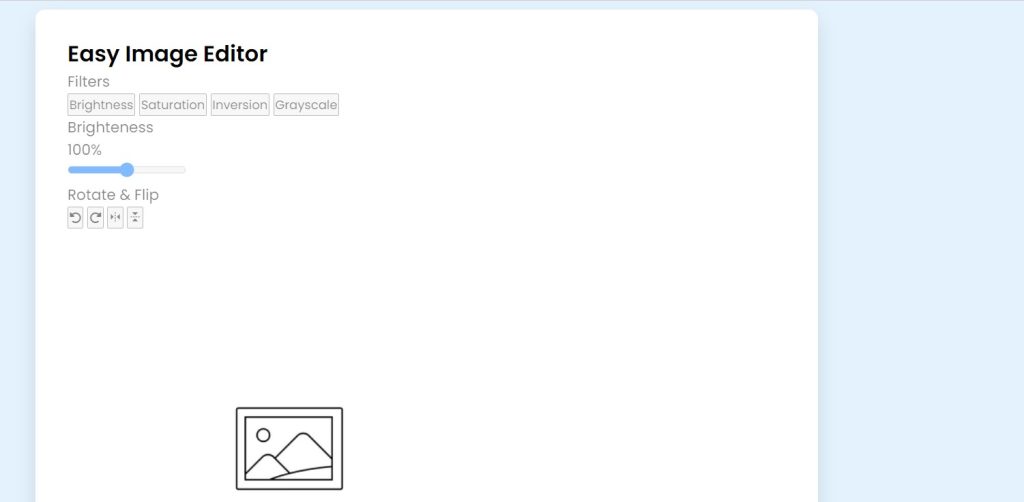
We don’t require anything else to build the structure for our image editor. Now that we are using CSS, we will style our image editor. But let’s look at our structure first.
Hangman Game using HTML, CSS & JavaScript
Output:
Step2: Adding CSS Code
Cascading Style Sheets (CSS) is a markup language for describing the presentation of a document written in HTML or XML. CSS, like HTML and JavaScript, is a key component of the World Wide Web.
Rubik’s Cube Code Using HTML,CSS And JavaScript
Now we will look at our CSS code.
/* Import Google font - Poppins */
@import url("https://fonts.googleapis.com/css2?family=Poppins:wght@400;500;600&display=swap");
* {
  margin: 0;
  padding: 0;
  box-sizing: border-box;
  font-family: "Poppins", sans-serif;
}
body {
  display: flex;
  padding: 10px;
  min-height: 100vh;
  align-items: center;
  justify-content: center;
  background: #e3f2fd;
}
.container {
  width: 850px;
  padding: 30px 35px 35px;
  background: #fff;
  border-radius: 10px;
  box-shadow: 0 10px 20px rgba(0, 0, 0, 0.1);
}
.container.disable .editor-panel,
.container.disable .controls .reset-filter,
.container.disable .controls .save-img {
  opacity: 0.5;
  pointer-events: none;
}
.container h2 {
  margin-top: -8px;
  font-size: 22px;
  font-weight: 500;
}
.container .wrapper {
  display: flex;
  margin: 20px 0;
  min-height: 335px;
}
.wrapper .editor-panel {
  padding: 15px 20px;
  width: 280px;
  border-radius: 5px;
  border: 1px solid #ccc;
}
.editor-panel .title {
  display: block;
  font-size: 16px;
  margin-bottom: 12px;
}
.editor-panel .options,
.controls {
  display: flex;
  flex-wrap: wrap;
  justify-content: space-between;
}
.editor-panel button {
  outline: none;
  height: 40px;
  font-size: 14px;
  color: #6c757d;
  background: #fff;
  border-radius: 3px;
  margin-bottom: 8px;
  border: 1px solid #aaa;
}
.editor-panel .filter button {
  width: calc(100% / 2 - 4px);
}
.editor-panel button:hover {
  background: #f5f5f5;
}
.filter button.active {
  color: #fff;
  border-color: #5372f0;
  background: #5372f0;
}
.filter .slider {
  margin-top: 12px;
}
.filter .slider .filter-info {
  display: flex;
  color: #464646;
  font-size: 14px;
  justify-content: space-between;
}
.filter .slider input {
  width: 100%;
  height: 5px;
  accent-color: #5372f0;
}
.editor-panel .rotate {
  margin-top: 17px;
}
.editor-panel .rotate button {
  display: flex;
  align-items: center;
  justify-content: center;
  width: calc(100% / 4 - 3px);
}
.rotate .options button:nth-child(3),
.rotate .options button:nth-child(4) {
  font-size: 18px;
}
.rotate .options button:active {
  color: #fff;
  background: #5372f0;
  border-color: #5372f0;
}
.wrapper .preview-img {
  flex-grow: 1;
  display: flex;
  overflow: hidden;
  margin-left: 20px;
  border-radius: 5px;
  align-items: center;
  justify-content: center;
}
.preview-img img {
  max-width: 490px;
  max-height: 335px;
  width: 100%;
  height: 100%;
  object-fit: contain;
}
.controls button {
  padding: 11px 20px;
  font-size: 14px;
  border-radius: 3px;
  outline: none;
  color: #fff;
  cursor: pointer;
  background: none;
  transition: all 0.3s ease;
  text-transform: uppercase;
}
.controls .reset-filter {
  color: #6c757d;
  border: 1px solid #6c757d;
}
.controls .reset-filter:hover {
  color: #fff;
  background: #6c757d;
}
.controls .choose-img {
  background: #6c757d;
  border: 1px solid #6c757d;
}
.controls .save-img {
  margin-left: 5px;
  background: #5372f0;
  border: 1px solid #5372f0;
}

@media screen and (max-width: 760px) {
  .container {
    padding: 25px;
  }
  .container .wrapper {
    flex-wrap: wrap-reverse;
  }
  .wrapper .editor-panel {
    width: 100%;
  }
  .wrapper .preview-img {
    width: 100%;
    margin: 0 0 15px;
  }
}

@media screen and (max-width: 500px) {
  .controls button {
    width: 100%;
    margin-bottom: 10px;
  }
  .controls .row {
    width: 100%;
  }
  .controls .row .save-img {
    margin-left: 0px;
  }
}
After we’ve added the CSS code, we’ll go over it step by step. To save time, you can simply copy this code and paste it into your IDE. Let us now examine our code step by step.
Weather App Using HTML,CSS and JavaScript (Source Code)
We will be adding some basic styling to our Image editor, but you guys can try new styling and share your code in the comments, which will help other people to think out of the box. you will be able to style the image editor own your own.
Step1: First, we’ll use the import link to add the Poppins typeface from Google Fonts. We will set the box-sizing to the border box and the margin and padding to “zero” using the universal selector. Using the font-family attribute, Poppins is selected as the font family.
We will now style the body of our webpage using the body. We have added a 10px padding and have the display set to flex. We will provide a minimum height of 100vh using the minimum height attribute. We will add centre alignment to the body of our webpage using the align-item attribute. The sky blue backdrop colour has been selected.
ADVERTISEMENT
/* Import Google font - Poppins */
@import url("https://fonts.googleapis.com/css2?family=Poppins:wght@400;500;600&display=swap");
* {
  margin: 0;
  padding: 0;
  box-sizing: border-box;
  font-family: "Poppins", sans-serif;
}
body {
  display: flex;
  padding: 10px;
  min-height: 100vh;
  align-items: center;
  justify-content: center;
  background: #e3f2fd;
}
ADVERTISEMENT
Step2: To style the container of our image editor, we will use the class selector (.container). The 850 pixel width has been set. Padding and a white backdrop have both been applied to our container’s interior utilising the background attribute. We will also give our container some curvature by utilising the border-radius parameter.
ADVERTISEMENT
Creating A Password Generator Using Javascript
ADVERTISEMENT
Now using the (.container . disable) and the opacity, we will add an opacity of 0.5 and the pointer event property is set to “none”.
ADVERTISEMENT
.container {
  width: 850px;
  padding: 30px 35px 35px;
  background: #fff;
  border-radius: 10px;
  box-shadow: 0 10px 20px rgba(0, 0, 0, 0.1);
}
.container.disable .editor-panel,
.container.disable .controls .reset-filter,
.container.disable .controls .save-img {
  opacity: 0.5;
  pointer-events: none;
}
Step3: The element inside of our container is now styled. We increase the heading’s font size to 22px and add a margin at the top. We’ll now add styling to our available options. The font colour is grey, and the display is set to flex. When the button is activated, the background turns blue.
Ecommerce Website Using HTML, CSS, & JavaScript (Source Code)
In a similar manner, we will give our slider a width of 100%, and if the height is set to 5px, the slider’s colour will change to blue.
.editor-panel .options,
.controls {
  display: flex;
  flex-wrap: wrap;
  justify-content: space-between;
}
.editor-panel button {
  outline: none;
  height: 40px;
  font-size: 14px;
  color: #6c757d;
  background: #fff;
  border-radius: 3px;
  margin-bottom: 8px;
  border: 1px solid #aaa;
}
.editor-panel .filter button {
  width: calc(100% / 2 - 4px);
}
.editor-panel button:hover {
  background: #f5f5f5;
}
.filter button.active {
  color: #fff;
  border-color: #5372f0;
  background: #5372f0;
}
.filter .slider {
  margin-top: 12px;
}
.filter .slider .filter-info {
  display: flex;
  color: #464646;
  font-size: 14px;
  justify-content: space-between;
}
.filter .slider input {
  width: 100%;
  height: 5px;
  accent-color: #5372f0;
}
.editor-panel .rotate {
  margin-top: 17px;
}
.editor-panel .rotate button {
  display: flex;
  align-items: center;
  justify-content: center;
  width: calc(100% / 4 - 3px);
}
.rotate .options button:nth-child(3),
.rotate .options button:nth-child(4) {
  font-size: 18px;
}
.rotate .options button:active {
  color: #fff;
  background: #5372f0;
  border-color: #5372f0;
}
.wrapper .preview-img {
  flex-grow: 1;
  display: flex;
  overflow: hidden;
  margin-left: 20px;
  border-radius: 5px;
  align-items: center;
  justify-content: center;
}
.preview-img img {
  max-width: 490px;
  max-height: 335px;
  width: 100%;
  height: 100%;
  object-fit: contain;
}
.controls button {
  padding: 11px 20px;
  font-size: 14px;
  border-radius: 3px;
  outline: none;
  color: #fff;
  cursor: pointer;
  background: none;
  transition: all 0.3s ease;
  text-transform: uppercase;
}
.controls .reset-filter {
  color: #6c757d;
  border: 1px solid #6c757d;
}
.controls .reset-filter:hover {
  color: #fff;
  background: #6c757d;
}
.controls .choose-img {
  background: #6c757d;
  border: 1px solid #6c757d;
}
.controls .save-img {
  margin-left: 5px;
  background: #5372f0;
  border: 1px solid #5372f0;
}
Step4: Now we will add repsonsiveness to our image editor . using the media query we will add responsivness we will set the maximum width for the screen if the width goes below the defined width then the size of our container and option will change according to the defined specification.
@media screen and (max-width: 500px) {
  .controls button {
    width: 100%;
    margin-bottom: 10px;
  }
  .controls .row {
    width: 100%;
  }
  .controls .row .save-img {
    margin-left: 0px;
  }
}
100+ JavaScript Projects With Source Code ( Beginners to Advanced)
Step3: JavaScript Code For Image Editor
const fileInput = document.querySelector(".file-input"),
  filterOptions = document.querySelectorAll(".filter button"),
  filterName = document.querySelector(".filter-info .name"),
  filterValue = document.querySelector(".filter-info .value"),
  filterSlider = document.querySelector(".slider input"),
  rotateOptions = document.querySelectorAll(".rotate button"),
  previewImg = document.querySelector(".preview-img img"),
  resetFilterBtn = document.querySelector(".reset-filter"),
  chooseImgBtn = document.querySelector(".choose-img"),
  saveImgBtn = document.querySelector(".save-img");

let brightness = "100",
  saturation = "100",
  inversion = "0",
  grayscale = "0";
let rotate = 0,
  flipHorizontal = 1,
  flipVertical = 1;

const loadImage = () => {
  let file = fileInput.files[0];
  if (!file) return;
  previewImg.src = URL.createObjectURL(file);
  previewImg.addEventListener("load", () => {
    resetFilterBtn.click();
    document.querySelector(".container").classList.remove("disable");
  });
};

const applyFilter = () => {
  previewImg.style.transform = `rotate(${rotate}deg) scale(${flipHorizontal}, ${flipVertical})`;
  previewImg.style.filter = `brightness(${brightness}%) saturate(${saturation}%) invert(${inversion}%) grayscale(${grayscale}%)`;
};

filterOptions.forEach((option) => {
  option.addEventListener("click", () => {
    document.querySelector(".active").classList.remove("active");
    option.classList.add("active");
    filterName.innerText = option.innerText;

    if (option.id === "brightness") {
      filterSlider.max = "200";
      filterSlider.value = brightness;
      filterValue.innerText = `${brightness}%`;
    } else if (option.id === "saturation") {
      filterSlider.max = "200";
      filterSlider.value = saturation;
      filterValue.innerText = `${saturation}%`;
    } else if (option.id === "inversion") {
      filterSlider.max = "100";
      filterSlider.value = inversion;
      filterValue.innerText = `${inversion}%`;
    } else {
      filterSlider.max = "100";
      filterSlider.value = grayscale;
      filterValue.innerText = `${grayscale}%`;
    }
  });
});

const updateFilter = () => {
  filterValue.innerText = `${filterSlider.value}%`;
  const selectedFilter = document.querySelector(".filter .active");

  if (selectedFilter.id === "brightness") {
    brightness = filterSlider.value;
  } else if (selectedFilter.id === "saturation") {
    saturation = filterSlider.value;
  } else if (selectedFilter.id === "inversion") {
    inversion = filterSlider.value;
  } else {
    grayscale = filterSlider.value;
  }
  applyFilter();
};

rotateOptions.forEach((option) => {
  option.addEventListener("click", () => {
    if (option.id === "left") {
      rotate -= 90;
    } else if (option.id === "right") {
      rotate += 90;
    } else if (option.id === "horizontal") {
      flipHorizontal = flipHorizontal === 1 ? -1 : 1;
    } else {
      flipVertical = flipVertical === 1 ? -1 : 1;
    }
    applyFilter();
  });
});

const resetFilter = () => {
  brightness = "100";
  saturation = "100";
  inversion = "0";
  grayscale = "0";
  rotate = 0;
  flipHorizontal = 1;
  flipVertical = 1;
  filterOptions[0].click();
  applyFilter();
};

const saveImage = () => {
  const canvas = document.createElement("canvas");
  const ctx = canvas.getContext("2d");
  canvas.width = previewImg.naturalWidth;
  canvas.height = previewImg.naturalHeight;

  ctx.filter = `brightness(${brightness}%) saturate(${saturation}%) invert(${inversion}%) grayscale(${grayscale}%)`;
  ctx.translate(canvas.width / 2, canvas.height / 2);
  if (rotate !== 0) {
    ctx.rotate((rotate * Math.PI) / 180);
  }
  ctx.scale(flipHorizontal, flipVertical);
  ctx.drawImage(
    previewImg,
    -canvas.width / 2,
    -canvas.height / 2,
    canvas.width,
    canvas.height
  );

  const link = document.createElement("a");
  link.download = "image.jpg";
  link.href = canvas.toDataURL();
  link.click();
};

filterSlider.addEventListener("input", updateFilter);
resetFilterBtn.addEventListener("click", resetFilter);
saveImgBtn.addEventListener("click", saveImage);
fileInput.addEventListener("change", loadImage);
chooseImgBtn.addEventListener("click", () => fileInput.click());
First of all we will create some constant variable which will store the value of our HTML elements and using the document.queryselector will select our html elements using their class name.
const fileInput = document.querySelector(".file-input"),
  filterOptions = document.querySelectorAll(".filter button"),
  filterName = document.querySelector(".filter-info .name"),
  filterValue = document.querySelector(".filter-info .value"),
  filterSlider = document.querySelector(".slider input"),
  rotateOptions = document.querySelectorAll(".rotate button"),
  previewImg = document.querySelector(".preview-img img"),
  resetFilterBtn = document.querySelector(".reset-filter"),
  chooseImgBtn = document.querySelector(".choose-img"),
  saveImgBtn = document.querySelector(".save-img");
Now using the let keyword we will create variables for brightness , saturation,inversion,grayscale. we will set their value as 100,100,0,0 respectively.
Weather App Using Html,Css And JavaScript
Similarly we will create for variable for our rotate = 0 , flip horizontal & flip vertical as 1 respectively.
let brightness = "100",
  saturation = "100",
  inversion = "0",
  grayscale = "0";
let rotate = 0,
  flipHorizontal = 1,
  flipVertical = 1;
Now using the anonymous function we will create a variable called file and using the file.Input file we will check the wheter any file is uploaded or not.
3D Image Rotate Effect on Mouse Hover Using CSS And JavaScript
if there is no file we will preview the url to upload the image and we will also add an event listener as the file user click on upload file the class (disable) will be removed.
Now we will a variable const applyFilter and inside it using the style.transform method we will change the value of rotate,scal & similarly for using the style.filter to change brightness, saturation,invert, grayscale.
const loadImage = () => {
  let file = fileInput.files[0];
  if (!file) return;
  previewImg.src = URL.createObjectURL(file);
  previewImg.addEventListener("load", () => {
    resetFilterBtn.click();
    document.querySelector(".container").classList.remove("disable");
  });
};

const applyFilter = () => {
  previewImg.style.transform = `rotate(${rotate}deg) scale(${flipHorizontal}, ${flipVertical})`;
  previewImg.style.filter = `brightness(${brightness}%) saturate(${saturation}%) invert(${inversion}%) grayscale(${grayscale}%)`;
};
Now we will add the functionality to change brightness and other filter. Using the add event listener and then using the conditional statement we will change the filter and brightness. I would suggest you guys to once go through the whole code you will understand the code easily.
Create Simple Portfolio Website Using Html Css (Portfolio Website Source Code)
Now we’ve completed our Image editor using HTML , CSS & javascript. I hope you understood the whole project. Let’s take a look at our Live Preview.
Final Output Of Image Editor Using HTML & JavaScript:
Codepen Preview Of Copy to Image editor using HTML & JavaScript
Now We have Successfully created our Image editor using HTML , CSS & javascript. You can use this project directly by copying into your IDE. WE hope you understood the project , If you any doubt feel free to comment!!
If you find out this Blog helpful, then make sure to search code with random on google for Front End Projects with Source codes and make sure to Follow the Code with Random Instagram page.
What are the basics features of image Editing?
1. Crop Image.
2. Adjust brightness.
3. Adjust Contrast.
4. Adjust Colour virbancy and saturation
5. Save
What is the purpose of image editing?
Brightness, width, and hue can all be modified in an image using image editing software. To rethink the picture in light of the circumstance is the goal of image editing.
