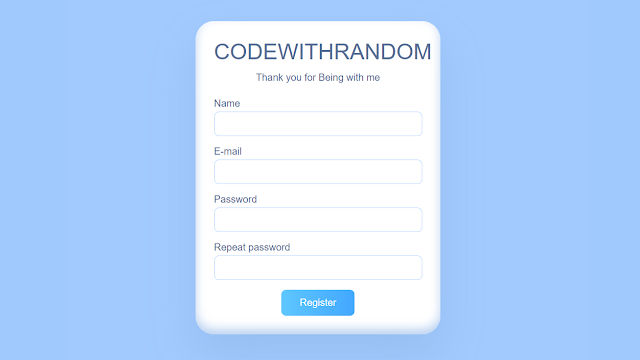
Claymorphism Design Form Using HTML and CSS
Welcome to the Codewithrandom blog. In this blog, we learn how to create a Claymorphism Design Form Using HTML and CSS. Claymorphism Design is similar to Neumorphism design. I hope you enjoy our blog so let’s start with a basic html structure for the Claymorphism Design Form.
HTML Code For Claymorphism Design Form
<div class="wrapper">
<h1 class="header">CODEWITHRANDOM</h1>
<p class="headerText">Thank you for Being with me</p>
<form>
<div class="inputWrapper">
<label for="name">Name</label>
<input id="name" type="text" autocomplete="off" required>
</div>
<div class="inputWrapper">
<label for="email">E-mail</label>
<input id="email" type="email" autocomplete="off" required>
</div>
<div class="inputWrapper">
<label for="password">Password</label>
<input id="password" type="password" required>
</div>
<div class="inputWrapper">
<label for="repeatPassword">Repeat password</label>
<input id="repeatPassword" type="password" required>
</div>
<button type="submit" class="submitButton">Register</button>
</form>
</div>
There is all the html code for the Claymorphism Design Form. Now, you can see output without Css, then we style Claymorphism Design Using Css.
Portfolio Website using HTML and CSS (Source Code)
Output
CSS Code For Claymorphism Design Form
* {
box-sizing: border-box;
}
body {
min-height: 100vh;
margin: 0;
background: #a2caff;
color: #576d95;
font-family: Arial;
display: flex;
justify-content: center;
align-items: center;
flex-direction: column;
}
.wrapper {
max-width: 400px;
width: 100%;
padding: 30px;
border-radius: 30px;
background: #fff;
box-shadow: 0 35px 68px 0 rgba(136, 174, 222, 0.42), inset 0 -8px 16px 0 #b9d1f1;
}
.header {
font-size: 36px;
font-weight: 500;
margin: 0 0 12px;
text-align: center;
}
.headerText {
font-size: 16px;
margin: 0 0 24px 0;
text-align: center;
}
.inputWrapper {
display: flex;
flex-direction: column;
align-items: flex-start;
justify-content: flex-start;
width: 100%;
margin: 0 0 16px 0;
}
.inputWrapper label {
margin: 0 0 4px 0;
}
.inputWrapper input {
width: 100%;
height: 40px;
padding: 8px 16px;
font-size: 16px;
border-radius: 8px;
border: 1px solid #b5d4ff;
color: #576d95;
outline-color: #236eb9;
}
.submitButton {
border: none;
padding: 12px 30px;
margin: 0 auto;
display: block;
font-size: 16px;
color: #fff;
border-radius: 8px;
background-image: linear-gradient(90deg, #5fc7ff 50%, #43a8ff 100%);
background-size: 200% 100%;
background-position: 100% 100%;
transition: background-position 256ms;
will-change: background-position;
cursor: pointer;
}
.submitButton:hover {
background-position: 0% 200%;
}
.link {
font-size: 16px;
margin: 50px 0 0 0;
display: block;
max-width: 400px;
width: 100%;
padding: 50px;
text-align: center;
color: #576d95;
border-radius: 30px;
background: #fff;
box-shadow: 0 35px 68px 0 rgba(136, 174, 222, 0.42), inset 0 -8px 16px 0 #b9d1f1;
}
Now we have completed our Claymorphism Design Form Using HTML and CSS.
Ecommerce Website Using HTML, CSS, & JavaScript (Source Code)
Final Output Of Claymorphism Design
100+ JavaScript Projects With Source Code ( Beginners to Advanced)
Now we have completed our CSS section, Here is our updated output with CSS. Hope you like the Claymorphism Design, you can see the output project screenshots. See our other blogs and gain knowledge in front-end development.
Thank you!
In this post, we learn how to create a Claymorphism Design Form using simple HTML and CSS. If we made a mistake or any confusion, please drop a comment to reply or help you in easy learning.
Written by – Code With Random/Anki
code by – Albert


