Image Carousel using HTML,CSS and JavaScript ( Source Code)
An Image Carousel is a UI component that displays a series of images or slides in a rotating manner. It can be used to display a slideshow of images, and allow users to navigate through the images by clicking on previous or next buttons or by clicking on navigation buttons that represent each slide. The Image Carousel is created using HTML, CSS and JavaScript. HTML provides the structure of the component, CSS provides the styling, and JavaScript is used to add the interactivity of switching between slides. The component can be customized to change the appearance and behavior of the Image Carousel to meet specific needs.
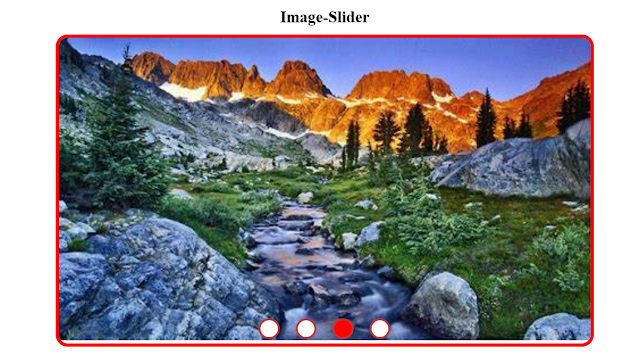
Heyy, Everyone Today we are going to create an Image Carousel using HTML, CSS, and JavaScript. I can assure you that completely reading this blog and making this project will boost your confidence and level up your skills in frontend dev. First of all, let’s look at How this looks after completing the code.
Live Preview Of Image Carousel:-
Live Preview of the Image Carousel project.
HTML Code For Image Carousel:-
<!DOCTYPE html>
<html lang="en">
    <head>
        <meta charset="UTF-8" />
        <meta http-equiv="X-UA-Compatible" content="IE=edge" />
        <meta name="viewport" content="width=device-width, initial-scale=1.0" />
        <title>Document</title>
        <link
            href="https://unpkg.com/[email protected]/dist/css/ionicons.min.css"
            rel="stylesheet"
        />
        <link rel="stylesheet" href="./style.css" />
    </head>
    <body>
        <div class="heading">Image-Slider</div>
        <div class="img-container">
            <img src="./img/1.jpg" alt="" class="img" />
            <div class="div prev" onclick="prev()">
                <ion-icon name="arrow-back"></ion-icon>
            </div>
            <div class="div next" onclick="next()">
                <ion-icon name="arrow-forward"></ion-icon>
            </div>
            <div class="radio">
                <button
                    class="radio-btn"
                    id="radio1"
                    onclick="imageShow(0)"
                ></button>
                <button
                    class="radio-btn"
                    id="radio2"
                    onclick="imageShow(1)"
                ></button>
                <button
                    class="radio-btn"
                    id="radio3"
                    onclick="imageShow(2)"
                ></button>
                <button
                    class="radio-btn"
                    id="radio4"
                    onclick="imageShow(3)"
                ></button>
            </div>
        </div>
        <script
            type="module"
            src="https://unpkg.com/[email protected]/dist/ionicons/ionicons.esm.js"
        ></script>
        <script
            nomodule=""
            src="https://unpkg.com/[email protected]/dist/ionicons/ionicons.js"
        ></script>
        <script src="./script.js"></script>
    </body>
</html>
This is an HTML file for a simple image slider that contains the following:
- A head section with meta information and links to CSS stylesheets, including a link to Ionicons library.
- A body section with the following elements:
- A heading with the text “Image-Slider”.
- An image container with an image (source: “./img/1.jpg”) and two buttons (previous and next) that call the JavaScript functions “prev()” and “next()”.
- Four radio buttons (with class “radio-btn”) that call the JavaScript function “imageShow()” with different parameters.
- A script section that includes:
- Two links to the Ionicons library (ESM and non-ESM version).
- A link to a JavaScript file (“./script.js”).
CSS (Styling the Image Carousel):-
*{
    margin: 0;
    padding: 0;
    box-sizing:border-box;
}
body{
    display:flex;
   min-height:100vh;
    width:100vw;
    justify-content: center;
    align-items:center;
    flex-direction: column;
}
.img-container{
    width:60vw;
    object-fit: cover;
    position: relative;
    border:4px solid red;
    border-radius:15px;
    overflow:hidden;
}
.div{
    position:absolute;
    visibility: hidden;

}
.next{
    top:50%;
    right:0;
    transform: translate(0,50%);
}
.prev{
    top:50%;
    left:0;
    transform: translate(0,50%);
}

img{
    position:relative;
    width:60vw;
    transition-duration:1s;

}
icon:active{
    color:red;

}
ion-icon{
    width:15px;
    height:15px;
    padding:10px;
    background-color: white;
    cursor: pointer;


}

.img-container:hover .div{
    visibility:visible;
}
.radio{
    position: absolute;
    bottom:0;
    display: flex;
    justify-content: center;
    width:100%;

}
.radio-btn{
    width:1vw;
    height:1vw;
    border-radius: 50%;
    background-color:white;
    margin:10px;
    padding:10px;
    border:3px solid rgb(194, 56, 56);
    margin-bottom:5px;
    transition-duration:1s;
}
.heading{
    font-weight: bolder;
    font-size:20px;
    margin-bottom: 10px;
}
It sets default styles for all elements on the page, including no margin or padding, and box-sizing to be border-box.
The body of the page is set to be a flex container, with a minimum height and width of 100% of the viewport and items centered both vertically and horizontally.
The class “img-container” sets styles for the container of an image slider, setting its width, border, border-radius, and making it a positioned container with hidden overflow.
The classes “next” and “prev” style the next and previous buttons in the image slider and position them in the top-right and top-left, respectively.
The img class sets styles for the images within the slider, making it positioned relative with a set width and transition-duration.
The “ion-icon” class styles the icons used in the next and previous buttons, setting the width, height, background color, padding, and cursor.
The class “img-container:hover .div” makes the next and previous buttons visible when the user hovers over the “img-container” element.
The class “radio” styles the radio buttons used to switch between images, setting their position, display, and justification.
The class “radio-btn” sets styles for the individual radio buttons, such as width, height, background color, border, and transition duration.
The “heading” class sets styles for the heading of the image slider, such as font-weight, size, and margin.
Javascript Code Image Carousel:-
const images=[
    {
        img:"https://i.pinimg.com/originals/57/ee/2b/57ee2b2dcfb1438479ed1dd80720a772.jpg"
    },{
        img:"https://th.bing.com/th/id/OIP.xKiE_jUn8tPueoLWXsyCPgHaEo?pid=ImgDet&rs=1"
    },{
        img:"https://th.bing.com/th/id/OIP.Sgs3Xw673xFLnE59pprVUQHaEK?pid=ImgDet&rs=1"
    },{
        img:"https://th.bing.com/th/id/R.fb535a20667848e1b1c2819904150734?rik=ansXOX3GQyAstA&riu=http%3a%2f%2fwallup.net%2fwp-content%2fuploads%2f2016%2f01%2f200866-nature-landscape-water.jpg&ehk=J6q1BlBYVKEY%2bNBEQh1kxbbDT%2bTlbd5ZzfrkOKvzqUA%3d&risl=&pid=ImgRaw&r=0"
    }
]
var i=0;
img=document.querySelector(".img")
const radio1=document.getElementById("radio1")
const radio2=document.getElementById("radio2")
const radio3=document.getElementById("radio3")
const radio4=document.getElementById("radio4")
const radioBtn=document.querySelectorAll(".radio-btn")
var type;

function next(){
    interval(false)
     i=(i+1)%(images.length)
     img.src=images[i].img
     radio(i)
     interval(true)
}
function prev(){
    interval(false)
    i=(i-1)%(images.length)
    if(i<0){
        i=3
    }
    radio(i)
    img.src=images[i].img
    interval(true)
}
function interval(e){
    if(e){
    type= setInterval(()=>{
            img.src=images[i].img
            radio(i);
            i=(i+1)%(images.length);
        },4000)
    }
    if(!e){
        clearInterval(type)
    }

}
window.addEventListener("DOMContentLoaded",()=>{
interval(true)
})
function radio(e){


if(e==0){
    radio3.style.backgroundColor="white"
    radio2.style.backgroundColor="white"
    radio4.style.backgroundColor="white"
    radio1.style.backgroundColor="red"
}
else if(e==1){
    radio3.style.backgroundColor="white"
    radio1.style.backgroundColor="white"
    radio4.style.backgroundColor="white"
    radio2.style.backgroundColor="red"
}
else if(e==2){
    radio2.style.backgroundColor="white"
    radio1.style.backgroundColor="white"
    radio4.style.backgroundColor="white"
    radio3.style.backgroundColor="red"
}
else if(e==3){
    radio3.style.backgroundColor="white"
    radio2.style.backgroundColor="white"
    radio1.style.backgroundColor="white"
    radio4.style.backgroundColor="red"
}
}
function imageShow(e){
    interval(false)
    img.src=images[e].img
    radio(e)
    interval(true)
}
The code starts with a variable declaration. The variable i is set to 0, and then the code begins to loop through an array of images that are stored in the img property of the Bing Image object.
The first image in this array is retrieved by using the rik property of the Bing Image object, which retrieves all images from a given source. Then it uses another property called risl to retrieve only those images that have been saved locally on your computer (as opposed to being hosted remotely).
This saves time because you don’t need to download every single image before you can use them.
Next, it uses yet another property called pid to get just one specific image out of this list: “https://th.bing.com/th/id/R.fb535a20667848e1b1c2819904150734?rik=ansXOX3GQyAstA&riu=http%3a%2f%2fwallup.net%2fwp-content%2fuploads%2f2016%2f01%2f200866-nature-landscape-water.”
The code is a function that takes an image URL as input and returns the first 10 pixels of the image. The code is a function that takes an image URL as input and returns the first 10 pixels of the image.
The code starts by setting up a variable called type. This is used to store the radio button’s value, which will be either “radio1”, “radio2”, or “radio3”.
Next, it creates an array of four radio buttons and assigns them values: var type; var radio1=document.getElementById(“radio1”) var radio2=document.getElementById(“radio2”) var radio3=document.getElementById(“radio3”) var radio4=document.getElementById(“radio4”)
ADVERTISEMENT
The code will have the following outcome: – The first radio button will be selected. – The second radio button will be unselected. – The third radio button will be selected. – The fourth radio button will be unselected.
ADVERTISEMENT
I hope you liked it Wait, Did you still not implement it So why are you waiting, go and implement it now 😎.
ADVERTISEMENT
100+ JavaScript Projects With Source Code ( Beginners to Advanced)
ADVERTISEMENT


