Create Multi Step Form Using HTML, CSS, and JavaScript
In this article, I will give you a step-by-step walkthrough for implementing a Multi Step Form in your web application Using Html, Css, and JavaScript. Steppers will be shown above the form that will represent the progress bar as we continue to fill in the form steps. Each form step will contain buttons named Prev and Next. These buttons will enable you to navigate between the steps.
| Code by | Tara Prasad Routray |
| Project Download | Link Available Below |
| Language used | HTML ,CSS and JavaScript |
| External link / Dependencies | No |
| Responsive | Yes |
To deal with long, complex forms we need to break them up into multiple steps. By only showing a few inputs on a screen at a time, the form will feel more digestible and prevent users from feeling overwhelmed by a sea of form fields.
50+ HTML, CSS & JavaScript Projects With Source Code
Build a Multi-Step Form in 3 Easy Steps
- Create the Layout of the Form and Step Elements Using HTML.
- Make the Multistep Form Functional Using JavaScript.
- Design the Form and the Step Elements Using CSS.
Step 1: Create the Layout of the Form and Step Elements Using HTML
HTML Code For Multi-Step Form
<!DOCTYPE html>
<html lang="en">
  <head>
    <meta charset="UTF-8" />
    <meta http-equiv="X-UA-Compatible" content="IE=edge" />
    <meta name="viewport" content="width=device-width, initial-scale=1.0" />
    <title>Multi-Step Form</title>
  </head>
  <body>
    <div>
      <h1>Create a Multi-Step Form Using HTML, CSS, and JavaScript</h1>
      <div id="multi-step-form-container">
        <!-- Form Steps / Progress Bar -->
        <ul
          class="form-stepper form-stepper-horizontal text-center mx-auto pl-0"
        >
          <!-- Step 1 -->
          <li
            class="form-stepper-active text-center form-stepper-list"
            step="1"
          >
            <a class="mx-2">
              <span class="form-stepper-circle">
                <span>1</span>
              </span>
              <div class="label">Account Basic Details</div>
            </a>
          </li>
          <!-- Step 2 -->
          <li
            class="form-stepper-unfinished text-center form-stepper-list"
            step="2"
          >
            <a class="mx-2">
              <span class="form-stepper-circle text-muted">
                <span>2</span>
              </span>
              <div class="label text-muted">Social Profiles</div>
            </a>
          </li>
          <!-- Step 3 -->
          <li
            class="form-stepper-unfinished text-center form-stepper-list"
            step="3"
          >
            <a class="mx-2">
              <span class="form-stepper-circle text-muted">
                <span>3</span>
              </span>
              <div class="label text-muted">Personal Details</div>
            </a>
          </li>
        </ul>
        <!-- Step Wise Form Content -->
        <form
          id="userAccountSetupForm"
          name="userAccountSetupForm"
          enctype="multipart/form-data"
          method="POST"
        >
          <!-- Step 1 Content -->
          <section id="step-1" class="form-step">
            <h2 class="font-normal">Account Basic Details</h2>
            <!-- Step 1 input fields -->
            <div class="mt-3">Step 1 input fields goes here..</div>
            <div class="mt-3">
              <button
                class="button btn-navigate-form-step"
                type="button"
                step_number="2"
              >
                Next
              </button>
            </div>
          </section>
          <!-- Step 2 Content, default hidden on page load. -->
          <section id="step-2" class="form-step d-none">
            <h2 class="font-normal">Social Profiles</h2>
            <!-- Step 2 input fields -->
            <div class="mt-3">Step 2 input fields goes here..</div>
            <div class="mt-3">
              <button
                class="button btn-navigate-form-step"
                type="button"
                step_number="1"
              >
                Prev
              </button>
              <button
                class="button btn-navigate-form-step"
                type="button"
                step_number="3"
              >
                Next
              </button>
            </div>
          </section>
          <!-- Step 3 Content, default hidden on page load. -->
          <section id="step-3" class="form-step d-none">
            <h2 class="font-normal">Personal Details</h2>
            <!-- Step 3 input fields -->
            <div class="mt-3">Step 3 input fields goes here..</div>
            <div class="mt-3">
              <button
                class="button btn-navigate-form-step"
                type="button"
                step_number="2"
              >
                Prev
              </button>
              <button class="button submit-btn" type="submit">Save</button>
            </div>
          </section>
        </form>
      </div>
    </div>
  </body>
</html>
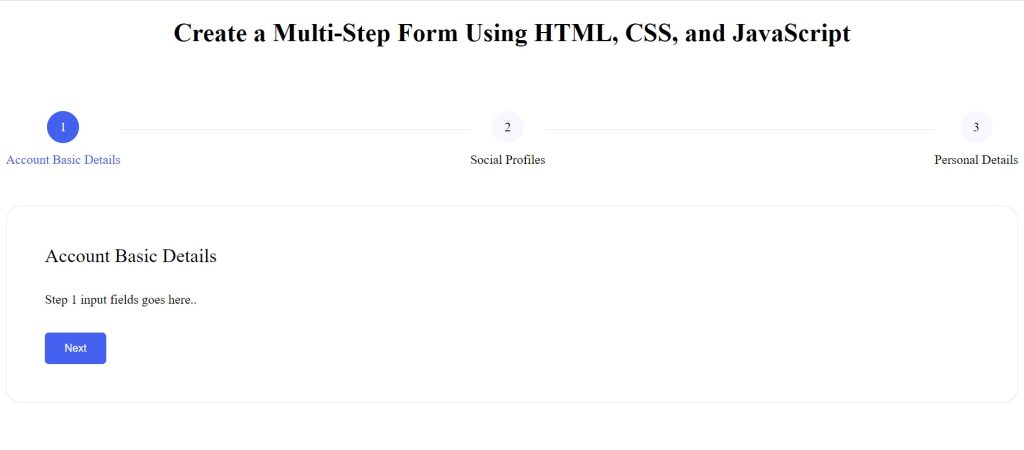
Let’s set up a basic HTML form before we will implement the navigator for form steps. It will include a form stepper, which will act as the progress bar.
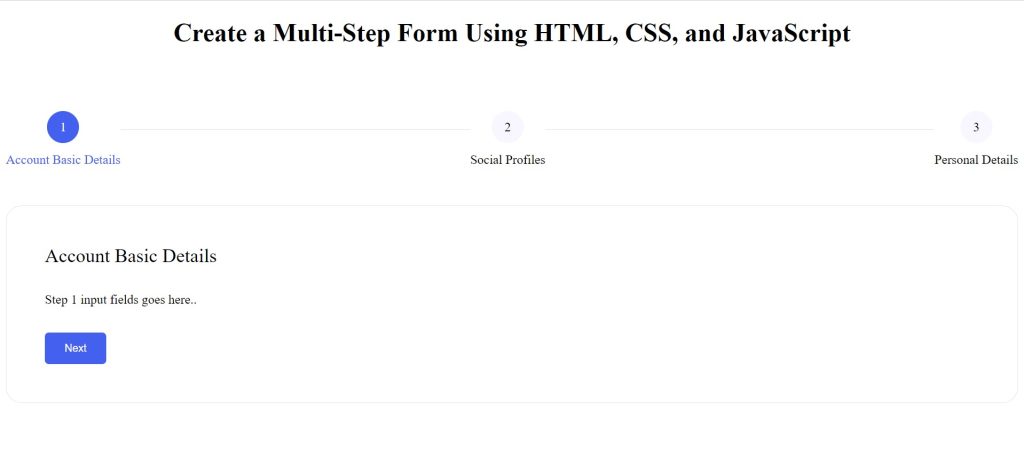
It will contain multiple items that will represent the step numbers. These items will be displayed as circles with the step number inside them. The unfinished steps will have their circle’s background color in grey.
Ecommerce Website Using HTML, CSS, & JavaScript (Source Code)
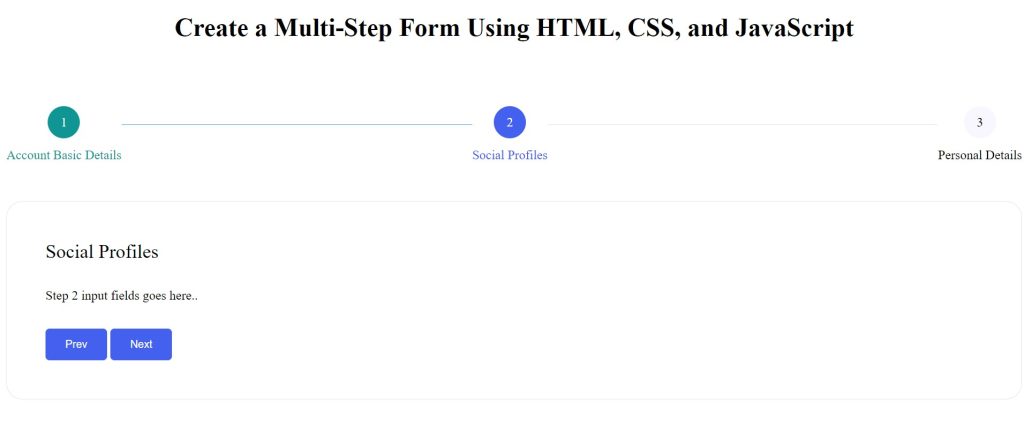
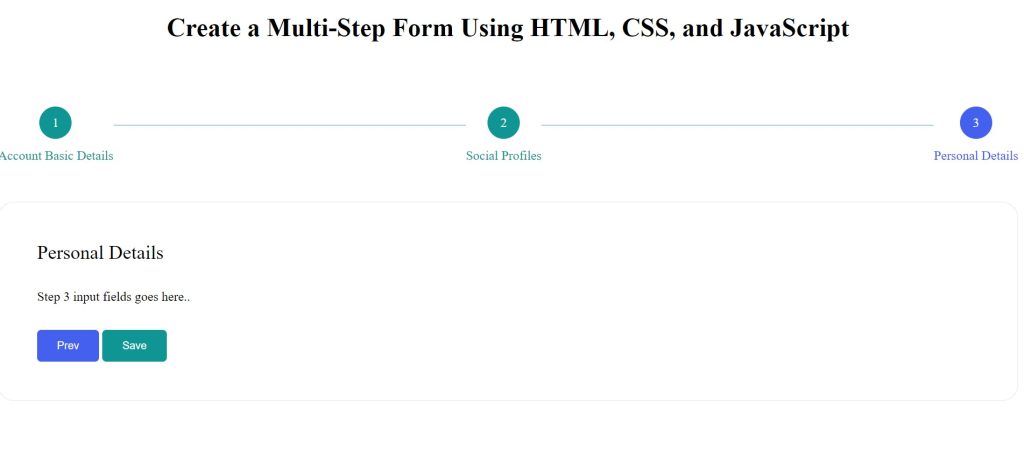
The active step will have its circle’s background color in purple. And, the completed steps will have their circle’s background color in green. After the form stepper, we need to create a form with multiple sections.
These sections will be available for all steps and will contain the form fields for each form step. Each step will contain a previous and next button, that will help to navigate between steps.
However, the last step will show a Save button, through which you can submit the form.
The code to build Form starts with a tag that has an id of “multi-step-form-container”. This is the container for our form. Next, we have an unordered list with a class of “form-stepper” and a class of “text-center mx-auto ul which means it will be horizontal and centered in the browser window.
Gym Website Using HTML and CSS With Source Code
The first number after the ul is how many items are in this list (in this case 0). The second number after the ul is how many lines there are per item (in this case 1)
The next line of form tells us that we’re creating an unordered list. Then comes a bunch of code inside parentheses: text-center mx-auto pl-. What does each part mean? Text Centered – centers text horizontally on screen Makes sure all paragraphs align to left margin Auto Margins – automatically adjusts margins so content doesn’t overlap or get cut off at edges Plain List – makes sure no styling gets applied to these items
This container will be used to hold all of the other forms steps and their respective labels. Inside this container, we will have an unordered list that holds all of our individual steps in order. The label for each step will be centered on its own line with a horizontal rule separating them from one another. Each step’s label should have text-center class applied to it so that it is horizontally centered within its own line.
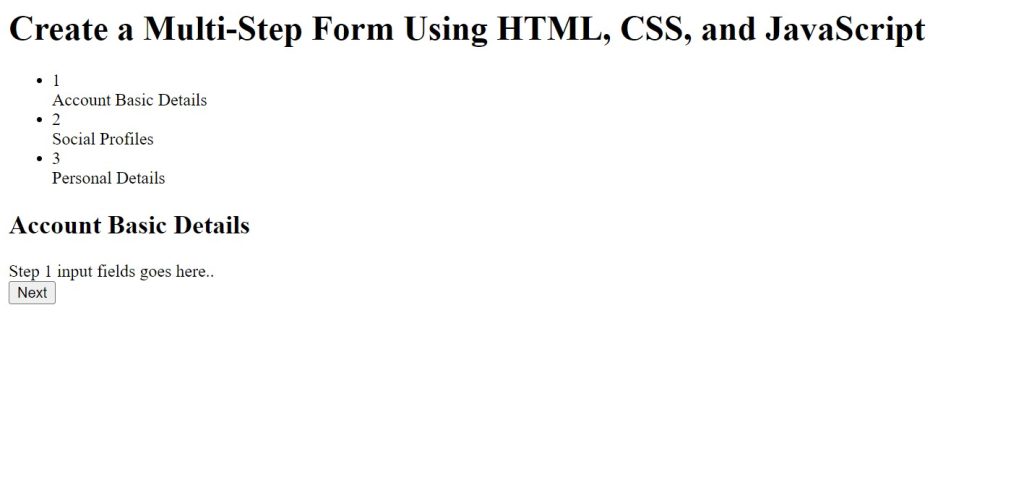
HTML Output
Simple Portfolio Website Using Html And Css With Source Code
Step 2: Make the Multistep Form Functional Using JavaScript
JavaScript Code For Multi-Step Form
/**
 * Define a function to navigate betweens form steps.
 * It accepts one parameter. That is - step number.
 */
const navigateToFormStep = (stepNumber) => {
    /**
     * Hide all form steps.
     */
    document.querySelectorAll(".form-step").forEach((formStepElement) => {
        formStepElement.classList.add("d-none");
    });
    /**
     * Mark all form steps as unfinished.
     */
    document.querySelectorAll(".form-stepper-list").forEach((formStepHeader) => {
        formStepHeader.classList.add("form-stepper-unfinished");
        formStepHeader.classList.remove("form-stepper-active", "form-stepper-completed");
    });
    /**
     * Show the current form step (as passed to the function).
     */
    document.querySelector("#step-" + stepNumber).classList.remove("d-none");
    /**
     * Select the form step circle (progress bar).
     */
    const formStepCircle = document.querySelector('li[step="' + stepNumber + '"]');
    /**
     * Mark the current form step as active.
     */
    formStepCircle.classList.remove("form-stepper-unfinished", "form-stepper-completed");
    formStepCircle.classList.add("form-stepper-active");
    /**
     * Loop through each form step circles.
     * This loop will continue up to the current step number.
     * Example: If the current step is 3,
     * then the loop will perform operations for step 1 and 2.
     */
    for (let index = 0; index < stepNumber; index++) {
        /**
         * Select the form step circle (progress bar).
         */
        const formStepCircle = document.querySelector('li[step="' + index + '"]');
        /**
         * Check if the element exist. If yes, then proceed.
         */
        if (formStepCircle) {
            /**
             * Mark the form step as completed.
             */
            formStepCircle.classList.remove("form-stepper-unfinished", "form-stepper-active");
            formStepCircle.classList.add("form-stepper-completed");
        }
    }
};
/**
 * Select all form navigation buttons, and loop through them.
 */
document.querySelectorAll(".btn-navigate-form-step").forEach((formNavigationBtn) => {
    /**
     * Add a click event listener to the button.
     */
    formNavigationBtn.addEventListener("click", () => {
        /**
         * Get the value of the step.
         */
        const stepNumber = parseInt(formNavigationBtn.getAttribute("step_number"));
        /**
         * Call the function to navigate to the target form step.
         */
        navigateToFormStep(stepNumber);
    });
});
Now, we need to implement the logic for navigating between the form steps. Create an arrow function named navigateToFormStep, that will accept one parameter named stepNumber.
This function will receive the value of the step to which you want to visit. It will mark the previous steps as completed, the current step as active, and the rest steps as unfinished.
Restaurant Website Using HTML and CSS
It will work for both the previous and next buttons, as we only need to pass the step number that will be visible and marked as active. Next, we need to select all previous and next buttons and add a click event listener to each of them.
On clicking any of these buttons, an anonymous function will be triggered, which will fetch the value of the target step, and will call the navigateToFormStep function to execute the navigation process.
The code starts by adding class “d-none” to all of the elements that are currently on the page.
Then it iterates through each element and adds class “form-stepper-unfinished” if it is not already there, then removes class “form-stepper-active”, and finally removes class “form-stepper-completed”.
Create Gmail Clone Template Using HTML and CSS (Gmail Template)
The code attempts to make the form-stepper-list elements show as “form-stepper-unfinished” and “form-stepper-completed” when the user navigates to a step in the form.
It also creates an object called “form-stepper-completed” and adds it to the classList property of each li element with a step attribute that has not been completed yet. The next line removes any classes from all unstarted forms, which are those without a completed circle on them, and adds the active class to all started forms, which have circles on them.
The code will remove the class “d-none” from all step labels that are not “form-stepper-completed”.
ADVERTISEMENT
You Might Like This:
ADVERTISEMENT
- Image Gallery Html Css
- 3D Card Rotate On Mouseover
- Indian Flag Source Code Html And CSS
- Flip Card Responsive Css
Step 3: Design the Form and the Step Elements Using CSS
ADVERTISEMENT
CSS Code For Multi-Step Form
h1 {
  text-align: center;
}
h2 {
  margin: 0;
}
#multi-step-form-container {
  margin-top: 5rem;
}
.text-center {
  text-align: center;
}
.mx-auto {
  margin-left: auto;
  margin-right: auto;
}
.pl-0 {
  padding-left: 0;
}
.button {
  padding: 0.7rem 1.5rem;
  border: 1px solid #4361ee;
  background-color: #4361ee;
  color: #fff;
  border-radius: 5px;
  cursor: pointer;
}
.submit-btn {
  border: 1px solid #0e9594;
  background-color: #0e9594;
}
.mt-3 {
  margin-top: 2rem;
}
.d-none {
  display: none;
}
.form-step {
  border: 1px solid rgba(0, 0, 0, 0.1);
  border-radius: 20px;
  padding: 3rem;
}
.font-normal {
  font-weight: normal;
}
ul.form-stepper {
  counter-reset: section;
  margin-bottom: 3rem;
}
ul.form-stepper .form-stepper-circle {
  position: relative;
}
ul.form-stepper .form-stepper-circle span {
  position: absolute;
  top: 50%;
  left: 50%;
  transform: translateY(-50%) translateX(-50%);
}
.form-stepper-horizontal {
  position: relative;
  display: -webkit-box;
  display: -ms-flexbox;
  display: flex;
  -webkit-box-pack: justify;
  -ms-flex-pack: justify;
  justify-content: space-between;
}
ul.form-stepper > li:not(:last-of-type) {
  margin-bottom: 0.625rem;
  -webkit-transition: margin-bottom 0.4s;
  -o-transition: margin-bottom 0.4s;
  transition: margin-bottom 0.4s;
}
.form-stepper-horizontal > li:not(:last-of-type) {
  margin-bottom: 0 !important;
}
.form-stepper-horizontal li {
  position: relative;
  display: -webkit-box;
  display: -ms-flexbox;
  display: flex;
  -webkit-box-flex: 1;
  -ms-flex: 1;
  flex: 1;
  -webkit-box-align: start;
  -ms-flex-align: start;
  align-items: start;
  -webkit-transition: 0.5s;
  transition: 0.5s;
}
.form-stepper-horizontal li:not(:last-child):after {
  position: relative;
  -webkit-box-flex: 1;
  -ms-flex: 1;
  flex: 1;
  height: 1px;
  content: "";
  top: 32%;
}
.form-stepper-horizontal li:after {
  background-color: #dee2e6;
}
.form-stepper-horizontal li.form-stepper-completed:after {
  background-color: #4da3ff;
}
.form-stepper-horizontal li:last-child {
  flex: unset;
}
ul.form-stepper li a .form-stepper-circle {
  display: inline-block;
  width: 40px;
  height: 40px;
  margin-right: 0;
  line-height: 1.7rem;
  text-align: center;
  background: rgba(0, 0, 0, 0.38);
  border-radius: 50%;
}
.form-stepper .form-stepper-active .form-stepper-circle {
  background-color: #4361ee !important;
  color: #fff;
}
.form-stepper .form-stepper-active .label {
  color: #4361ee !important;
}
.form-stepper .form-stepper-active .form-stepper-circle:hover {
  background-color: #4361ee !important;
  color: #fff !important;
}
.form-stepper .form-stepper-unfinished .form-stepper-circle {
  background-color: #f8f7ff;
}
.form-stepper .form-stepper-completed .form-stepper-circle {
  background-color: #0e9594 !important;
  color: #fff;
}
.form-stepper .form-stepper-completed .label {
  color: #0e9594 !important;
}
.form-stepper .form-stepper-completed .form-stepper-circle:hover {
  background-color: #0e9594 !important;
  color: #fff !important;
}
.form-stepper .form-stepper-active span.text-muted {
  color: #fff !important;
}
.form-stepper .form-stepper-completed span.text-muted {
  color: #fff !important;
}
.form-stepper .label {
  font-size: 1rem;
  margin-top: 0.5rem;
}
.form-stepper a {
  cursor: default;
}
Add the following code snippet to a style element or inside an external CSS file and use it on the page.
ADVERTISEMENT
The code starts with a tag that has an id of “multi-step-form-container”. Inside the div, there is a form. The form has two fields: one for name and one for email.
ADVERTISEMENT
There are also three buttons: submit, cancel, and reset. The code uses margin to create space between elements in order to make them easier to read and understand.
10+ HTML CSS Projects For Beginners (Source Code)
It also uses padding on some elements such as the text field inside the input box so that it doesn’t touch other elements when they’re not supposed to be touching each other.
The code will center the text on the page. The code above will make sure that there is no margin on the left and right of an element.
The code is a form with three fields: first name, last name, and email. code has two buttons: submit and cancel. The .form-step class is used to create the border around each field in the form. The code has been designed to have a button with a background color of #4361ee and border-radius of 5px. code also has a padding of 3rem on the top, bottom, left and right side.
The div used to group the form-stepper elements together.Inside of the ul, there are two form-steppers: one for horizontal and one for vertical. The code above has been written in order to make the form-stepper look like it’s being stepped on.
There are also three span tags inside of each form-stepper that have position: absolute; top: 50%; left: 50%; transform: translateY(-50%) translateX(-50%); This code moves the circles on both forms to be positioned at different parts of their respective forms.
The code will change the color of all the form-stepper .form-stepper-active elements to #4361ee and change the background color of all form-stepper .form-stepper-unfinished elements to #f8f7ff. Code will also change the color of all form-stepper .form-stepper-completed elements to #0e9594.
100+ JavaScript Projects With Source Code ( Beginners to Advanced)
Final Output Of Multi-Step Form
Video Output:
You have completed learning how to create a multistep form using purely HTML, CSS, and JavaScript.
Live Preview Of Multi-Step Form:
If you enjoyed reading this post and have found it useful for you, then please give a share with your friends, and follow me to get updates on my upcoming posts. You can connect with me on Instagram.
if you have any confusion Comment below or you can contact us by filling out our contact us form from the home section. 🤞🎉
Code By – Tara Prasad Routray
written by – Ninja_webTech
Which code editor do you use for this Multi Step Form Form coding?
I personally recommend using VS Code Studio, it’s straightforward and easy to use.
is this project responsive or not?
Yes! this is a responsive project
Do you use any external links to create this project?
No!
What is a multi-step form?
When you wish to divide a very large form into smaller, more manageable forms, multi-step forms are quite helpful. It resembles a wizard in that you must click “Next” to advance to the following screen.
Why Use a multi-step form?
The fact that multi-step forms divide the form into smaller sections to lessen the visitor’s question overload makes them fascinating tools for increasing customer engagement.
