Create iPhone/ios Checkbox Using CSS
Welcome to the Codewithrandom blog. In this blog, We learn how to create iPhone/ios Checkbox Using CSS. We use Html for creating Checkbox and Style Using Css.
I hope you enjoy our blog so let’s start with a basic html structure for iPhone/ios Checkbox.
HTML Code For iPhone/ios Checkbox
<h1>iOS-inspired checkbox</h1>
<div class="iphone">
<div class="iphone-top">
<span class="camera"></span>
<span class="sensor"></span>
<span class="speaker"></span>
</div>
<div class="top-bar"></div>
<div class="iphone-screen">
<label>
Bluetooth
<input type="checkbox" />
<i></i>
</label>
<label>
Wi-Fi
<input type="checkbox" checked/>
<i></i>
</label>
<label>
Mobile Data
<input type="checkbox" />
<i></i>
</label>
</div>
<div class="buttons">
<span class="on-off"></span>
<span class="sleep"></span>
<span class="up"></span>
<span class="down"></span>
</div>
<div class="bottom-bar"></div>
<div class="iphone-bottom">
<span></span>
</div>
</div>
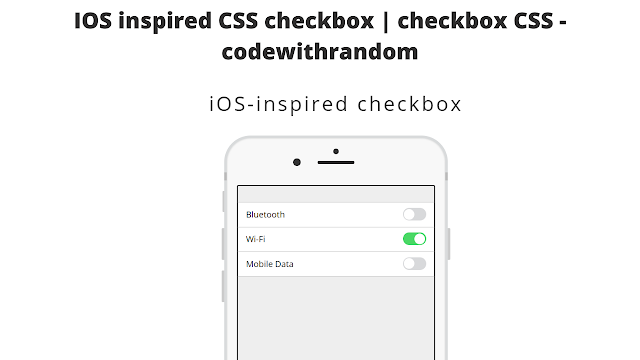
There is all the html code for the iPhone/ios Checkbox. Now, you can see output without Css. then we Styling iPhone/ios Checkbox.
Portfolio Website Using HTML CSS And JAVASCRIPT ( Source Code)
Output
CSS Code For iPhone/ios Checkbox
 *, *:after, *:before {
box-sizing: border-box;
}
body {
font: 10px "Open Sans", sans-serif;
padding: 30px;
}
h1 {
font-size: 2.4em;
text-align: center;
letter-spacing: 4px;
color: #333;
}
.iphone {
box-shadow: inset 0 0 3px 0 rgba(0, 0, 0, 0.2);
border: 5px solid #d9dbdc;
background: #f8f8f8;
padding: 15px;
border-radius: 50px;
height: 817px;
width: 423px;
margin: 30px auto;
position: relative;
}
.iphone-top {
padding: 5px 110px 40px;
position: relative;
}
.iphone-top .speaker {
display: block;
width: 70px;
height: 6px;
margin: 0 auto;
border-radius: 6px;
background: #292728;
}
.iphone-top .camera {
display: block;
margin: 0 auto;
height: 10px;
width: 10px;
border-radius: 50%;
margin-bottom: 13px;
background: #333;
}
.iphone-top .sensor {
display: block;
width: 15px;
height: 15px;
float: left;
background: #333;
margin-top: -5px;
border-radius: 50%;
}
.top-bar, .bottom-bar {
display: block;
width: 423px;
height: 15px;
border-left: 5px solid #bbb;
border-right: 5px solid #bbb;
position: absolute;
left: -5px;
}
.top-bar {
top: 65px;
}
.bottom-bar {
bottom: 65px;
}
.iphone-screen {
background: #eee;
padding: 30px 0;
border: 1px solid #fff;
height: 617px;
width: 375px;
margin: 0 auto;
border: 2px solid rgba(0, 0, 0, 0.9);
border-radius: 3px;
}
.buttons .on-off, .buttons .up, .buttons .down, .buttons .sleep {
display: block;
background: #ccc;
position: absolute;
border-radius: 2px 0px 0px 2px;
}
.buttons .on-off {
height: 40px;
width: 3px;
top: 100px;
left: -8px;
}
.buttons .up, .buttons .down, .buttons .sleep {
height: 60px;
width: 5px;
left: -10px;
}
.buttons .up {
top: 170px;
}
.buttons .down {
top: 250px;
}
.buttons .sleep {
left: auto;
right: -10px;
top: 170px;
border-radius: 0px 2px 2px 0px;
}
.iphone-bottom {
padding: 10px 0 0;
}
.iphone-bottom span {
display: block;
margin: 0 auto;
width: 68px;
height: 68px;
background: #ccc;
border-radius: 50%;
background: linear-gradient(135deg, #303233 0%, #b5b7b9 50%, #f0f2f2 69%, #303233 100%);
position: relative;
}
.iphone-bottom span:after {
content: "";
display: block;
width: 60px;
height: 60px;
background: #fff;
border-radius: 50%;
position: absolute;
left: 4px;
top: 4px;
}
label {
display: inline-block;
width: 100%;
background: #fff;
padding: 10px 15px;
border-top: 1px solid #bbb;
font-size: 2.4em;
}
label:last-child {
border-bottom: 1px solid #bbb;
}
label > input {
display: none;
}
label i {
display: inline-block;
float: right;
padding: 2px;
width: 40px;
height: 20px;
border-radius: 13px;
vertical-align: middle;
transition: 0.25s 0.09s;
position: relative;
background: #d8d9db;
box-sizing: initial;
}
label i:after {
content: " ";
display: block;
width: 20px;
height: 20px;
border-radius: 50%;
background: #fff;
position: absolute;
left: 2px;
transition: 0.25s;
}
label > input:checked + i {
background: #4bd865;
}
label > input:checked + i:after {
transform: translateX(20px);
}
label:hover {
cursor: pointer;
}
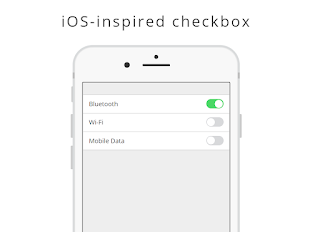
Now we have completed our iPhone/ios Checkbox. Here is our final updated output HTML + CSS.
Ecommerce Website Using HTML, CSS, & JavaScript (Source Code)
Final Output Of iPhone/ios Checkbox Using CSS
50+ HTML, CSS & JavaScript Projects With Source Code
Hope you like the iPhone/ios Checkbox, You can see output project screenshots. See our other blogs and gain knowledge in front-end development. Thank you
In this post, we learn how to Create iPhone/ios Checkbox Using HTML and CSS. If we made a mistake or any confusion, please drop a comment to reply or help you in easy learning.
Written by – Code With Random/Anki


