Textarea Character Limit Javascript | Textarea Limit Using Html Css Javascript
Learners, have you ever used Twitter so must have an idea that in the feed section we can’t put more than 30 words, so have you thought that how this stuff can be possible, let me tell you learner this is not the so tough call at all, in this blog we are going to design it by your self, so just join me on this blog and make sure your finger is free for scrolling down 😉.
Hey learners..!
Welcome to our 🎊 today’s blog with code with random. In this blog, we gonna learn how we can design Character limits in the text areas.
I hope you must have got an idea about the project.
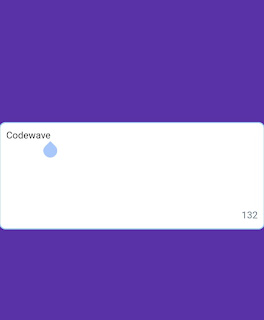
Let’s have a look at our project.
If you are able to observe this in the right corner so there is a number of fixed 140, it is showing that it will accept only 140 charcherter not more than that, so this is nothing but a character limit.
HTML SECTION
Here I’m not going to add a structure of the HTML file from scratch, I will just paste the body part, it is so because the body is the main part of our designing a browser.
So, let’s have count what is in the HTML part:-
- We have the main div with class rich-editor that will enclose everything of the project.
- By succeeding the first div we have a div with a class wrapper and within the wrapper, we have a text and blinking cursor div.
- In the end, we have a counter of 140 that is doing the job of limitless.
Go through the below code 👇 and run it in your IDE or where you used to design just HTML without CSS styling.
 <div class="rich-editor">
  <div class="wrapper">
   <div class="editor-area" contenteditable="true" placeholder="Enter text here..."></div>
   <div class="editor-backer"></div>
  </div>
  <span class="counter">140</span>
 </div>
CSS SECTION
By CSS we will design all the div and give them a box-like shape and we will place it in the center as well with the help of the display flex property.
And we will focus to put up the counter in the right corner.
The Below code will analyze you more👇. So just add in your HTML half complete file and wait to watch some magic.
 html,
 body {
  display: flex;
  width: 100%;
  height: 100%;
  padding: 0;
  margin: 0;
  background: #8132a8;
  font-family: "Helvetica Neue",Helvetica,Arial,sans-serif;
 }
 .rich-editor {
  width: 508px;
  height: auto;
  /* max-height: 134px;
  overflow-y: scroll;*/
  margin: auto;
  padding: 8px;
  background: #fff;
  border-radius: 8px;
  border: 1px solid #A4D9F9;
  box-shadow: 0 0 0 1px #A4D9F9;
 }
 .wrapper {
  position: relative;
  width: 100%;
  min-height: 116px;
  z-index: 1;
 }
 .editor-area, .editor-backer {
  width: 100%;
  height: auto;
  min-height: 116px;
  font-size: 14px;
  line-height: 20px;
  word-wrap: break-word;
  background: transparent;
 }
 .editor-area {
  outline: none;
  border: none;
 }
 .editor-area.is-showPlaceholder[contenteditable=true]:before {
  content: attr(placeholder);
  color: #ccd6dd;
  position: absolute;
 }
 .editor-backer {
  position: absolute;
  left: 0;
  top: 0;
  color: transparent;
  z-index: -1;
 }
 .editor-backer em {
  background-color: #ffb8c2;
  font-style: normal;
  font-size: 14px;
  line-height: 20px;
  white-space: pre-wrap;
  word-wrap: break-word;
 }
 .counter {
  float: right;
  color: #657786;
  font-size: 14px;
  line-height: 20px;
  text-align: right;
  user-select: none;
 }
 .counter.max-reached {
  color: #e0245e;
 }
Javascript section
In the Javascript part, we will add magic logic as initially only heading and textarea will be previewed and whenever you will hit the cursor on Textarea then both buttons will be pop-out.
And as we know there are two buttons we have added through HTML one is submit and the second one is canceled.
Whenever You will click on the cancel buttons then again both buttons will be hidden and the layout will turn into the previous one.
For observing this magic for this project then you should add the js file with the rest of the HTML and CSS file and enjoy this project and deploy it on Github.
 var editorArea = document.querySelector('.editor-area')
 var editorBacker = document.querySelector('.editor-backer')
 var counter = document.querySelector('.counter')
 var limitCnt = 140
 var isComposing = false
 editorArea.addEventListener('compositionstart', () => {
  isComposing = true
 })
 editorArea.addEventListener('compositionend', () => {
  isComposing = false
  //
  let text = editorArea.innerText
  setCounter(limitCnt - text.length)
 })
 function setCounter (cnt) {
  counter.innerHTML = cnt
  if (cnt < 0) {
   counter.classList.add('max-reached')
  } else {
   counter.classList.remove('max-reached')
  }
 }
 var inputCompose = function () {
  if (editorArea.innerHTML === '<div><br></div>' ||
   editorArea.innerHTML === '<br>' ||
   editorArea.innerHTML === '') {
   editorArea.classList.add('is-showPlaceholder')
  } else {
   editorArea.classList.remove('is-showPlaceholder')
  }
  let text = editorArea.innerText
  let remainingCnt = limitCnt - text.trim().length
  if (remainingCnt < 0) {
   let allowedText = text.substring(0, limitCnt)
   let refusedText = text.substring(limitCnt)
   editorBacker.innerHTML = allowedText + '<em>' + refusedText + '</em>'
  } else {
   editorBacker.innerHTML = ''
  }
  if (!isComposing) {
   setCounter(remainingCnt)
  }
 }
 inputCompose();
 editorArea.oninput = inputCompose
For a live preview, you can follow the below codepen..
See the Pen RichInputBox by YingshanDeng (@yingshandeng) on CodePen.
By this blog… We have learned how we can design a character limit in the text area…
Now I’m looking for your reviews.
So, How was the blog 😁, Learners!
If you want a more crisp blog like this then please check our Blogs sites CodewithRandom. keep tuned with us because every day you will learn something new here.😊
I hope that I’m able to make you understand this topic and you have learned something new from this blog. If you faced any difficulty feel free to drop a comment down your problems and if you liked it, please show your love in the comment section. This fills blogger hearts with enthusiasm for writing more and new blogs.
You can follow me on Instagram
Written by @Ankit kumar
.png)


