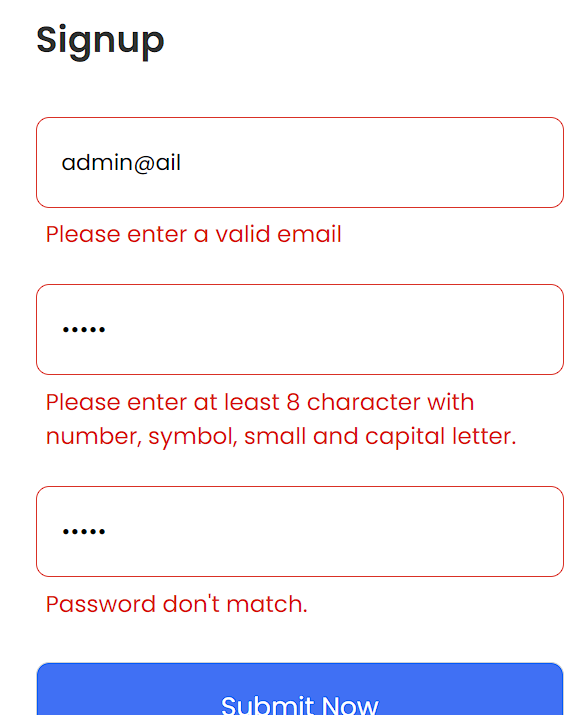
Forms are a method for building user profiles on a website. Forms assist in gathering user data and giving them a personal area or profile where they may execute personal tasks without the involvement of a third party.
Collecting data through forms is one thing, but how does the website owner know whether the profiles on their website are reliable or not? We use the form validation mechanism in Javascript to create profiles for just those users who are real and have accurate information. This strategy helps with fraud profiles and protects them from data leakage. In this article, we will build an interactive form using Javascript validation.

Codepen Preview:
See the Pen
Registration Form Validate by Alex Golovanov (@AlexGolovanov)
on CodePen.
Creating From Using HTML
<div class="container">
      <h3>Signup</h3>
      <form action="#">
        <div class="field email-field">
          <div class="input-field">
            <input type="email" placeholder="Enter your email" class="email" />
          </div>
          <span class="error email-error">
            <i class="bx bx-error-circle error-icon"></i>
            <p class="error-text">Please enter a valid email</p>
          </span>
        </div>
        <div class="field create-password">
          <div class="input-field">
            <input
              type="password"
              placeholder="Create Password"
              class="password"
            />
            <i class="bx bx-hide password-hide"></i>
          </div>
          <span class="error password-error">
            <i class="bx bx-error-circle error-icon"></i>
            <p class="error-text">
              Please enter at least 8 character with number, symbol, small and
              capital letter.
            </p>
          </span>
        </div>
        <div class="field confirm-password">
          <div class="input-field">
            <input
              type="password"
              placeholder="Confirm password"
              class="confirpassword"
            />
            <i class="bx bx-hide password-hide"></i>
          </div>
          <span class="error confirm-error">
            <i class="bx bx-error-circle error-icon"></i>
            <p class="error-text">Password don't match.</p>
          </span>
        </div>
        <div class="field button-field input-field">
          <input type="submit" value="Submit Now" />
        </div>
      </form>
    </div>
The standard HTML tags are used for creating the form. Here, we have constructed a main container using the <div> tag, which will be the parent container for the form, and the form tag inside the form tag utilizing fundamental form elements like username, email, password, and confirm password. These inputs were made and placed inside our form. These inputs can be constructed by utilizing the <input> tag with a certain type, which will produce the basic form structure.
Output:

Form Styling using CSS
@import url('https://fonts.googleapis.com/css2?family=Poppins:wght@300;400;500;600&display=swap');
* {
  padding: 0;
  margin: 0;
  box-sizing: border-box;
  font-family: 'Poppins', sans-serif;
}
body {
  display: flex;
  justify-content: center;
  align-items: center;
  min-height: 100vh;
  background-color: #4070f4;
}
.container {
  position: relative;
  width: 100%;
  max-width: 370px;
  padding: 25px;
  background-color: #fff;
  border-radius: 8px;
}
.container h3 {
  font-size: 22px;
  font-weight: 600;
  color: #333;
}
.container form {
  margin-top: 30px;
}
form .field {
  margin-bottom: 20px;
}
form .input-field {
  position: relative;
  width: 100%;
  height: 55px;
}
.input-field input {
  width: 100%;
  height: 100%;
  padding: 0 15px;
  border: 1px solid #d1d1d1;
  border-radius: 8px;
  outline: none;
}
.invalid input {
  border: 1px solid #d93025;
}
.input-field .password-hide {
  position: absolute;
  top: 50%;
  right: 15px;
  transform: translateY(-50%);
  font-size: 18px;
  color: #919191;
  padding: 3px;
  cursor: pointer;
}
.field .error {
  display: flex;
  align-items: center;
  margin-top: 6px;
  font-size: 14px;
  font-weight: 400;
  color: #d93025;
  display: none;
}
.invalid .error {
  display: flex;
}
.error .error-icon {
  font-size: 15px;
  margin-right: 6px;
}
.create-password .error {
  align-items: flex-start;
}
.create-password .error-icon {
  margin-top: 4px;
}
.button-field {
  margin: 25px 0 6px;
}
.button-field input {
  font-size: 16px;
  font-weight: 400;
  background-color: #4070f4;
  color: #fff;
  transition: all 0.3s;
  cursor: pointer;
}
.button-field input:hover {
  background-color: #0e4bf1;
}
A website’s styling is an integral component. We will use the class selector to style various form elements. Using the global selector (*), we will first apply the default styling to our form webpage. The webpage’s padding, margin, and font family will be set.
The body of the webpage will then get some background colour and font size additions. We will add a solid background to our form page using the background colour attribute.
@import url('https://fonts.googleapis.com/css2?family=Poppins:wght@300;400;500;600&display=swap');
* {
  padding: 0;
  margin: 0;
  box-sizing: border-box;
  font-family: 'Poppins', sans-serif;
}
body {
  display: flex;
  justify-content: center;
  align-items: center;
  min-height: 100vh;
  background-color: #4070f4;
}
We will now style the form’s container and its components. We’ll use the class selector (.container) to set the container’s width to 100%, the background colour to white, and the border-radius to add the curved form edges.
We will now style the various form inputs by utilising some fundamental class selectors. We will increase the form’s input fields’ width, height, margin, padding, and font size. Just read through the code and try adding your own styling to the form for a better understanding.
.container {
  position: relative;
  width: 100%;
  max-width: 370px;
  padding: 25px;
  background-color: #fff;
  border-radius: 8px;
}
.container h3 {
  font-size: 22px;
  font-weight: 600;
  color: #333;
}
.container form {
  margin-top: 30px;
}
form .field {
  margin-bottom: 20px;
}
form .input-field {
  position: relative;
  width: 100%;
  height: 55px;
}
.input-field input {
  width: 100%;
  height: 100%;
  padding: 0 15px;
  border: 1px solid #d1d1d1;
  border-radius: 8px;
  outline: none;
}
.invalid input {
  border: 1px solid #d93025;
}
.input-field .password-hide {
  position: absolute;
  top: 50%;
  right: 15px;
  transform: translateY(-50%);
  font-size: 18px;
  color: #919191;
  padding: 3px;
  cursor: pointer;
}
.field .error {
  display: flex;
  align-items: center;
  margin-top: 6px;
  font-size: 14px;
  font-weight: 400;
  color: #d93025;
  display: none;
}
.invalid .error {
  display: flex;
}
.error .error-icon {
  font-size: 15px;
  margin-right: 6px;
}
.create-password .error {
  align-items: flex-start;
}
.create-password .error-icon {
  margin-top: 4px;
}
.button-field {
  margin: 25px 0 6px;
}
.button-field input {
  font-size: 16px;
  font-weight: 400;
  background-color: #4070f4;
  color: #fff;
  transition: all 0.3s;
  cursor: pointer;
}
.button-field input:hover {
  background-color: #0e4bf1;
}
CSS Output:

Form Validation Using Javascript
We will include the form validation feature within our form using Javascript. This kind of validation helps in validating only accurate information. We will add validation to various form elements. We will include the password and confirm password validating properties inside the email.
const form = document.querySelector('form'),
  emailField = form.querySelector('.email-field'),
  emailInput = emailField.querySelector('.email'),
  passField = form.querySelector('.create-password'),
  passInput = passField.querySelector('.password'),
  cPassField = form.querySelector('.confirm-password'),
  cPassInput = cPassField.querySelector('.confirpassword');
Using the document.queryselector, we will first choose each element of the HTML form. All of the HTML form components will be chosen for the validation function.
Email Validation:
// ---- ---- Email Validation ---- ---- //
function checkEmail() {
  const emailPattern = /^[^ ]+@[^ ]+\.[a-z]{2,3}$/;
  if (!emailInput.value.match(emailPattern)) {
    return emailField.classList.add('invalid');
  }
  emailField.classList.remove('invalid');
}
We will create an email validation function to add a validation property to our email, and within that function, we will establish a constant variable containing the unique symbols and characters needed for email validation. Then, if-else condition will be used to determine whether or not the input email pattern fits the default pattern. If not, an incorrect email will be displayed and the class will be added using the class.addlist method.
Hide Password:
// ---- ---- Hide Password ---- ---- //
const eyeIcons = document.querySelectorAll('.password-hide');
eyeIcons.forEach((eyeIcon) => {
  eyeIcon.addEventListener('click', () => {
    const pInput = eyeIcon.parentElement.querySelector('input');
    if (pInput.type === 'password') {
      eyeIcon.classList.replace('bx-hide', 'bx-show');
      return (pInput.type = 'text');
    }
    eyeIcon.classList.replace('bx-show', 'bx-hide');
    return (pInput.type = 'password');
  });
});
In order to protect the user’s privacy, the password can be hidden using the mechanism known as “hide password.” We will choose the hidepassword element and add a click event to our hide password using the hidepassword function. The input text will replace the concealed dots as soon as the user clicks on the eye.
Password Validation:
// ---- ---- Password Validation ---- ---- //
function createPass() {
  const passPattern =
    /^(?=.*[a-z])(?=.*[A-Z])(?=.*\d)(?=.*[@$!%*?&])[A-Za-z\d@$!%*?&]{8,}$/;

  if (!passInput.value.match(passPattern)) {
    return passField.classList.add('invalid');
  }
  passField.classList.remove('invalid');
}
// ---- ---- Confirm Password Validation ---- ---- //
function confirmPass() {
  if (passInput.value !== cPassInput.value || cPassInput.value === '') {
    return cPassField.classList.add('invalid');
  }
  cPassField.classList.remove('invalid');
}

// ---- ---- Calling Function on Form Sumbit ---- ---- //
form.addEventListener('submit', (e) => {
  e.preventDefault();
  checkEmail();
  createPass();
  confirmPass();
  emailInput.addEventListener('keyup', checkEmail);
  passInput.addEventListener('keyup', createPass);
  cPassInput.addEventListener('keyup', confirmPass);
});
In the password validation function, we will create a constant variable and store all the special characters, and we will define the length of the password to be 8 characters along with letters, numbers, and special characters. Along with these validations, we will create the password pattern match inside the password validation using the if-else condition.
When the user clicks the submit button, the checkemail, createpass, and confirmpass functions run and determine whether or not all the conditions are met. This is done by using the click event listener. The form will be submitted if you’re happy.
Video Output:
Now We have Successfully created the interactive form with javascript validation. You can use this project directly by copying it into your IDE. We hope you understood the project, If you have any doubts feel free to comment!!
If you find out this Blog helpful, then make sure to search Codewithrandom on google for Front End Projects with Source codes and make sure to Follow the Code with Random Instagram page.
Follow: CodewithRandom
Author: Arun
CodeBy: Alex
ADVERTISEMENT


