Hello Developers, Today we will look at one of my best portfolio projects for this year. We always deliver new and dynamic projects to our followers, as promised. Here I present you a dynamic portfolio website in WhatsApp chat style.
I promise this kind of portfolio you haven’t seen before. In this project we will be using advanced concepts of HTML, CSS,CSS and Javascript. We will create a chatbot-like portfolio where the user can find all about me just chatting through my portfolio bot.
I have used the advanced concepts of Javascript for adding the dynamic nature to our portfolio and making it unique compared to other portfolios you have seen on the internet.
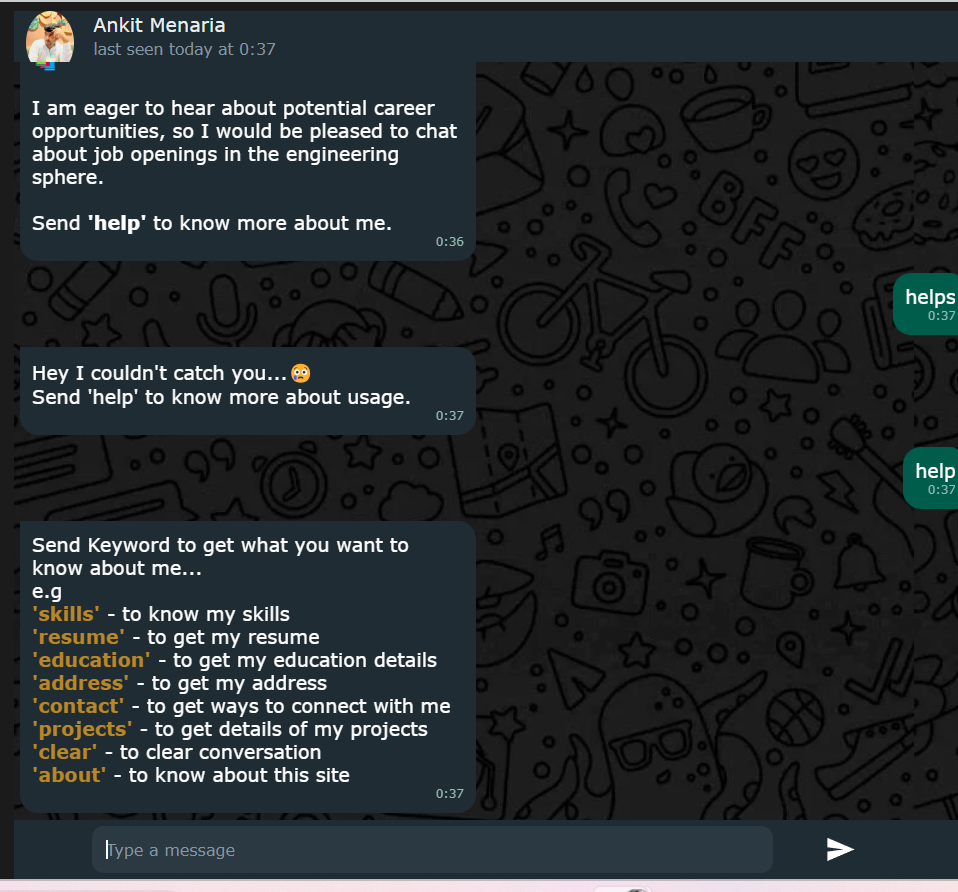
You must be wondering, How can you create this kind of project? Right . Don’t worry, today I’ll be teaching you the step-by-step process for creating this portfolio, and if you have some doubts, you are free to ask any questions in the comment section. So without further ado, let’s look at the output of our project first.
Looks very cool, right? It feels like we are talking in real time with someone. We have used various icons and images and other essential media items for creating this project, which we will be discussing later on in our project.
But first we should have some information about portfolios, like:
100+ JavaScript Projects For Beginners With Source Code
What is a portfolio and its benefit?
A portfolio is a webpage that contains the personal information of an individual, which helps them to get in touch with job recruiters, which is a convenient way of connecting with different people at the same time.
Adding the Structure to our portfolio
We have first created a base for our portfolio using the standard HTML tags. Firstly, we added some meta tags, which help the browser understand all about the project, and using the title tag, we added a small title to our portfolio page.
Inside the body tag we created an onload function: “It is a javascript function that runs a script of code just after the loading of the webpage.”.
Now inside our body section, using the <nav> tag, we create a dedicated navbar for giving a WhatsApp chatlook to our project. Using the navbar, we will add the title and display image of the user along a single line and also add the last date and time of the user when he was active.
To add the active time, we will be using the javascript date and time function, which fetches the current date and time of the user from their web browser. We will get more information about this date and time function when I work with you guys on the javascript part of our portfolio.
In the bottom of our portfolio webpage, we create a send message section along with a send button icon. For creating this section, we have used the text area for adding the section where the user can ask a question and a send button to send the question to the developer.
<!DOCTYPE html>
<html lang="en">
<head>
<meta charset="UTF-8">
<meta http-equiv="X-UA-Compatible" content="IE=edge">
<link rel="stylesheet" href="style.css">
<script src="script.js"></script>
<meta name="viewport" content="width=device-width, initial-scale=1.0">
<meta property="og:site_name" content="View Vinayak Patil's Portfolio Website">
<meta property="og:title" content="Developer | Tech Enthusiast" />
<meta property="og:description" content="Hello there 👋🏻,My name is Ankit Menaria.I am the founder of codewithrandom 👨🏻💻📚I am eager to hear about potential career opportunities, so I would be pleased to chat about job openings in the engineering sphere.Send 'help' to know more about me."
/>
<meta property="og:image" itemprop="image" content="https://vinayak-portfolio-09.herokuapp.com/images/dp.jpg">
<meta property="og:type" content="website" />
<link itemprop="thumbnailUrl" href="https://vinayak-portfolio-09.herokuapp.com/images/dp.jpg">
<!-- No need to change anything here -->
<meta property="og:type" content="website" />
<meta property="og:image:type" content="image/jpeg">
<!-- Size of image. Any size up to 300. Anything above 300px will not work in WhatsApp -->
<meta property="og:image:width" content="300">
<meta property="og:image:height" content="300">
<meta property="og:updated_time" content="1440432930" />
<title>Developer | Tech Enthusiast | </title>
</head>
<body onload="startFunction()">
<link itemprop="thumbnailUrl" href="https://vinayak-portfolio-09.herokuapp.com/images/dp.jpg">
<span itemprop="thumbnail" itemscope itemtype="http://schema.org/ImageObject">
<link itemprop="url" href="https://vinayak-portfolio-09.herokuapp.com/images/dp.jpg">
</span>
<nav>
<div class="navbar">
<img class="dpimg" onclick="openFullScreenDP()" src="images/squareDp.jpg" alt="">
<div class="personalInfo">
<label id="name">Ankit Menaria</label>
<label id="lastseen">last seen today at 3:24 pms</label>
</div>
</div>
</nav>
<div class="scrollable" id="myScrollable">
<div class="fullScreenDP" id="fullScreenDP">
<div class="insideDP">
<img class="dp" src="images/squareDp.jpg" alt="">
<svg class="closeBTN" onclick="closeFullDP()" xmlns="http://www.w3.org/2000/svg" width="64px" viewBox="0 0 512 512" height="64px">
<path class="btnColor" fill="#E04F5F"
d="M504.1,256C504.1,119,393,7.9,256,7.9C119,7.9,7.9,119,7.9,256C7.9,393,119,504.1,256,504.1C393,504.1,504.1,393,504.1,256z" />
<path fill="#FFF"
d="M285,256l72.5-84.2c7.9-9.2,6.9-23-2.3-31c-9.2-7.9-23-6.9-30.9,2.3L256,222.4l-68.2-79.2c-7.9-9.2-21.8-10.2-31-2.3c-9.2,7.9-10.2,21.8-2.3,31L227,256l-72.5,84.2c-7.9,9.2-6.9,23,2.3,31c4.1,3.6,9.2,5.3,14.3,5.3c6.2,0,12.3-2.6,16.6-7.6l68.2-79.2l68.2,79.2c4.3,5,10.5,7.6,16.6,7.6c5.1,0,10.2-1.7,14.3-5.3c9.2-7.9,10.2-21.8,2.3-31L285,256z" />
</svg>
</div>
</div>
<div id="chatting" class="chatting">
<ul id="listUL">
</ul>
</div>
</div>
<footer>
<div class="sendBar">
<input id="inputMSG" onkeypress="isEnter(event)" type="text" placeholder="Type a message" autofocus>
<svg onclick="sendMsg()" viewBox="0 0 24 24" width="24" height="24" class="">
<path fill="currentColor"
d="M1.101 21.757 23.8 12.028 1.101 2.3l.011 7.912 13.623 1.816-13.623 1.817-.011 7.912z"></path>
</svg>
</div>
</footer>
</body>
</html>Styling Our Portfolio
Adding Basic Style to Display Image and title
First of all, we will be using the uninversal tag selector, in which we will set the padding and the margin of the webpage to zero from the browser’s default padding and margin. Also using the font-family property, we will set the font styling to Verdana.
Now using the Body tag selector, we will add the styling to the body of our webpage, in which, using the background color property, we will set the background as black, and using the background-size property, we will set it as “unset.”.
Now we will add the styling to our navbar, where we will set the display type as “flex,” and using the height property, we will set the height as 6% of the body size and the background as a dark gray. Then we will add the styling to our DP (display image), and we will change its position and shape to the circle.
*{
    padding: 0;
    margin: 0;
    font-family: Verdana, Tahoma, sans-serif;
}

body{
    padding-top: 1vh;
    background-color: #1b1b1b;
    background-size: unset;
    background-repeat: repeat;
    height: 98vh;
}

nav{
    display: flex;
    height: 6%;
    background-color: #202c33;
}

.navbar{
    width: 100%;
    display: flex;
}


.dpimg{
    cursor: pointer;
    border-radius: 100%;
    width: 5%;
    height: 5%;
    height: auto;
    margin: auto 0px;
    margin-left: 10px;
}

.navbar .personalInfo{
    line-height: 100%;
    display: flex;
    flex-direction: column;
    margin: auto 0px;
    margin-left: 2%;
}

.personalInfo #name{
    color: #e9edef;
    margin-bottom: 4px;
}

.personalInfo #lastseen{
    color: #8696a0;
    font-size: small;
}


.scrollable{
    overflow-y: scroll;
    color: #fff;
    display: flex;
    height: 88%;
    flex-direction: column;
    background-image: url('images/bg.webp');
    align-items: flex-end;
    position: relative;
    -ms-overflow-style: none;
    scrollbar-width: none;
    position: relative;
}

.scrollable .chatting{
    overflow-y: scroll;
    -ms-overflow-style: none;
    scrollbar-width:none;
    position: relative;
    height: 100%;
    width: 100%;
}

.scrollable .chatting::-webkit-scrollbar {
    display: none;
  }
Adding Styling to the Social Items (Icons)
We will first of all hide all the icons that are visible on the webpage just after the loading of the website. We will use the property as display time hidden, and then we will set the positioning, styling, and alignment of the social icons according to our portfolio webpage to make it a visually appealing and unique project.
We will be using different classes for different elements, but the concept is the same. I would suggest you guys give it a try by yourself in this section to have a better in-depth knowledge for styling the website parts on their own, which will help you understand the importance of styling in the development of webpages.
#listUL{
    overflow-y: hidden;
    position: static;
    width: 100%;
    bottom: 0;
    list-style-type: none;
    display: flex;
    flex-direction: column;
}

#listUL li{
    width: 100%;
    text-decoration: none;
    flex-direction: row-reverse;
}

.sent{
    text-align: end;
    float: right;
    width: auto;
    max-width: 45%;
}

.green{
    margin: 5px;
    text-align: start;
    width: auto;
    padding: 10px;
    background-color: #005c4b;
    border-radius: 15px 15px 0px;
}

#sentlabel{
    color: #94bab3;
    display: block;
    text-align: end;
    font-size: x-small;
}

.recieved{
    float: left;
    width: 45%;
    max-width: 45%;
    background-color: red;

}


.grey{
    max-width: 45%;
    margin: 5px;
    text-align: start;
    width: auto;
    padding: 10px;
    background-color: #202c33;
    border-radius: 0px 15px 15px;
}

.grey .mapview{
    margin: auto;
    display: flex;
    padding: 5px;
}

.add address{
    margin-top: 10px;
    padding-left: 15px;
}

.map{
    margin: auto;
    width: 100%;
    border-radius: 10px;
}

.dateLabel{
    color: #94bab3;
    display: block;
    text-align: end;
    font-size: x-small;
}


/* help menu bold words color  */

.sk .bold{
    color: rgba(219, 154, 33, 0.822);
}


/* resume thumbnail in received class*/
.resumeThumbnail{
    width: 100%;
    border-radius: 10px 10px 0px 0px;
}

.downloadSpace{
    background-color: #1d282f;
    display: flex;
    width: 100%;
}
.downloadSpace .pdfname{
    display: flex;
    width: 100%;
}
.pdfname label{
    margin: auto 0px;
}
.downloadSpace img{
    width: 30px;
    cursor: pointer;
    margin: 5px;
}

/* this css is used for embedded html in messages */
.bold{
    font-weight: bold;
}

.alink{
    color: goldenrod;
    transition: all 600ms ease;
    text-decoration: none;
}

.alink:hover{
    text-decoration: none;
    color: green;
}

/* this css is used for social links message */

.social{
    padding: 10px;
}

.social .socialItem{
    width: 100%;
    border-radius: 10px;
    background-color: #94bab3;
    cursor: pointer;
    display: flex;
    margin-bottom: 10px;
    transition: all 500ms ease-in-out;
}

.social .socialItemI{
    margin: auto;
    padding: 10px;
    flex-direction: column;
}

.social .socialItem:hover{
    background-color: rgba(58, 170, 58, 0.863);
}
#call{
    flex-direction: column;
    text-align: center;
}

.number{
    display: none;
}
Styling the Textmessage Sending Section of our portfolio
ADVERTISEMENT
We will be using the fullscreen child class selector; this will help in adding transitions of ease-in-out. It is a transition effect in which, when the user clicks or hovers over the display image, The DP size will increase and decrease gradually.
ADVERTISEMENT
Also, we will be adding different colors on the hover effect to the social media icon. A hover effect is a type of styling effect in which, as soon as the user moves the cursor on a particular element, the background and other styling properties of that element change.
ADVERTISEMENT
scrollable .fullScreenDP{
    transition: all 700ms ease-in-out;
    position: absolute;;
    width: 100%;
    height: 100%;
    display: none;
    flex-direction: column;
    background-color: #2f2f2fec;
    z-index: 1000;
}

.scrollable .fullScreenDP .insideDP{
    display: flex;
    margin: auto;
    scrollbar-width: 0px;
}

.closeBTN{
    width: 30px;
    height: 30px;
    display: block;
    position: absolute;
    margin-left: 6%;
    margin-top: 5px;
    cursor: pointer;

}

.btnColor{
    fill: rgba(0, 0, 0, 0.692);
    transition: all 400ms ease-in-out;
}

.closeBTN:hover .btnColor{
    fill: red;
}


.scrollable .fullScreenDP .insideDP .dp{
    width: 90%;
    margin: auto;
    border-radius: 10px;
}


footer{
    position: relative;
    left: 0;
    bottom: 0;
    width: 100%;
    color: white;
    text-align: center;
    height: auto;
    background-color: #202c33;
    text-align: center;
}

.sendBar{
    display: flex;
    height: 100%;
    width: 100%;
    margin: auto;
}
.sendBar svg{
    margin: auto;
    height: 40%;
    min-height: 40%;

}

.sendBar input[type='text']{
    margin: auto;
    margin: 5px;
    border-radius: 10px;
    padding: 10px;
    color: #fff;
    float: left;
    width: 80%;
    height: 100%;
    outline-color: transparent;
    accent-color: transparent;
    background-color: #2a3942;
    outline: none;
    border-color: transparent;
}


::placeholder {
    color: #8696a0;
    opacity: 1;
  }

  :-ms-input-placeholder {
    color: #8696a0;
  }

  ::-ms-input-placeholder {
    color: #8696a0;
  }


@media screen and (min-width: 1024px) {

    body{
        margin: auto;
        width: 50vw;
    }

    .sendBar{
        width: 85%;
    }

    .scrollable{
        -ms-overflow-style: none;
        scrollbar-width: none;
        position: relative;
        overflow: hidden;
    }


    .scrollable .fullScreenDP{
        display: none;
        width: 100%;
        height: 100%;
        overflow-y: scroll;
    }


    .scrollable .fullScreenDP .insideDP{
        display: flex;
        width: 70%;
    }


    .scrollable .fullScreenDP .dp{
        width: 50%;
        margin: auto;
    }

    .scrollable .closeBTN{
        margin-top: 15px;
    }

    #call:hover .number{
        display: block;
        height: auto;
    }
}
Most Important Part of Project- Adding Javascript Functionality to make it dynamic.
Creating Variable and Assigning Values:
ADVERTISEMENT
We will create four variables , which we will be using to store our value. This variable keyword is a predefined keyword inside javascript and it will store an audio tone file , which will be played using a actiontrigger keyword function
ADVERTISEMENT
Then we will create a string variable in which we will store all the hyperlinks and the details of the developer for the social section.Similarly we will create this variable for storing the address of the user.
var audio = new Audio('assets/sentmessage.mp3');
var contactString = "<div class='social'> <a target='_blank' href='tel:+918600765857'> <div class='socialItem' id='call'><img class='socialItemI' src='images/phone.svg'/><label class='number'>594939453354</label></div> </a> <a href='mailto:[email protected]'> <div class='socialItem'><img class='socialItemI' src='images/gmail.svg' alt=''></div> </a> <a target='_blank' href='Arun020/Portfolio'> <div class='socialItem'><img class='socialItemI' src='images/github.svg' alt=''></div> </a> <a target='_blank' href='https://wa.me/45343563635'> <div class='socialItem'><img class='socialItemI' src='images/whatsapp.svg' alt=''></div> </a> <a target='_blank' href='https://t.me/Codewithrandom'> <div class='socialItem'><img class='socialItemI' src='images/telegram.svg' alt=''></div> </a> <a target='_blank' href='https://www.instagram.com/codewith_random/'> <div class='socialItem'><img class='socialItemI' src='images/instagram.svg' alt=''> </div> </a> <a href='https://www.linkedin.com/company/codewithrandom/' target='_blank' rel='noopener noreferrer'> <div class='socialItem'><img class='socialItemI' src='images/linkedin.svg' alt=''></div> </a> </div>";
var resumeString = "<img src='images/resumeThumbnail.png' class='resumeThumbnail'><div class='downloadSpace'><div class='pdfname'><img src='images/pdf.png'><label>Ankit Resume.pdf</label></div><a href='assets/Vinayak Patil's Resume.pdf' download='Vinayak_Patil_Resume.pdf'><img class='download' src='images/downloadIcon.svg'></a></div>";
var addressString = "<div class='mapview'><iframe src='https://www.google.com/maps/embed?pb=!1m18!1m12!1m3!1d238.63833262443757!2d74.19014864534314!3d16.865338763272877!2m3!1f0!2f0!3f0!3m2!1i1024!2i768!4f13.1!3m3!1m2!1s0x3bc1a7dcf40f5dd7%3A0xd7b69fe1fcfa9877!2zMTbCsDUxJzU1LjQiTiA3NMKwMTEnMjUuMyJF!5e0!3m2!1sen!2sin!4v1645079906766!5m2!1sen!2sin' class='map'></iframe></div><label class='add'><address>B2 'Asara'<br>Jag Mandir Place<br>Udaipur ,Rajasthan , INDIA 313001</address>";
Creating Functionality to open and close dp and set last time
We will create a function called startfunction, in which we will call one another small function called setfunction. which will fetch the current time from the browser and set it to the user profile using the gethours and minutes method.
Now we will create two functions for opening the full-size DP and closing the full-size DP image. We will use the if and else statement for checking if the condition is true or not. If the condition specified in the function is true, the full size of the DP will be displayed to the user.
function startFunction() {
    setLastSeen();
    waitAndResponce("intro");
}

function setLastSeen() {
    var date = new Date();
    var lastSeen = document.getElementById("lastseen");
    lastSeen.innerText = "last seen today at " + date.getHours() + ":" + date.getMinutes()
}


function closeFullDP() {
    var x = document.getElementById("fullScreenDP");
    if (x.style.display === 'flex') {
        x.style.display = 'none';
    } else {
        x.style.display = 'flex';
    }
}

function openFullScreenDP() {
    var x = document.getElementById("fullScreenDP");
    if (x.style.display === 'flex') {
        x.style.display = 'none';
    } else {
        x.style.display = 'flex';
    }
}
Creating Send Message and Clear Message Function
Creating Send Message function , in which we will using the variable input to create a variable and using the document.getElementById is a specific value that is to be given to one tag at a time.
Then inside our send message function we will use different methods for storing and display value of the send message.
Then using the clearchat We will use the wait and response method. if we got the response as a we are clear to remove the previous batch work . it will automiaticaullty rebound.
function isEnter(event) {
if (event.keyCode == 13) {
sendMsg();
}
}
function sendMsg() {
var input = document.getElementById("inputMSG");
var ti = input.value;
if (input.value == "") {
return;
}
var date = new Date();
var myLI = document.createElement("li");
var myDiv = document.createElement("div");
var greendiv = document.createElement("div");
var dateLabel = document.createElement("label");
dateLabel.innerText = date.getHours() + ":" + date.getMinutes();
myDiv.setAttribute("class", "sent");
greendiv.setAttribute("class", "green");
dateLabel.setAttribute("class", "dateLabel");
greendiv.innerText = input.value;
myDiv.appendChild(greendiv);
myLI.appendChild(myDiv);
greendiv.appendChild(dateLabel);
document.getElementById("listUL").appendChild(myLI);
var s = document.getElementById("chatting");
s.scrollTop = s.scrollHeight;
setTimeout(function() { waitAndResponce(ti) }, 1500);
input.value = "";
playSound();
}
function waitAndResponce(inputText) {
var lastSeen = document.getElementById("lastseen");
lastSeen.innerText = "typing...";
switch (inputText.toLowerCase().trim()) {
case "intro":
setTimeout(() => {
sendTextMessage("Hello there 👋🏻,<br><br>My name is <span class='bold'><a class='alink'>Ankit Menaria</a>.</span><br><br>I am the founder of <span class='bold'>Codewithrandom 👨🏻💻📚</span><br><br>I am eager to hear about potential career opportunities, so I would be pleased to chat about job openings in the engineering sphere.<br><br>Send <span class='bold'>'help'</span> to know more about me.<br>");
}, 2000);
break;
case "help":
sendTextMessage("<span class='sk'>Send Keyword to get what you want to know about me...<br>e.g<br><span class='bold'>'skills'</span> - to know my skills<br><span class='bold'>'resume'</span> - to get my resume<br><span class='bold'>'education'</span> - to get my education details<br><span class='bold'>'address'</span> - to get my address<br><span class='bold'>'contact'</span> - to get ways to connect with me<br><span class='bold'>'projects'</span> - to get details of my projects<br><span class='bold'>'clear'</span> - to clear conversation<br><span class='bold'>'about'</span> - to know about this site</span>");
break;
case "resume":
sendTextMessage(resumeString);
break;
case "skills":
sendTextMessage("<span class='sk'>I am currently working as full time software engineer.<br><br>I can comfortably write code in following languages :<br><span class='bold'>Java<br>C++<br>C<br>PHP<br>Kotlin<br>Dart<br>Python<br>CSS<br>HTML</span><br><br>I've experiance with following frameworks :<span class='bold'><br>Android<br>Flutter<br>ReactJs<br>GTK</span><br><br>I use <span class='bold'>Arch Linux</span> as daily driver on my HP Pavilion 15-ec0xxx<br>OS:Arch Linux<br>DE:Gnome(More often) Kde(often)<br>Favourite IDE:VSCode</span>");
break;
case "education":
sendTextMessage("I completed my graduation in Bachelors of Computer Application from jaipur<br>Passing Year : 2023<br><br>I have completed my Diploma from Government Polytechnic Karad<br>Passing Year:2020<br>Result:86.06%<br><br>I have completed my Secondary school from local school known as SWV<br>Passing Year:2016");
break;
case "address":
sendTextMessage(addressString);
break;
case "clear":
clearChat();
break;
case "about":
sendTextMessage("🛠️💻 This portfolio website is built using HTML, CSS and JavaScript from SCRATCH!<br><br>👨🏻💻 Designed and Developed by <a class='alink' target='_blank' href='https://www.instagram.com/codewith_random/'><span class='bold'>Ankit Menaria</a> with ❤️</span>");
break;
case "contact":
sendTextMessage(contactString);
break;
case "projects":
sendTextMessage("You want to check my projects? Then just jump into my Github Account.<br><br><div class='social'><a target='_blank' href='https://github.com/Arun020'> <div class='socialItem'><img class='socialItemI' src='images/github.svg' alt=''></div> </a></div>");
break;
case "new":
sendTextMessage(addressString);
break;
default:
setTimeout(() => {
sendTextMessage("Hey I couldn't catch you...😢<br>Send 'help' to know more about usage.");
}, 2000);
break;
}
}
function clearChat() {
document.getElementById("listUL").innerHTML = "";
waitAndResponce('intro');
}
Creating Function to play sound on message sending:
We will use the setTimeout function, in which after every 1000 milliseconds the last seen changes, and using the new Date() and the play method, we will play the sound two times. One is when users send the message to the chatbot of our portfolio, and the other is the same sound when the user gets a reply along with the project.
function sendResponse() {
    setTimeout(setLastSeen, 1000);
    var date = new Date();
    var myLI = document.createElement("li");
    var myDiv = document.createElement("div");
    var greendiv = document.createElement("div");
    var dateLabel = document.createElement("label");
    dateLabel.innerText = date.getHours() + ":" + date.getMinutes();
    myDiv.setAttribute("class", "received");
    greendiv.setAttribute("class", "grey");
    dateLabel.setAttribute("class", "dateLabel");
    greendiv.innerText = "Lorem Ipsum is simply dummy text of the printing and typesetting industry. Lorem Ipsum has been the industry's standard dummy text ever since the 1500s, when an unknown printer took a galley of type and scrambled it to make a type specimen book. It has survived not only five centuries, but also the leap into electronic typesetting, remaining essentially unchanged. It was popularised in the 1960s with the release of Letraset sheets containing Lorem Ipsum passages, and more recently with desktop publishing software like Aldus PageMaker including versions of Lorem Ipsum. ";
    myDiv.appendChild(greendiv);
    myLI.appendChild(myDiv);
    greendiv.appendChild(dateLabel);
    document.getElementById("listUL").appendChild(myLI);
    var s = document.getElementById("chatting");
    s.scrollTop = s.scrollHeight;
    playSound();
}

function playSound() {
    audio.play();
}
Final Output:


Conclusion:
It is very important to make unique college project which can make you stand out in a crowd. By this project we learned about advance javacript concept and using different styling method to give our project a unique and different look.My main motive was to make you understand the real-world use of the concepts through the project, and I hope you liked this project.
If you are able to create your own portfolio in whatsapp style using javascript along with this project, then trust me, you have understood these concepts.
Have any doubt? Ask us on instagram page codewithrandom
If you like this project, share it with friends and subscribe to our codewithrandom website for more such helpful projects.
Code Credit:- Vinayak
Author: Arun


