Automatic Image Slider In Html Css Javascript
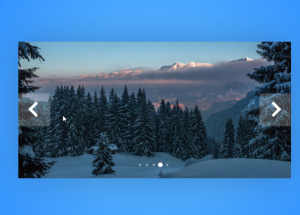
Welcome🎉 to the Codewithrandom blog. This blog teaches us how to create an Automatic Image Slider. We use HTML, CSS, and JavaScript for the Automatic Image Slider.
I hope you enjoy our blog so let’s start with a basic HTML Structure for the Automatic Image Slider.
| Code by | Ali Majid |
| Project Download | Link Available Below |
| Language used | HTML, CSS And JavaScript |
| External link / Dependencies | No |
| Responsive | YES |
HTML Code
<!DOCTYPE html>
<html lang="en">

<head>
  <meta charset="UTF-8">
  <meta http-equiv="X-UA-Compatible" content="IE=edge">
  <meta name="viewport" content="width=device-width, initial-scale=1.0">
  <title> Image Slider</title>
  <link rel="stylesheet" href="style1.css">

 <link rel="stylesheet" href="https://fonts.googleapis.com/css2?family=Baloo+Chettan+2:wght@400;500&display=swap">
 <link href='https://unpkg.com/[email protected]/css/boxicons.min.css' rel='stylesheet'>
 </head>

<body>
  <!-- Wrapper -->
<div class="wrapper">
  <!-- Images Area -->
  <div class="images-area">
    <img src="https://d.top4top.io/p_1933b0jx81.jpg" alt="image" class="firstImage">
    <img src="https://e.top4top.io/p_1933fqrzh2.jpg" alt="image">
    <img src="https://f.top4top.io/p_1933gojsk3.jpg" alt="image">
    <img src="https://g.top4top.io/p_1933as3zx4.jpg" alt="image">
    <img src="https://h.top4top.io/p_1933upn9s5.jpg" alt="image">
  </div>
  <!-- Buttons Area -->
  <div class="buttons-area">
    <div class="previous-btn">
      <i class='bx bx-chevron-left'></i>
    </div>
    <div class="next-btn">
      <i class='bx bx-chevron-right'></i>
    </div>
  </div>
  <!-- Pagination Area -->
  <div class="pagination-area">
  </div>
</div>
<!-- End Wrapper -->
<script src="app.js"></script>
</body>

</html>
There is all the HTML code for the Automatic Image Slider. Now, you can see an output with an Automatic Image Slider then we write javascript for the Automatic Image Slider.
Output

CSS Code
/* Main Rules */
:root{
  --white-c: #fff;
  --black-c: #000;
  --body-background-c: #FD7AC0;
  --wrapper-background-c: #D4F1F4;
  --wrapper-shadow-c: rgba(0, 0, 0, 0.219);
  --buttons-background-c: rgba(255, 255, 255, 0.219);
  --buttons-active-background-c: rgba(135, 207, 235, 0.493);
}
*{
  margin: 0;
  padding: 0;
  box-sizing: border-box;
}
body{
  font-family: 'Baloo Chettan 2', cursive;
  background: radial-gradient(circle, rgba(78,171,255,1) 25%, rgba(0,100,255,1) 100%);  height: 100vh;
  display: flex;
  justify-content: center;
  align-items: center;
}
/* End Main Rules */

/* Wrapper */
.wrapper{
  width: 600px;
  height: 300px;
  position: relative;
  background-color: var(--wrapper-background-c);
  box-shadow: 0 0 80px var(--wrapper-shadow-c);
}

/* Images Area */
.images-area{
  width: 100%;
  height: 100%;
  position: relative;
  display: flex;
  overflow: hidden;
}
.images-area img{
  width: 100%;
  transition: 0.3s cubic-bezier(.79,.03,0,.99);
}

/* Buttons Area  */
.buttons-area{
  width: 100%;
  position: absolute;
  top: 50%;
  left: 0;
  transform: translateY(-50%);
  display: flex;
  justify-content: space-between;
  overflow: hidden;
}
.buttons-area > div{
  color: var(--white-c);
  background-color: var(--buttons-background-c);
  cursor: pointer;
  transition: 0.3s ease-in-out;
}
/* Buttons | Previous And Next */
.buttons-area > div:first-child{
  border-radius: 0 5px 5px 0;
  margin-left: -100px;
}
.buttons-area > div:last-child{
  border-radius: 5px 0 0 5px;
  margin-right: -100px;
}
/* Show The Buttons */
.wrapper:hover .buttons-area > div:first-child{
  margin-left: 0;
}
.wrapper:hover .buttons-area > div:last-child{
  margin-right: 0;
}
.buttons-area div:hover:not(div.disabled){
  background-color: var(--buttons-active-background-c);
}
.buttons-area div:not(div.disabled):active{
  opacity: 0.7;
}
/* Disabled Button */
.buttons-area > div.disabled{
  cursor: no-drop;
  opacity: 0.3;
}
.buttons-area div i{
  font-size: 70px;
}

/* Pagination Area */
.pagination-area{
  position: absolute;
  top: 90%;
  left: 50%;
  transform: translate(-50%, -50%);
  pointer-events: none;
}
/* Pagination Spans */
.pagination-area span{
  display: inline-block;
  width: 10px;
  height: 10px;
  border-radius: 50%;
  background-color: var(--white-c);
  margin-right: 5px;
  transform: scale(0.5);
  transition: 0.3s ease-in-out;
  opacity: 0.4;
}
/* Current Active Span */
.pagination-area span.active{
  transform: scale(1);
  opacity: 1;
}

/* End Wrapper */
Css Updated output
Javascript Code
// Images Area Images
let imagesAreaImages = document.querySelectorAll('.images-area img');
// Images Area First Image
let imagesAreaFirstImage = document.querySelector('.images-area .firstImage');

// Previous And Next Buttons
let previousBtn = document.querySelector('.previous-btn');
let nextBtn = document.querySelector('.next-btn');

// Pagination Area
let paginationArea = document.querySelector('.pagination-area');

// Current Image Count
let currentImageCount = 1;

// Slider Controler Function
let sliderController;
// Create Pagination Spans Function
let createPaginationSpans;

// Every Click On Buttons
previousBtn.addEventListener('click', previousImage);
nextBtn.addEventListener('click', nextImage);


// Previous Image Function
function previousImage() {
  // If The currentImageCount Is 1
  if(currentImageCount === 1){
    return false;
  }else{ // Else
    // Minus One From currentImageCount
    currentImageCount--;
    // Call Function sliderController();
    sliderController();

  };
};

// Next Image Function
function nextImage() {
  // If The currentImageCount Is imagesAreaImages.length
  if(currentImageCount === imagesAreaImages.length){
    return false;
  }else{ // Else
    // Plus One To currentImageCount
    currentImageCount++;
    // Call Function sliderController();
    sliderController();
  };
};

// Create Pagination Spans [Circls] Function
(function createPaginationSpans(){
  // Loop On All The Images Slider
  for(var i = 0; i < imagesAreaImages.length; i++){
    // Create Span
    let paginationSpan = document.createElement('span');
    // Append The Span
    paginationArea.appendChild(paginationSpan)
  };
})();

// Slider Controler Function
(sliderController = function (){
  // Get All The pagination Spans
  let paginationCircls = document.querySelectorAll('.pagination-area span');

  // Call Remore All Active Class Function
  removeAllActive(paginationCircls);

  // Call Remore Active Button Function
  activeButton();

  // The currentImageCount Minus One
  let currentImageMinusOne = currentImageCount - 1;

  // Set Active Class On Current Pagination
  paginationCircls[currentImageMinusOne].classList.add('active');

  // Move The images Area First Image
  imagesAreaFirstImage.style.marginLeft = `-${600 * currentImageMinusOne}px`;
  console.log(600 * currentImageMinusOne);
})();

// Remove All Active Class Function
function removeAllActive(targetElement){
  for(var i = 0; i < targetElement.length; i++){
    targetElement[i].classList.remove('active');
  };
};

// Check Active Button Function
function activeButton() {
  // If The Current Image Count Equle 1
  currentImageCount === 1 ?
  // Hide The Previous Button
  previousBtn.classList.add('disabled') :
  // Else: Show The Previous Button
  previousBtn.classList.remove('disabled');

  // If The Current Image Count Equle imagesAreaImages.length
  currentImageCount === imagesAreaImages.length ?
  // Hide The Next Button
  nextBtn.classList.add('disabled') :
  // Else: Show The Next Button
  nextBtn.classList.remove('disabled');
};

// Move Slider Image Every 3 Second
setInterval(() => {
  // If The Current Image Count Not Equle imagesAreaImages.length
  if(currentImageCount != imagesAreaImages.length){
    // Plus One
    currentImageCount++;
    // Call Function sliderController();
    sliderController();
  }else{ // else
    // Make currentImageCount Equle 1
    currentImageCount = 1;
    // Call Function sliderController();
    sliderController();
  };
}, 3000);

// :)
Final output

Conclusion
Now that we have completed our javascript section, our updated output with javascript. Hope you like the Automatic Image Slider. you can see the output video and project screenshots. See our other blogs and gain knowledge in front-end development. Thank you!
This post teaches us how to create an Automatic Image Slider using simple HTML & CSS and javascript. If we made a mistake or any confusion, please drop a comment to reply or help you in easy learning.
Written by – Code With Random/Anki
Code By – Ali Majid
Check out more…..
1. 50 front-end projects html Css
Which code editor do you use for this Automatic Image Slider coding?
I personally recommend using VS Code Studio, it’s straightforward and easy to use.
is this project responsive or not?
Yes! this project is a responsive project.
Do you use any external links to create this project?
No!


