How to Resize Images in HTML
When using HTML, you can alter an image’s size to fit your layout needs. Making use of the height and width elements of the img tag is one of the easiest ways to resize an image in Html. You can specify the required image dimensions with the help of these properties.
You can quickly change the image’s size to properly fit your design by defining the values using CSS pixels (px). With the proper arrangement and aesthetic appeal preserved, you may smoothly incorporate images into your HTML content thanks to this flexibility.

The following methods can be used in HTML to alter the size of any image:
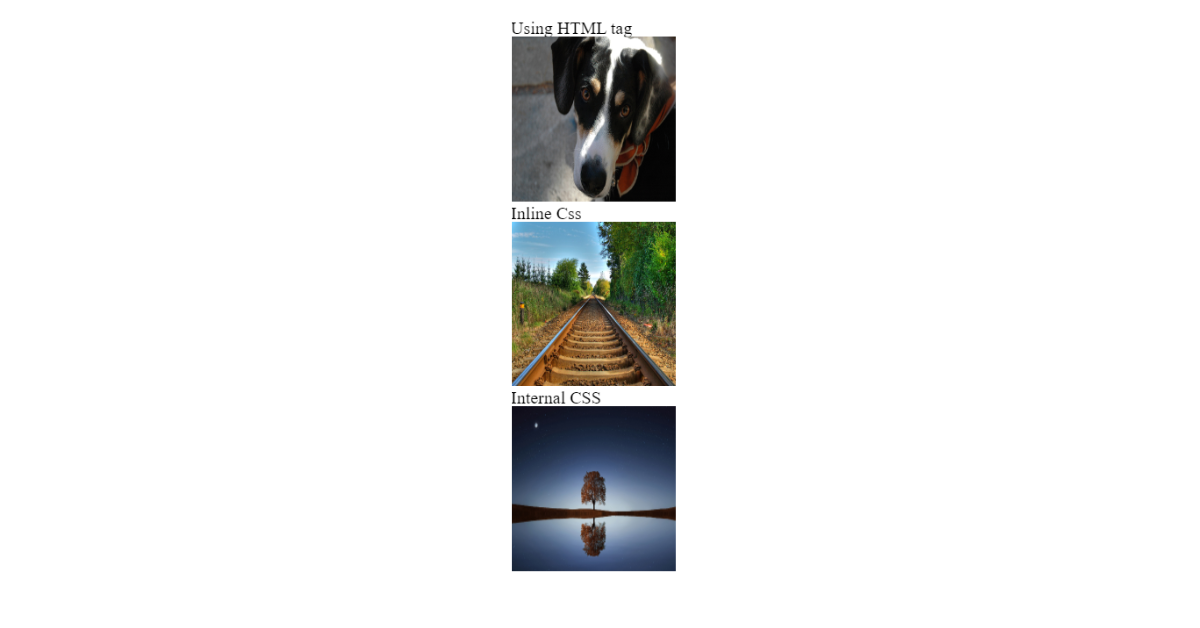
- Using HTML tag.
- Using internal styling.
- using inline CSS.
In our article, we’ll go through each step for resizing photographs in various ways on your website. You may quickly comprehend all the image sizing properties with the aid of this blog. To better comprehend, just try to put this step into practice as you read along with us in our post.
50+ HTML, CSS and JavaScript Projects With Source Code
#Method 1: Using HTML Tags
This is the first technique of resizing the photos because it uses the html elements’ default width and height values. We must first include some images on our webpage using the <img> tag attribute in order to resize them using html tags.
<!DOCTYPE html>
<html>
<body>
<img src="https://s3-us-west-2.amazonaws.com/s.cdpn.io/29841/dog.jpg" alt="A black, brown, and white dog wearing a kerchief">
</body>
</html>
First, we’ll include a dog image using the <img> element and a url inside the body tag of our HTML document. We’ve also used the alt property to describe the image to the viewer. You can see that it is the default original size image if you look at the image size.
Original Image:

We will now resize the dog image to fit the user’s screen using the width and height parameters found inside the image tag. The value is dependent on the user within of the width and height. If the user wants to minimise the size, he will increase the image size to roughly 50–100 px wide and 100–150 px high. If the user wants to enlarge the image, they can specify the width and height in pixels.
<img src="https://s3-us-west-2.amazonaws.com/s.cdpn.io/29841/dog.jpg" alt="A black, brown, and white dog wearing a kerchief" width="200px" height="200px">

Using html tags, you can resize the image in this manner. Just keep in mind the image tag’s width and height values.
Create Image Gallery Using HTML and CSS (Source Code)
#Method 2: Using Internal Styling
If we wish to alter the size of an image or picture that will be displayed on a web page using an internal cascading stylesheet, we must utilise the style attribute inside the head tag of our HTML. We can either define the id inside the image element using the style attribute, in which case we will resize the image using the id sselector.
<!DOCTYPE html>
<html>
<head>
<title>Image Resizing</title>
</head>
<body>

<img src="https://images.pexels.com/photos/268533/pexels-photo-268533.jpeg?cs=srgb&dl=pexels-pixabay-268533.jpg&fm=jpg" id="Resize">
</body>
</html>
Original photo:

The image’s resize property will now be added within our head section. The style> tag will be used to change the image’s size. We will choose the image inside the style tag and provide its width and height inside using the id selector.
<!DOCTYPE html>
<html>
<head>
<title>Page Title</title>
<style>
#Resize
{
width:150px;
height:150px;
}
  </style>
</head>
<body>

<img src="https://images.pexels.com/photos/268533/pexels-photo-268533.jpeg?cs=srgb&dl=pexels-pixabay-268533.jpg&fm=jpg" id="Resize">
</body>
</html>
Resized Image:

#Method 3: Using Inline Styling
To change the size of an image or picture that will be displayed on a web page using an internal cascading stylesheet, we must use the style element inside the image tag of our HTML. Using HTML, resizing an image is as simple as specifying its width and height using the style attribute.
<!DOCTYPE html>
<html>
<head>
<title>Page Title</title>
</head>
<body>

<img src="https://images.freeimages.com/images/previews/ac9/railway-hdr-1361893.jpg" >
</body>
</html>
Original Photo:

Now we will use the width and height properties to resize the image using inline CSS. Inside the style attribute, we will define the width and height properties. We will simply define the style attribute, and inside of it, using the width and height attributes, we will resize the image.
Image Hover Border Effect Using CSS
Resized Image:

ADVERTISEMENT
The techniques for resizing the image are as follows. Using internal CSS is the most effective method for resizing images since it makes it simple for users to modify the styling of an image in the future because styling is defined independently of the image tag. To resize the image property or perform some little styling, consider concentrating on internal CSS. Another excellent approach is to simply make a separate CSS file and connect it to our html file, where you can add all the styling.
ADVERTISEMENT
Now let’s have a peek at our codepen where you can find the three approaches of resize the image.
ADVERTISEMENT
Codepen Preview Resize Image:
Video Preview:
Now We have Successfully created our Resize Image Using HTML. You can use this project for your personal webpage and We hope you understood the project, If you any doubt feel free to comment!! If you find out this Blog helpful, then make sure to search Codewithrandom on Google for Front End Projects with Source codes and make sure to Follow the Code with Random Instagram page.
ADVERTISEMENT


