Create Twitter Clone Client In Html and CSS(Source Code)
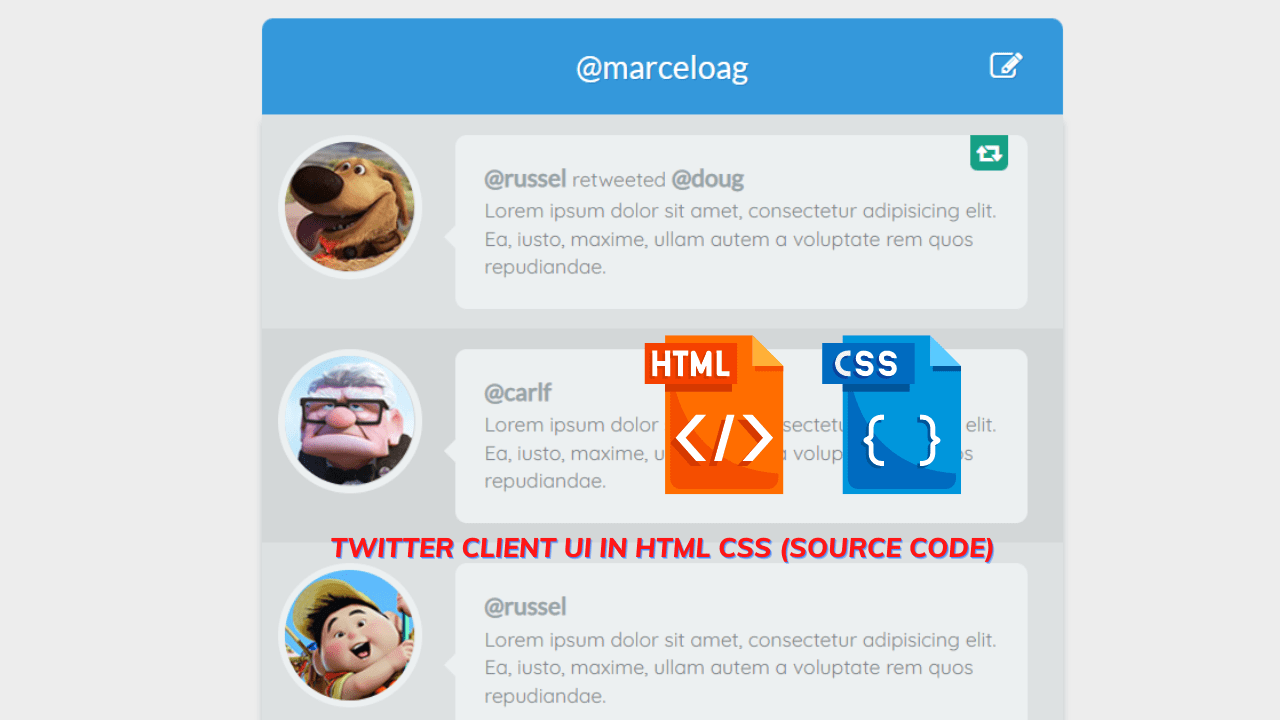
Hello Coders ! welcome to this blog, In today’s blog, we are going to see how to create a Twitter Clone UI using Html and CSS. Before that, we could see what is the Twitter client.
The Twitter client is a great management tool that is represented as one column display.. That contains powerful and impressive tweets which we can read, send, mark as favorites, and manage the tweets that came. This layout is packed with impactful tweets, providing functionalities to read, send, mark favorites, and efficiently manage incoming tweets.
Understanding the Twitter Client:This layout is home to powerful and impactful tweets. You can read, send, mark favorites, and efficiently manage incoming tweets—all the Twitter goodness packed in one place.
50+ HTML, CSS & JavaScript Projects With Source Code
| Code by | marceloag |
| Project Download | Link Available Below |
| Language used | HTML and CSS |
| External link / Dependencies | Yes |
| Responsive | No |
Likewise, we are going to create this Twitter client project with html and css.
So now let’s get started with the html code.
Html Code For Twitter Clone:
<!doctype html>
<html lang="en">
<head>
    <meta charset="UTF-8">
    <title>Twitter Client</title>
   	<link href='https://fonts.googleapis.com/css?family=Quicksand:300,400' rel='stylesheet' type='text/css'>
    <link href='https://fonts.googleapis.com/css?family=Lato:400,300' rel='stylesheet' type='text/css'>
    <link href="https://netdna.bootstrapcdn.com/font-awesome/3.1.1/css/font-awesome.css" rel="stylesheet">

</head>
<body>

        <span class="first">
            @marceloag
            <span class="icon-edit new"></span>
        </span>
        <ul class="timeline">
            <li>
                <div class="avatar">
          <img src="http://www.croop.cl/UI/twitter/images/doug.jpg">
                    <div class="hover">
                        <div class="icon-twitter"></div>
                    </div>
                </div>
                <div class="bubble-container">
                    <div class="bubble">
                    <div class="retweet">
                        <div class="icon-retweet"></div>
                    </div>
                        <h3>@russel</h3> retweeted <h3>@doug</h3><br/>
                    Lorem ipsum dolor sit amet, consectetur adipisicing elit. Ea, iusto, maxime, ullam autem a voluptate rem quos repudiandae.
                        <div class="over-bubble">
                            <div class="icon-mail-reply action"></div>
                            <div class="icon-retweet action"></div>
                            <div class="icon-star"></div>
                        </div>
                    </div>

                    <div class="arrow"></div>
                </div>
            </li>
            <li>
                <div class="avatar">
                    <img src="http://www.croop.cl/UI/twitter/images/carl.jpg">
                    <div class="hover">
                        <div class="icon-twitter"></div>
                    </div>
                </div>
                <div class="bubble-container">
                    <div class="bubble">
                        <h3>@carlf</h3><br/>
                    Lorem ipsum dolor sit amet, consectetur adipisicing elit. Ea, iusto, maxime, ullam autem a voluptate rem quos repudiandae.
                        <div class="over-bubble">
                            <div class="icon-mail-reply action"></div>
                            <div class="icon-retweet action"></div>
                            <div class="icon-star"></div>
                        </div>
                    </div>
                    <div class="arrow"></div>
                </div>
            </li>
            <li>
                <div class="avatar">
                    <img src="http://www.croop.cl/UI/twitter/images/russel.jpg">
                    <div class="hover">
                        <div class="icon-twitter"></div>
                    </div>
                </div>
                <div class="bubble-container">
                    <div class="bubble">
                    <h3>@russel</h3><br/>
                    Lorem ipsum dolor sit amet, consectetur adipisicing elit. Ea, iusto, maxime, ullam autem a voluptate rem quos repudiandae.
                        <div class="over-bubble">
                            <div class="icon-mail-reply action"></div>
                            <div class="icon-retweet action"></div>
                            <div class="icon-star"></div>
                        </div>
                    </div>
                    <div class="arrow"></div>
                </div>
            </li>
            <li>
                <div class="avatar">
                    <img src="http://www.croop.cl/UI/twitter/images/carl.jpg">
                    <div class="hover">
                        <div class="icon-twitter"></div>
                    </div>
                </div>
                <div class="bubble-container">
                    <div class="bubble">
                        <h3>@carlf</h3><br/>
                    Lorem ipsum dolor sit amet, consectetur adipisicing elit. Ea, iusto, maxime, ullam autem a voluptate rem quos repudiandae.
                        <div class="over-bubble">
                            <div class="icon-mail-reply action"></div>
                            <div class="icon-retweet action"></div>
                            <div class="icon-star"></div>
                        </div>
                    </div>
                    <div class="arrow"></div>
                </div>
            </li>
        </ul>

    </div>
</body>
</html>
Now we have added the html code successfully. In his code, we first included the link tag for css code and the title tag for the project name. Then inside the body tag, we started adding div elements inside by giving them separate names for each element. Now we add the icons for purposes like send, favorite, share, etc… Using the img tags.
100+ JavaScript Projects With Source Code ( Beginners to Advanced)
With heading tags like h1, and h2 we have given the title wherever it is necessary and several places contained by div elements are specified by separate names with every element. Lastly, we are giving the images with some values and alt names for specifying it and making it adjusts with screen sizes.
We have now completed our html code, so let’s begin with css code for styling.
CSS Code For Twitter Clone:
* {
  box-sizing: border-box;
  -moz-box-sizing: border-box;
  -webkit-box-sizing: border-box;
}

body {
  font-family: 'Quicksand';
  color: #7f8c8d;
  font-size: 14px;
  background-color: #ededed; }

.bubble {
  width: 100%;
  padding: .5em 1em;
  line-height: 1.4em;
  padding: 20px;
  background-color: #ecf0f1;
  position: relative;
  -webkit-border-radius: 8px;
  -moz-border-radius: 8px;
  -ms-border-radius: 8px;
  -o-border-radius: 8px;
  border-radius: 8px;
  text-align: left;
  display: inline-block; }
  .bubble:hover > .over-bubble {
    opacity: 1; }

.bubble-container {
  width: 75%;
  display: block;
  position: relative;
  padding-left: 20px;
  vertical-align: top;
  display: inline-block; }

.arrow {
  content: '';
  display: block;
  position: absolute;
  left: 12px;
  bottom: 25%;
  height: 0;
  width: 0;
  border-top: 20px solid transparent;
  border-bottom: 20px solid transparent;
  border-right: 20px solid #ecf0f1; }

.timeline {
  width: 560px;
  display: block;
  margin: auto;
  background-color: #dde1e2;
  padding-bottom: 2em;
  -webkit-box-shadow: #bdc3c7 0 5px 5px;
  -moz-box-shadow: #bdc3c7 0 5px 5px;
  box-shadow: #bdc3c7 0 5px 5px;
  -moz-border-radius-bottomleft: 8px;
  -webkit-border-bottom-left-radius: 8px;
  border-bottom-left-radius: 8px;
  -moz-border-radius-bottomright: 8px;
  -webkit-border-bottom-right-radius: 8px;
  border-bottom-right-radius: 8px;
  margin-bottom: 2em; }
  .timeline li {
    padding: 1em 0; }
  .timeline li:nth-child(even) {
    background-color: #d3d7d8; }

.avatar {
  width: 18%;
  display: inline-block;
  vertical-align: top;
  position: relative;
  overflow: hidden;
  margin-left: 2%; }
  .avatar img {
    width: 100%;
    -webkit-border-radius: 50%;
    -moz-border-radius: 50%;
    -ms-border-radius: 50%;
    -o-border-radius: 50%;
    border-radius: 50%;
    border: 5px solid #ecf0f1;
    position: relative; }
  .avatar:hover > .hover {
    cursor: pointer;
    opacity: 1; }

.hover {
  position: absolute;
  width: 100%;
  height: 100%;
  background-color: #3498db;
  top: 0;
  font-size: 1.8em;
  border: 5px solid #5cc0ff;
  -webkit-border-radius: 50%;
  -moz-border-radius: 50%;
  -ms-border-radius: 50%;
  -o-border-radius: 50%;
  border-radius: 50%;
  text-align: center;
  color: white;
  padding-top: 24%;
  opacity: 0;
  font-family: 'FontAwesome';
  font-weight: 300;
  -webkit-transition-property: all;
  -moz-transition-property: all;
  -o-transition-property: all;
  transition-property: all;
  -webkit-transition-duration: 0.5s;
  -moz-transition-duration: 0.5s;
  -o-transition-duration: 0.5s;
  transition-duration: 0.5s;
  -webkit-transition-timing-function: ease;
  -moz-transition-timing-function: ease;
  -o-transition-timing-function: ease;
  transition-timing-function: ease; }

.first {
  width: 560px;
  display: block;
  margin: auto;
  background-color: #3498db;
  text-shadow: #2084c7 1px 1px 0;
  padding: 1em 0 !important;
  color: white;
  text-align: center;
  margin-top: 1em;
  font-family: "Lato";
  font-size: 1.6em;
  -moz-border-radius-topleft: 8px;
  -webkit-border-top-left-radius: 8px;
  border-top-left-radius: 8px;
  -moz-border-radius-topright: 8px;
  -webkit-border-top-right-radius: 8px;
  border-top-right-radius: 8px;
  position: relative; }

.icon-twitter {
  font-size: 1.5em; }

.new {
  position: absolute;
  right: 5%; }

.over-bubble {
  line-height: 1.4em;
  padding-top: 10%;
  background-color: rgba(236, 240, 241, 0.8);
  position: relative;
  -webkit-border-radius: 8px;
  -moz-border-radius: 8px;
  -ms-border-radius: 8px;
  -o-border-radius: 8px;
  border-radius: 8px;
  text-align: center;
  display: inline-block;
  position: absolute !important;
  height: 100%;
  width: 100%;
  opacity: 0;
  top: 0;
  left: 0;
  z-index: 999;
  -webkit-transition-property: all;
  -moz-transition-property: all;
  -o-transition-property: all;
  transition-property: all;
  -webkit-transition-duration: 0.3s;
  -moz-transition-duration: 0.3s;
  -o-transition-duration: 0.3s;
  transition-duration: 0.3s;
  -webkit-transition-timing-function: ease-in;
  -moz-transition-timing-function: ease-in;
  -o-transition-timing-function: ease-in;
  transition-timing-function: ease-in;
  font-size: 2.8em;
  text-shadow: white 1px 1px 0; }

.action {
  margin-right: .3em;
  -webkit-transition-property: all;
  -moz-transition-property: all;
  -o-transition-property: all;
  transition-property: all;
  -webkit-transition-duration: 0.2s;
  -moz-transition-duration: 0.2s;
  -o-transition-duration: 0.2s;
  transition-duration: 0.2s;
  -webkit-transition-timing-function: ease-in;
  -moz-transition-timing-function: ease-in;
  -o-transition-timing-function: ease-in;
  transition-timing-function: ease-in; }

.icon-star {
  -webkit-transition-property: all;
  -moz-transition-property: all;
  -o-transition-property: all;
  transition-property: all;
  -webkit-transition-duration: 0.2s;
  -moz-transition-duration: 0.2s;
  -o-transition-duration: 0.2s;
  transition-duration: 0.2s;
  -webkit-transition-timing-function: ease;
  -moz-transition-timing-function: ease;
  -o-transition-timing-function: ease;
  transition-timing-function: ease; }
  .icon-star:hover {
    cursor: pointer;
    color: #f39c12; }

.icon-retweet {
  -webkit-transition-property: all;
  -moz-transition-property: all;
  -o-transition-property: all;
  transition-property: all;
  -webkit-transition-duration: 0.2s;
  -moz-transition-duration: 0.2s;
  -o-transition-duration: 0.2s;
  transition-duration: 0.2s;
  -webkit-transition-timing-function: ease;
  -moz-transition-timing-function: ease;
  -o-transition-timing-function: ease;
  transition-timing-function: ease; }
  .icon-retweet:hover {
    cursor: pointer;
    color: #16a085; }

.icon-mail-reply {
  -webkit-transition-property: all;
  -moz-transition-property: all;
  -o-transition-property: all;
  transition-property: all;
  -webkit-transition-duration: 0.2s;
  -moz-transition-duration: 0.2s;
  -o-transition-duration: 0.2s;
  transition-duration: 0.2s;
  -webkit-transition-timing-function: ease;
  -moz-transition-timing-function: ease;
  -o-transition-timing-function: ease;
  transition-timing-function: ease; }
  .icon-mail-reply:hover {
    cursor: pointer;
    color: #3498db; }

h3 {
  font-size: 1.2em;
  font-weight: bold;
  font-family: 'Lato';
  display: inline-block;
  margin-bottom: .2em;
  color: #95a5a6; }

.retweet {
  position: absolute;
  opacity: 1;
  top: 0;
  right: 1em;
  display: block;
  background-color: #16a085;
  padding: 4px;
  -moz-border-radius-bottomleft: 5px;
  -webkit-border-bottom-left-radius: 5px;
  border-bottom-left-radius: 5px;
  -moz-border-radius-bottomright: 5px;
  -webkit-border-bottom-right-radius: 5px;
  border-bottom-right-radius: 5px; }
  .retweet .icon-retweet {
    color: white;
    margin: auto;
    width: 100%;
    display: block;
    font-size: 1.2em; }
Now we have added our css code successfully. In this code we first making he margin and padding values from default to zero and applying sizes to border-box with he universal mark(*). Now in body section we are adding the font family , background , color , font size for all the elements presented here to match the body properties.
Building a Twitter Clone isn’t just about replicating; it’s about adding your flair. Customize the HTML, CSS, and JavaScript to make this Twitter Clone uniquely yours.
Have Fun Building!
Portfolio Website using HTML and CSS (Source Code)
Here moreover the animation properties takes place in all the elements throughout the css to make an interactive animations and exciting looks. Some common animation properties wee included below.
-webkit-transition-property: all;
-moz-transition-property: all;
-o-transition-property: all;
Transition-property: all;
-webkit-transition-duration: 0.2s;
-moz-transition-duration: 0.2s;
So then we started styling each and every elements as per interactions and responsiveness needed with css properties in the code mentioned above.
Now we have successfully completed our css code , so it’s time to preview our project in the output section given below.
Final output:

Now we have successfully created our Twitter client page ui project with the help of html and css. You can use this project for your personnel needs and the respective lines of code are given with the code pen link mentioned below.
ADVERTISEMENT
10+ HTML CSS Projects For Beginners (Source Code)
ADVERTISEMENT
ADVERTISEMENT
So if you find out this blog helpful? , then make sure to search code with random on google for front-end projects with source codes and make sure to follow the codewithrandom Instagram page.
ADVERTISEMENT
Refer code – marceloag
ADVERTISEMENT
Written by – ragunathan s
FAQ:- twitter clone html css , twitter clone using html and css
Which code editor do you use for this Twitter Clone Client Ui coding?
I personally recommend using VS Code Studio, it’s straightforward and easy to use.
How do I personalize my Twitter Clone UI?
Dive into the HTML and CSS files to make it yours. Tweak colors, fonts, and layout to add your unique touch. This clone isn’t just about copying; it’s about showcasing your style.
Can I add extra features to my Twitter Clone?
Yes Dude!!! Feel free to enhance the functionality. Add features like real-time updates, notifications, or even experiment with different tweet layouts using JavaScript.


